Showing posts with label Imagine Crafts. Show all posts

Sunday, October 22, 2017

Fall Branch Greeting Card

Rubbernecker Stamps Branch Blossoms with Faber-Castell Polychromos

Although the main Rubbernecker Stamp's image is part of their watercolor stamp collection, I decided to stamp it in dye ink (Memento) and enhance it with colored pencils (Faber-Castell Polychromos). I colored the flowers in Autumn colors for a Fall greeting card. The Fireworks! spray custom colored bow matches perfectly, as does the Lawn Fawn Perfectly Plaid Fall background paper.

Affiliate links may be included in this post. I participate in the Amazon Services LLC Associates Program, an affiliate advertising program that provides a means for me to earn fees by linking to Amazon.com and affiliated sites at no cost to you. This helps offset a small portion of my crafting addiction... uh, hobby. See notice at bottom of blog for a longer description.

Making the Card

1. Cut brown cardstock 5 1/2 x 8 1/2 inches; fold in half to form a 4 1/4 x 5 1/2 inch card base. Cut orange cardstock 4 x 5 1/4 inches. Adhere to card base. Cut orange/yellow plaid (Lawn Fawn Perfectly Plaid Fall 6x6 Pad) 3 7/8 x 5 1/8 inches. Adhere to card base.

2. Cut a piece of Strathmore 500 Bristol Vellum to about 4 1/4 x 5 1/2 inches (a bit bigger than necessary for some wiggle room). You could probably use white cardstock but since I'm layering a lot of colors, I decided to use a really good paper for it.

Fall Branch Leaves with Polychromos Colored Pencils

3. Use a Stamp Platform or a stamp positioner to stamp the thick branch layer in Toffee Crunch Memento Ink near the center of the Bristol paper. Position the small branch layer and stamp with Rich Cocoa Memento Ink. Position the flower layer and stamp with Cantaloup Memento Ink.

4. Use colored pencils (Faber-Castell Polychromos) to color the image, layer yellow-oranges to orange-reds on flowers with the darkest at the centers. Add some browns to the branches. You may also add extra flowers or branches, even extend the existing branches if you like.

5. Cut a length of seam binding. Tie a small bow. Spray center with Dandelion Fireworks! Next spray with Cantaloup, overlapping the Dandelion. Finally spray the ends of the bow loops and tails with Tangelo. Set aside to dry.

6. Die cut image using third largest stitched rectangle die, centering the branch but leaving room for the sentiment in the top left corner. Use the Stamp Platform or a stamp positioner to stamp the sentiment in Rich Cocoa Memento Ink where shown. Adhere to card. Adhere bow where shown.

Rubbernecker Stamps Branch Blossoms with Memento Ink

Supplies
Follow my blog with Bloglovin so you won't miss any of the colorful Fall fun!


Saturday, May 6, 2017

Nailed It! Your Next Stamp Masculine Birthday Card in Prismacolor


Hi y'all! This post is part of the Your Next Stamp (YNS) new release blog hop. The blog hop starts May 6, 2017, at 10 pm EST and will end on May 9, 2017, at midnight EST. Leave a comment on each blog along the way for your chance to win a $25 YNS gift certificate; the more blogs you leave comments on, the better your chances of winning (although you do not need to leave comments on all to be eligible). The winner's name will be posted on the YNS blog on May 11, 2017. See bottom of post for all participating blogs.


The new releases are now available at the YNS store (check the New Products tab for new releases). And here's a coupon code for 20% off (good until May 10, 2017, at midnight).


Included in the new release is this adorable Nailed It set of stamps and complimentary dies. I couldn't wait to color this cute (yet still masculine) image. I was tempted to mask his hand to put a hammer or other tool in it but I kind of liked the way he looks like he's doing a fist pump (appropriate for a birthday!) so I just used the tools in the background. Next time I might do some masking though.


If you haven't already, be sure to check out my preview post using the Good Vibes stamp set (also in this release). The toucan is super fun to color and probably my favorite character in this release. Plus you have to love the punny sentiments that perfectly accompany each set.

Affiliates links may be included in this post. See Notice at bottom of blog.

Making the Card

1. Cut green cardstock 5 1/2 x 8 1/2 inches; fold in half to form a 4 1/4 x 5 1/2 inch card base. Cut one cream cardstock and one brown gingham paper (Doodlebug Design) to 4 x 5 1/4 inches.

2. On the brown gingham, use Vintage Photo Distress Oxide ink to stamp tools in various places all over the paper.

3. On the cream cardstock, spray Fireworks sprays through Speckles Layering Stencil such that Cottage Ivy is heavier on one side and Desert Storm is heavier on the other; they should overlap. Once dry, cut a piece 1 3/4 inches (by 5 1/4) and mount it on the brown gingham as shown, then cut a strip 5/8 inches wide and stamp the sentiment as shown (I put most of the green towards the bottom). Mount on green cardstock that is 3/4 inches wide and 5 1/4 inches long.


4. Stamp the tool man on white cardstock (before coloring, you may want to test your cardstock to be sure the colors will blend the way you like). Coloring the image: I used Prismacolor colored pencils with Sansodor (this is a solvent; you can also use mineral spirits, Gamsol, or other similar product). WARNING: even though many of these products are made to have little to no smell, the fumes still may harm you. Read the package warnings before use. Use in a well ventilated room. I keep my solvent in a small glass jar with a screw lid that I leave ajar while coloring, I only move the lid aside to dip a stump into the solvent as necessary. Use a light hand, color in small circles until the area is filled, then use a stump dipped in solvent to blend. Layer more color as necessary. Use gray over darker shaded areas to get a more true color. Once done use the coordinating die to cut out the image.

4. Cut two pieces of white seam binding about 5 inches long. Use the Cottage Ivy Fireworks spray to die one of the pieces and let dry. Adhere these to the brown gingham paper where shown, wrapping ends around each side and securing on back. Adhere this to the card base.

5. Adhere the tool man and sentiment using dimensional tape. Adhere gears as shown using Mini Glue Dots (I folded them so that they would fit behind the gears).


Supplies
  • Your Next Stamp: Nailed It! (CYNS539) Stamps and Dies
  • Prismacolor Pencils
  • Solvent (e.g. Sans odor) - Read warnings on container before using!
  • Stumps
  • Cardstock: White, Green, Cream
  • Doodlebug Designs 6x6 Paper Pad: Gingham-Linen Rainbow Petite Prints (5450)
  • Vintage Photo Distress Oxide Ink
  • Fireworks Spray (Imagine Crafts): Cottage Ivy, Desert Sand
  • Layering Stencil: Speckles THS021 (Stampers Anonymous/Tim Holtz)
  • Gears and Mini Gears (Idea-ology/Tim Holtz)
  • Seam Binding: White
  • Dimensional Tape
  • Mini Glue Dots (1/8 Inch)


Follow my blog with Bloglovin so you won't miss any of the tool man fun!

Thursday, January 26, 2017

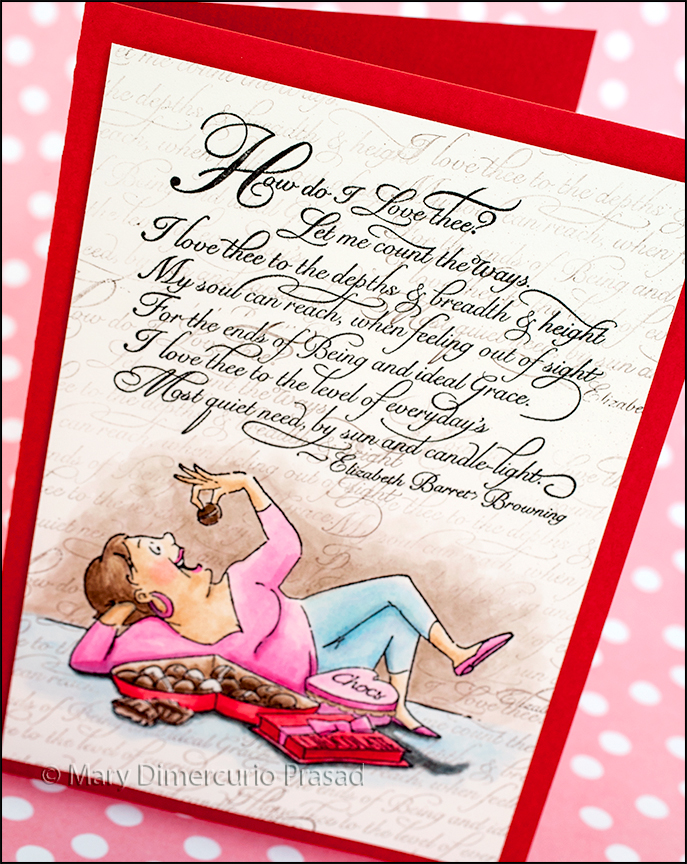
Poetry: Elizabeth Barrett Browning and Chocolate Card


Sorry it has been a while since my last post! I have been working on a new design team - Frantic Stamper! The new dies don't release until next month (February 2017) so even though I've been creating and writing up posts, I can't publish until then! For now, here is a post that I did last year to go with my first video as part of the Imagine Crafts Artist in Residence program. There was a bit of a snafu with getting the video posted on their blog and a change in leadership so this never got released.

The theme for the challenge was Poetry. I had an Elizabeth Barrett Browning poem stamp for the longest time, usually using it as a background for Valentine's Day cards. This one has a little twist - the whimsical lady enjoying boxes of chocolates! You can just imagine her reciting the poem in her head as she eats her chocolates one by one.

Making the Card

Watch the tutorial below for a step-by-step on making the card:


I love how fun this image is, giving a whole new meaning to the poem. I don't know about you, but chocolate has this effect on me.


Unfortunately the Pico Embellisher doesn't show up well in the photos. The chocolates and her earring have a slight 3D feel to them plus a glossy shine and slight shimmer - looks so cool in person!


Supplies

Imagine Crafts Supplies
Other Supplies
  • Masking Material
  • Watercolor Paper (e.g. Arches Hot Press)
  • Stamps: Elizabeth Barrett Browning "How Do I Love Thee", Art Impressions: Love and Chocolate Set
  • Cardstock: Red
  • Brush, Water, Paper Towel
  • Dimensional Tape
Follow my blog with Bloglovin so you won't miss any of the poetic fun!
Affiliates links may be included in this post. See Notice at bottom of page.

Monday, December 26, 2016

Repurposed Box for a Masculine Gift


I tend to keep containers, notepads, and other objects in hopes that I might make something with sometime in the future. In this case, I had a box that came from a grab bag at a craft store. It was a red lacquer-type box with "hello" written in white on the top - not very exciting. The techniques here can be adopted for use in other ways, such as on a cover for a notepad or in multi-media artwork. Creative Medium, by Imagine Crafts, can be used on all types of surfaces - it adheres well and provides enough tooth for easy integration with other mediums. In this case I'm using black gesso as a base. The iridescent and metallic layers look best over black.


Making the Box

1. If the wood finish is shiny or smooth, it's a good idea to sand first. These techniques may be used over paper mâché or even plastic.


2. Watch the video below:


Notes: there are several choices for Creative Medium, different metallics as well as iridescent colors. There are also other choices for Delicata and Brilliance - making for seemingly endless combinations.


Supplies
  • Creative Medium: Clear, Iridescent Green, Metallic Bronze
  • Delicata Ink: Golden Glitz
  • Brilliance Ink: Gamma Green
  • irRESISTible Pico Embellisher: Bronze
  • Sheer Shimmer Spritz: Gold
  • Ink Blushers
  • Multi-Purpose Squeegee and/or Palette Knives
  • Box
  • Acrylic Paint Brush
  • Gears Stencil (e.g. Dreamweaver)
  • Black Gesso (e.g. Liquitex)
  • Felt: Black, Red
  • Optional: Soap Pen
  • Recommended: Craft Mat

Follow my blog with Bloglovin so you won't miss any of the upcycling fun!
Affiliates links may be included in this post. See Notice at bottom of blog.

Wednesday, December 14, 2016

Coloring with Fireworks and Memento: Holiday Card


I love the shimmer of Fireworks sprays; it's perfect for holiday cards. I used the sprays to color most of the card. It lends a bit more texture to the background and tree. I masked to color a few areas, and used a paint brush to apply it to the smallest areas. The irRESISTible Texture Spray gave the card a slight dimension in the background as snow. Finally a few touches of Neon Amplify added fur to the hat and fox's tail.

Making the Card

1. Cut red cardstock 5 1/2 x 8 1/2 inches; fold in half to form a 4 1/4 x 5 1/2 inch card base. Cut plaid patterned paper (Lawn Fawn Perfectly Paid Christmas) 4 x 5 1/4 inches.

2. Using 2nd largest oval (Large Stitched Oval Stackables), die cut white cardstock. using largest oval (Small Stitched Oval Stackables), die cut green cardstock.


3. Die cut bow from red cardstock and assemble.

4. Watch the video below:


5. I had originally planned to do more shading in the background with Summer Sky Memento Ink, either starting at the bottom and fading to the top or vice versa but I actually liked the background just sprayed so I left it. You can also optionally use Cottage Ivy Memento Ink and masking for tree shading under the branches.


Supplies
  • irRESISTible Texture Spray: Wedding Dress
  • Fireworks Sprays: Lady Bug, Cottage Ivy, Desert Sand, Summer Sky
  • Memento Dew Drop Inks: Lady Bug, Toffee Crunch, Optional: Cottage Ivy, Summer Sky
  • Ink Blushers
  • VersaFine Ink: Onyx Black
  • StazOn Ink: Jet Black
  • Memento Markers: Tuxedo Black, Optional - London Fog
  • Neon Amplify: White
  • Patterned Paper: Lawn Fawn Perfectly Paid Christmas 6x6 Petite Paper Pack
  • Cardstock: White, Red, Green
  • Dies: Lawn Fawn Large Stitched Oval Stackables & Small Stitched Oval Stackables, Paper Smooches Baby Bow
  • Stamps: Taylored Expressions Woodland Winter
  • Masking Paper or Post-it Tape
  • Dimensional Tape
Follow my blog with Bloglovin so you won't miss any of the Fireworks fun!
Affiliates links may be included in this post. See Notice at bottom of blog.

Monday, November 28, 2016

Winter Bouquet Flourishes and Imagine Crafts Blog Hop


This card has a lot of sparkle - perfect for the holidays. The stamps are by Flourishes, l.c. The sparkle comes from Imagine Crafts, as part of a blog hop! The card is simple to make but looks very elegant.

Be sure to leave a comment in order to win prizes!

Imagine Blog
Barbara Thompson
Toni Storie
Alison Heikkila
Beverly Cole
Kren Kurts
Neva Cole
Roni Johnson
Linda Lucas
Davi Long
Jennifer Vanderbeek
Naomi Gong
Vickie Yeakley
Nadine Carlier
Rebecca Ednie
Gloria Hayoung Lee
Mark Melnick
Shirley Qu
Martha Lucia Gomez
Terre Fry
Mary Prasad <- You are here!
Trisha Traxler
Monica Edwards
Flourishes L.C

Making the Card

1. Cut red cardstock to 5 1/2 x 8 1/2; inches. Fold in half to form a 4 1/4 x 5 1/2 inch card base.

2. Stamp large bouquet and tag with "Winter Cheer" greeting on white cardstock with StazOn Jet Black ink. Color bouquet with Memento Markers, going from dark to light, overlapping colors to shade and blend. Cut around bouquet and tag with detail scissors. Go around outside edges from the back side with Tuxedo Black Memento Marker (this hides the white edges and gives it a finished look). Spray bouquet with Sparkle Sheer Shimmer Spritz. Spray tag with Gold Sheer Shimmer Spritz.

3. Cut about a 6 inch long piece of seam binding. Spray with Gold Sheer Shimmer Spritz.

4. Cut black cardstock 3 3/4 x 5 inches. Spray with Gold irRESISTible Texture Spray. Once dry, spray Gold Sheer Shimmer Spritz over the entire piece. Wrap gold sprayed seam binding around middle where shown, adhering on backside. Adhere to card base.

5. Die cut 3rd smallest Dotted Scallop Oval from white cardstock. Spray with Gold Sheer Shimmer Spritz. Add dots of Gold irRESISTible Pico Embellisher to outside scallops. Let dry. Adhere to center of card.

6. Adhere bouquet with dimensional tape as shown. Adhere tag where shown.


Supplies
  • Memento Markers: Lady Bug, Love Letter, Rhubarb Stalk, Dandelion, New Sprout, Pear Tart, Bamboo Leaves, Cottage Ivy, Tuxedo Black
  • StazOn Ink: Jet Black
  • irRESISTible Texture Spray: Gold, Sparkle
  • irRESISTible Pico Embellisher: Gold
  • Sheer Shimmer Spritz: Gold
  • Flourishes Stamps: Winter Bouquet SSBCA024
  • Elizabeth Craft Designs 1173 Dotted Scallop Ovals
  • Cardstock: White, Black, Red
  • Seam Binding: White
  • Dimensional Tape
Follow my blog with Bloglovin so you won't miss any of the flourish fun!
Affiliates links may be included in this post. See Notice at bottom of blog.

Saturday, November 26, 2016

Embossing and Coloring Sheet Metal with StazOn


Making the Charm

1. Cut dark blue cardstock to 5 1/2 x 8 1/2 inches; fold in half for a 4 1/4 x 5 1/2 inch card base.

2. Cut alcohol marker friendly cardstock 3 3/4 x 5 inches.

3. Follow the instructions for your die cutting machine to make the proper sandwich for Sizzlit sized dies. Emboss the 1 inch SHEET Metal. The good side will face up (not toward the die) since you want to color the raised side.


4. Watch the following video to color the embossed metal and card panel:


5. Adhere panel to card base. Tie ribbon in bow. Open small jump ring, put charm on it then close it. Open medium jump ring and add half the beads, the charm jump ring, then the other half of the beads. Thread through bow center; close jump ring.


Supplies
  • SHEET Metal: Assorted Pack (1 Inch Circle)
  • StazOn Inks: Mustard, Ultramarine, Jet Black
  • GlazOn: Clear
  • Ink Blushers
  • Fantastix
  • 657803 Sizzix DecoEtch Die - Fairy Twilight by Vintaj
  • Stamp Set: Sending Holiday Cheer - Hero Arts CL464
  • Wink of Stella
  • Alcohol Markers (e.g. Copics)
  • Cardstock: Alcohol Marker Friendly (X-Press It Blending Card), Dark Blue
  • Ribbon: Red
  • Silver Jump Rings: Medium, Small
  • Optional: Colored Glass Beads (Red, Orange, Yellow, Green, Blue, Purple)
Follow my blog with Bloglovin so you won't miss any of the charm-ing fun!
Affiliates links may be included in this post. See Notice at bottom of blog.

Wednesday, October 19, 2016

Colorfull Fall Leaf Grateful Card


These Paper Smooches stamp leaf outlines work beautifully with Imagine Crafts' Memento Luxe Inks. Create this colorful Fall background, perfect for Thanksgiving or as just a note to a loved one.

Making the Card

1. Cut red cardstock 5 1/2 x 8 1/2 inches; fold in half to form a 4 1/4 x 5 1/2 inch cardbase. Cut brown cardstock 4 x 5 1/4 inches. Cut white cardstock 3 7/8 x 5 1/8 inches.

2, Die cut "Grateful" from red cardstock, one leaf (Leaves 2 dies) each from yellow, green and orange cardstock, and all three leaves from brown cardstock. Set aside for now.


3. Watch the following video for stamping:


4. Adhere "Grateful" and leaves as shown.


Supplies

  • Memento Luxe Inks: Pear Tart, Olive Grove, Pistachio, Peanut Brittle, Dandelion, Morocco, Love Letter, Rhubarb Stalk, Rich Cocoa
  • Paper Smooches Dies: Grateful, Leaves 2
  • Paper Smooches Stamps: Fall Sampler
  • Cardstock: White, Brown, Red, Yellow, Green, Orange

Follow my blog with Bloglovin so you won't miss any of the colorful Fall fun!
Affiliates links may be included in this post. See Notice at bottom of blog.

Friday, October 7, 2016

Echo Park/Imagine Crafts Blog Hop - Summer Card


I'm taking a little break from the Fall cards for this blog hop with Echo Park and Imagine Crafts. Actually we're still hovering around 80 degrees F here in North Carolina! (I'm not complaining!) These summer themed Echo Park papers are from Lori Whitlock; she created a fun 12x12 pack called I Love Sunshine. A full list of products is listed under Supplies, further in the post.

The Hop

Be sure to comment along the way for a chance to win some holiday prizes (more information on the Echo Park Paper and Imagine Crafts sites).

Echo Park Paper
Katharina Frei 
Jana Eubank
Mary Prasad   <- You are here!
Terre Fry
Kimberly Crawford
Alison Heikkila

Jennifer Vanderbeek
Wendy Sue Anderson

Roni Johnson
Nadine Carlier

Anya Lunchenko

Mark Melnick
Neva Cole
Becki Adams

Monica Edwards
Jowilna Nolte
Imagine Crafts


Making the Card

1. Cut light blue cardstock 7 x 10 inches; fold in half to form a 5 x 7 inch card base.

2. Cut blue cardstock 4 5/8 x 6 inches. Cut striped cardstock 4 1/2 x 5 7/8 inches. Adhere together. Adhere to card base.

3. Stamp Glasses background on white cardstock (about 4 1/4 x 5 1/2 inches) using Camellia VersaColor Ink. Add Ganache StazOn Studio Glaze to some of the lenses as shown, as well as to the glasses sticker. Let dry fully.

4. Cut blue cardstock 4 3/4 x 5 3/8 inches. Trim Glasses background to 4 5/8 x 5 1/4 inches. Adhere to blue piece. Adhere to card where shown.

5. Cut out sunny scene panel (sun, cloud, ocean, umbrella, and flip flops) from page. Cut the panel in two pieces, just under sun so that the rest will fit in the Polaroid frame sticker Catching Rays. Adhere the umbrella/flip flops part of panel behind frame. Adhere sun/cloud to card where shown using dimensional tape. Adhere frame with scene using dimensional tape.

6. Adhere sunglasses with dimensional tape where shown. Use irRESISTible Pico Embellishers as shown - on flowers at the corners of the glasses, in the top right corner of the card, and on the top right corner of the frame with scene. Adhere drink sticker as shown.


Supplies
  • Ink: VersaColor - 101 Camellia
  • Paper: Echo Park - I Love Sunshine #ILS86016
  • Background Stamp: Echo Park Glasses #EPSTAMP 51
  • StazOn Studio Glaze: Ganache
  • irRESISTible Pico Embellishers: Dandelion, Neon Electric Blue, Angel Pink
  • Cardstock: White, Light Blue, Blue
  • Dimensional Tape
Follow my blog with Bloglovin so you won't miss any of the sunny day fun!
Affiliates links may be included in this post. See Notice at bottom of blog.

Next on the hop is Terre Fry!

Tuesday, September 27, 2016

A Halloween Night Ink Blended Background with Lawn Fawn Happy Haunting Stamps


I just love Halloween! This night scene is so fun to create - the inks blend nicely to create the spooky night sky. GooseBumps acts as a resist, protecting the colors of the moon and creating stars that come out as you apply the inks to the sky. These Lawn Fawn stamps are only slightly scary (well, the ghosts are actually adorable, especially the little one).

Making the Card

1. Cut white cardstock to about 4 1/4 x 5 1/2 inches (the final size will be 4 x 5 1/4).

2. Watch the following video to see how to create the ink blended background. Be sure not to touch the GooseBumps until it dries... I accidentally touched the moon and put a fingerprint in it. (Ugh.)


3. Stamp the house, tree, and 3 ghosts on white cardstock. Color with colored pencils. If you want to see how I colored them with my Faber-Castell Polychromos, watch the following video (coloring has been sped up).


4. Optional: with a small brush add GooseBumps to the parts of the bats that are outside the moon (i.e. outside the previous application of GooseBumps). Let that dry then put another application over both bats to give them a slight dimension (it also helped fix my finger indent somewhat).


5. Cut purple cardstock 5 1/2 x 8 1/2 inches; fold in half to form a 4 1/4 x 5 1/2 inch card base.

6. Once the GooseBumps has dried, adhere scene to cardbase. Adhere final ghost with dimensional tape if you haven't already done so. I wanted mine to go slightly beyond the scene onto the card base to make it seem like it was coming out of the card.


Supplies
  • Memento Inks: Dandelion, Cantaloupe, Tangelo, Elderberry, Paris Dark, Tuxedo Black
  • StazOn Ink: Jet Black
  • GooseBumps Clear Texture Spray
  • Memento Marker: Tuxedo Black
  • Ink Blushers
  • Optional: BrushStix, DoodleStix, Foam Pad
  • Cardstock: White (Smooth, e.g. Neenah Solar White), Dark Green, Purple
  • Stamps: Lawn Fawn Happy Haunting
  • Colored Pencils (e.g. Faber-Castell Polychromos)
  • Hillside Die: ECD 914 Outdoor Edges
  • Dimensional Tape
Follow my blog with Bloglovin so you won't miss any of the spooky fun!
Affiliates links may be included in this post. See Notice at bottom of blog.

Tuesday, September 13, 2016

Faux Glass Charm with StazOn


This charm is both fun to make and looks really cool. You could easily use this technique to make a pendant, earrings, or smaller charms for hanging off tags or a charm bracelet. I made this one with potions for Halloween.

The clear embossing powder gives the charm a shine that makes it look like glass. I edged the piece with silver embossing powder, which looks like a metal frame when finished. You could also use other colors, such as gold or black.


Making the Charm

1. Die cut shrink plastic using Potion Bottles. Cut a piece of shrink plastic in a rectangle that is larger than the potions stamp (Mini Halloween 4) - I recommend using a cutter so the lines will be straight.

2. Watch the video below for stamping, coloring, and embossing. You will emboss the piece multiple times with clear embossing powder. You may add VersaMarker (or VersaMark Ink) in between layers, or if you work quickly, you may dip the just heated piece back into the clear powder and it will stick.


3. Hints: I left the back of the charm with a pebble-like texture for a rough glass look. You may put more on to make it smooth. Also, I made the mistake of coloring the entire purple bottle, which had the unfortunate effect of making the label too dark. If I did this over, I would leave the center of the bottle clear where the label would go. The green bottle label didn't fit in the hole after shrinking (they don't shrink evenly) - it didn't bother me since I wanted it to stick up anyway. I'm not sure if adding it to the center of the plastic before shrinking would work - I wouldn't recommend putting glue on before baking; it might start a fire.

4. Attach a jump ring to each side through the hole punched earlier. Attach one jump ring to the lobster claw hook clasp and the other to the chain. Note, if you don't like the clasp next to the charm, you may attach it in the middle of the chain so it won't show on the front, just open a link in the middle to do so. I like the look of it so I put it next to the charm.


Supplies
  • StazOn Inks (Midi and/or Full Sized Ink Pads): Jet Black, Cactus Green, Forest Green, Eden
    Green, Orange Zest, Pumpkin, Gothic Purple, Royal Purple, Midnight Blue, Dove Gray, Spiced Chai
  • StazOn All Purpose Stamp Cleaner
  • Embossing Powder: Clear, Silver
  • VersaMarker (Preferred) or VersaMark Ink Pad
  • Ink Blushers
  • DoodleStix
  • GlazOn Clear
  • Shrink Plastic: Clear (e.g. Shrinky Dinks)
  • Stamps: Stampers Anonymous - Mini Haloween 4 CMS198, Mini Blueprints 5 CMS170
  • Dies: Taylored Expressions - Potion Bottles
  • Hole Punch (e.g. Crop-A-Dile)
  • Alcohol
  • Cotton Swabs
  • Glue
  • Chain, Jump Rings, Lobster Claw Hook Clasp
  • Optional: Stamp Positioner
Follow my blog with Bloglovin so you won't miss any of the charming fun!
Affiliates links may be included in this post. See Notice at bottom of blog.

Monday, August 29, 2016

Creating a Galaxy or Nebula with Radiant Neon


Creating galaxy or nebula backgrounds is really popular these days. Many people are using watercolor paints to create them. I decided to use the incredibly bright Radiant Neon Inks by Imagine Crafts to create mine, along with Memento Tuxedo Black ink. This combination gives a surprisingly realistic look (well, similar to the enhanced space photos seen in magazines and online). I applied Sheer Shimmer Spritz to the background as well - it's so beautiful in person! Unfortunately the photos don't pick up much more than a few shiny dots here & there but you can see it better in the video (although the colors are duller in the video, sigh).

Making the Card

1. Cut purple/blue cardstock to 5 1/2 x 8 1/2 inches; fold in half for a card base.

2. Cut watercolor paper to about 5 x 6 inches. Note: the final size will be 4 x 5 1/4 inches, leaving extra space for taping down and triming.

3. Watch the video below to create the nebula look on the watercolor paper. To create a galaxy, just apply the color in a band across the card. Hint: do a Google search for "nebula" or "galaxy" - click the "Images" tab and use one of the photos as a model as you work. You will see me do this on my iPhone, which I set up in front of my work area (out of view of the video camera).

NOTE: YouTube took down my video and put a strike on my account due to a FALSE copyright claim by Sony Music Entertainment (SME). The actual music copyright owner is Pacific Digital Video, from whom I have permission to use their music. Someone called "Ogie" sang over Pacific's music track illegally and SME is distributing it. SME filed a false copyright violation against me and YouTube will not even look at this unless I allow SME to sue me! Their process rewards false copyright claims - the victims have no viable recourse. I now have a strike on my YouTube account because I filed a counter notification and wouldn't yield to them. No one at YouTube will look at the issue.


4. After cutting down the watercolor piece to 4 x 5 1/4 inches, emboss the sentiment in white embossing powder where shown (I use an anti-static tool before embossing). Mount it on the front of the card base using a strong tape, e.g. Tear It tape. Adhere alien using dimensional tape.


Supplies
  • Radiant Neon Ink Pads or Inkers:  Electric Yellow, Electric Orange, Electric Coral, Electric Pink, Electric Purple, Electric Blue, Electric Green
  • StazOn Ink: Jet Black
  • irRESISTible Texture Spray: Wedding Dress
  • Memento Ink Pad: Tuxedo Black
  • Memento Marker: Tuxedo Black
  • Sheer Shimmer Spritz: Sparkle
  • VersaMark Ink Pad (For Embossing)
  • Embossing Powder: White
  • Watercolor Paper: Arches Hot Press (Recommended)
  • Ink Blushers
  • Tear It! Tape
  • Painter's Tape (Masking Tape)
  • Stamps: Paper Smooches Space Cadet
  • Plastic Packaging
  • Paintbrush(s)
  • Optional: Spray Bottle with Water
  • Cardstock: Purple/Blue
  • Dimensional Tape
Follow my blog with Bloglovin so you won't miss any of the space themed fun!
Affiliates links may be included in this post. See Notice at bottom of blog.

Thursday, August 18, 2016

Elegant Black and White Wedding or Anniversary Card


This elegant card can be used for a wedding or anniversary. I used VersaFine ink to capture the details on the stamp - it stamps crisp and clear. I used my Xyron Creative Station to put permanent adhesive on the delicate die cuts for easy adhesion. The irRESISTible Pico Embellisher adds a nice touch in the corner. For more Xyron inspiration, visit Xyron's Facebook page.

Making the Card

1. Cut white cardstock 5 1/2 x 8 1/2 inches; fold in half to form a 4 1/4 x 5 1/2 inch card base.

2. Die cut black cardstock with both largest and 2nd largest Spellbinders labels dies (S4-465).

3. Use Xyron to add adhesive to the back of black cardstock and white cardstock. Die cut white with largest decorative elements die (S4-467); adhere to largest black from step 2. Adhere to card base. Die cut black with 2nd largest decorative elements die (S4-467); adhere to 2nd largest black from step 2. Adhere to last layer on card base using dimensional tape.

4. Stamp "Congratulations" on white cardstock with VersaFine Black Onyx ink. Use 3rd largest labels die (S4-465) to cut it out, looking through die to line it up. Adhere to last layer on card base using dimensional tape.

5. Tie small bow with black ribbon; adhere as shown. Use irRESISTible Pico Embellisher to make enamel dots where shown (hint: you may make the dots on a craft mat then pop them off to glue on your card later - this way you can try different sizes).


Supplies
  • Cardstock: White, Black
  • VersaFine Black Onyx Ink
  • irRESISTible Pico Embellisher: Tuxedo Black
  • Xyron Creative Station 9"
  • Spellbinders Labels 40 (S4-465) plus Decorative Elements (S4-467)
  • Stamp: Congratulations
  • Black Ribbon
Follow my blog with Bloglovin so you won't miss any of the elegant card making fun!
Affiliates links may be included in this post. See Notice at bottom of blog.

Sunday, August 14, 2016

Radiant Neon Bird Crazy Belated Birthday Card


These super fun crazy birds are the perfect subjects to color with bright Radiant Neon inks. The inks look almost like they are glowing and show up really well on dark cardstock. I made this little scene with the pooped out balloon (string blowing in the breeze) to go with the belated birthday sentiment. I especially love the expressions on the birds' faces. The set of "things" to go with the bird stamps make them quite versatile.

Making the Card

1. Cut kraft cardstock to about 4 1/4 x 5 1/2 inches (a quarter of 8 1/2 x 11 sheet).

2. Cut coral cardstock to 5 1/2 x 8 1/2 inches; fold in half for a card base.

3. Watch this video for stamping, masking, and coloring:


4. Trim kraft cardstock (with birds) to 4 x 5 1/4 inches; adhere to card base as shown.


Supplies
Follow my blog with Bloglovin so you won't miss any of the crazy bird fun!
Affiliates links may be included in this post. See Notice at bottom of page.