Showing posts with label Sizzix. Show all posts

Wednesday, October 9, 2024

Making Stamp Ephemera Using Tim Hotz Stamps

Tim Holtz Stampers Anonymous Stamp Collector VersaFine Clair

I had so much fun making these vintage looking postage stamps! I looked up vintage stamps online to get an idea of colors but there was a huge range, so pretty much any ink color will do. I chose mostly muted colors with a few exceptions. The Tim Holtz/Sizzix Postale die set comes with three dies to make postage edges. These matched most, but not all, of the Tim Holtz/Stampers Anonymous Stamp Collector set. I fussy cut around the others with a good pair of detail scissors.

These stamps are perfect for junk journals, cards, and even decorating envelopes. Please do not use them as postage, but they are perfect for hand delivering; you can even "cancel" them yourself if you have one of the many postage themed stamp sets out there (for example, Tim Holtz/Stampers Anonymous Correspondence - see the Supplies section below for more recommendations).

Copyright Notice: ©Mary Dimercurio Prasad. All rights reserved. Any illegal reproduction of this content, including images, will result in immediate legal action.

Disclaimer:  Please help support my work in this small way - just use my links if you plan to purchase anything - there's no extra cost to you. Here's the official jargon: links, affiliate links, and cookies may be used in this post and on this site. Using this site implies your consent. I participate in the Amazon Services LLC Associates Program, Share a Sale, and other affiliate programs; these affiliate advertising programs provide a means for me to earn fees by linking to amazon.com and/or other affiliated sites. This helps offset a small portion of my crafting addiction... uh, hobby. I am truly thankful for your kind support! I also receive free products from companies, possibly monetary compensation, and sometimes free products for review. Regardless, all opinions are my own. Google and Blogger use cookies to provide and improve their services. See Notice at the bottom of this blog for a longer description and/or see the full Privacy Policy
 for even more details.

Tim Holtz Stampers Anonymous Stamp Collector Sizzix Postale

Making the Stamps

1. Antique several sheets of high quality/premium printer paper (e.g. Hammermill Premium). I do not use cardstock for this; paper makes them feel and look more like real stamps. I antique the paper by pressing various colors of Distress Inks on a craft mat or Glass Media Mat, spraying lots of water, then dragging the paper through it. Start with a light color such as Antique Linen to cover the entire sheet. Dry with a heat tool or let air dry before continuing. If you want darker paper, use less water or use something like Vintage Photo but start with more water unless you want very dark results. To add texture, press various light brown inks (maybe 2 or 3 colors) onto craft mat again, spray with water, break up ink by running your fingers through it, then tap paper in it, moving it to different areas. I recommend starting with light colors and more water first. Dry between layers with a heat tool. Tim Holtz shows how to do this in many of his videos when creating backgrounds. Make a lot of sheets if you want many colors.

2. For optimum efficiency, I recommend mounting the entire unweeded stamp onto a stamp platform (e.g. Tim Holtz or Misti). If you have already separated the stamps, you'll need to move each stamp onto the stamp platform - be sure to leave enough room between each to cut apart and die cut later. Ink up and stamp onto antiqued paper. I recommend using VersaFine Clair inks. They have the crispest results. Note: you should use a heat tool to set the ink as it tends to dry slowly. I also used Ranger Archival Ink and Tim Holtz Distress Archival Ink to fill in colors I didn't have in VF Clair. Clean stamps with Stamp Shammy and water.

3. Cut stamp images apart, leaving room for die cutting. Fussy cut around any that don't fit in one of the dies with a good pair of detail scissors. Using a die cutting machine and Postale Dies, die cut the rest of the stamps. I like to do this in front of the TV or while listening to a podcast.

4. Optional; Use an ink blending tool and dome foam to ink edges of stamps with a brown Distress Ink.

Supplies

Sunday, July 28, 2024

Use Scraps to Make Vintage Labels - Tip to Prevent Ink Beading

Tim Holtz Sizzix Vintage Labels 665929

Use your cream and white scraps to create lots of labels in different colors. Grunge them up for a more vintage look. Add adhesive to the back using a Xyron Creative Station, Xyron Creative Station LiteXyron 250 Create-A-Sticker, or Xyron 150 Create-A-Sticker if you would like to make them into stickers. I listed these in order of price (high to low), which also corresponds to size. The largest Creative Station will accept paper/cardstock up to 9 inches wide (e.g. US letter) and may also be used with 5 inch cartridges. The Creative Station Lite will accept 5" and 3" cartridges. The 250 has a 2.5" opening, and the smallest 150 has a 1.5" opening. All are refillable, but the larger machines (former two) offer more and varied cartridges, such as lamination and magnet, whereas the latter two are just for making stickers. Note: the largest Vintage Labels will not fit in the smallest sticker maker.

Labels can be used in many ways. You can stamp on them with words or numbers for a more traditional look, or stamp them with images for something different. Use rub-ons or vellum stickers on them. Use them on cards, in scrapbooks, or junk journals. Write on them to label folders, storage bins, etc. Make tabs out of them by either folding one in half or putting two of the same size/type back to back on a page or other edge so that part sticks out.

Copyright Notice: ©Mary Dimercurio Prasad. All rights reserved. Any illegal reproduction of this content, including images, will result in immediate legal action.

Disclaimer:  Please help support my work in this small way - just use my links if you plan to purchase anything - there's no extra cost to you. Here's the official jargon: links, affiliate links, and cookies may be used in this post and on this site. Using this site implies your consent. I participate in the Amazon Services LLC Associates Program, Share a Sale, and other affiliate programs; these affiliate advertising programs provide a means for me to earn fees by linking to amazon.com and/or other affiliated sites. This helps offset a small portion of my crafting addiction... uh, hobby. I am truly thankful for your kind support! I also receive free products from companies, possibly monetary compensation, and sometimes free products for review. Regardless, all opinions are my own. Google and Blogger use cookies to provide and improve their services. See Notice at the bottom of this blog for a longer description and/or see the full Privacy Policy
 for even more details.

Sizzix Tim Holtz Vintage Labels Ranger Archival Ink

Making the Labels

1. Gather your white card stock and cream card stock scraps. Of course you may also use full sheets but this is a great way to use up your scraps! If pieces (or sheets) are too big for your die cutting plates, you may want to cut them down to fit first. This is especially important if using a Sidekick. Note: I show how to use scrap strips in a different post.

2. Before inking your Vintage Label dies, you need to condition them or the ink will bead up, giving you poor results. See photo below. The labels on the left were inked and die cut before conditioning the dies. The labels on the right were done after (same ink, same dies). To condition the dies, use toothpaste on a cotton swab to scrub well over the raised surface of each die where ink will go. I did this back and forth around each die about a dozen or more times. A little surface metal will come off - you should see this as you rub the toothpaste. This is how it conditions the surface; it roughs up the surface on a micro level, giving the ink a place to sit without beading up. This should only have to be done once, although if not enough of the surface is roughed up, this process may need to be repeated.

Sizzix Tim Holtz Vintage Labels Ranger Archival Ink Conditioning

3. Have die cutting plates ready. One plate will be the cutting side; set this aside for the moment. Place the non-cutting side nearby so you can easily transfer inked dies to this plate when ready. Choose Vintage Label dies (or die) to fit a scrap piece of white or cream cardstock. Place these dies cutting side up on a sheet of scrap paper - I use scrap copy/cartridge/printer paper. Tap Ranger Archival Ink (or Distress Archival Ink) over surface until the flat raised areas are well covered. If the ink is still beading up too much, you may have to repeat conditioning. Be sure your ink pad is not too dry or you may not get enough ink to transfer on to the die. Once inked, carefully lift paper and slide dies onto plate, still cutting side up. You may need to slide them around in a configuration that will work with your piece of cardstock. Place cardstock carefully over dies then place cutting plate on top. Be sure nothing shifts. You may have to hold the plates in both hands as you start to feed them into your die cutting machine. If you find they move too much, you could try using washi or painters tape to temporarily tape paper to the bottom plate before placing the cutting plate on top.

Note: If you want to change ink colors, I recommend using isopropyl alcohol to clean dies. I don't recommend using stamp cleaner as any oil residue left behind may prevent ink from sticking.

4. Optional: after die cutting, ink edges of labels with Distress Ink or Distress Oxide Ink. I used Vintage Photo Distress Oxide Ink on an ink blender tool with domed foam. Note that if you do not ink the edges, some of the color of the Archival Ink that got on the blade may show a little. Adding inking around the edges helps hide this.

5. Optional: if you want to create sticker labels, put labels through a Xyron Creative Station or Sticker Maker (see other models listed in supplies, below). If you are doing multiples, you may cut them apart or leave them on the larger sheet until you want to use them. Note: you may add the adhesive to the cardstock before die cutting but I find that this wastes more adhesive and makes one side of the cardstock really slick, possibly making it more difficult when feeding into the die cutting machine.

Tim Holtz Vintage Labels Sizzix Grunge Ephemera

Tuesday, June 11, 2024

Tim Holtz Distress Bloom Cards with Texture Paste


Tim Holtz Distress Ink Oxide Brushstroke Flowers

I love the light textures and soft distressed look of these cards. Be sure to check out the photos below to see more of the texture paste, which shows much better when the light is coming from above. I was inspired by some of the makers from the Tim Holtz team as well as the man himself. I haven't had much time to create in the past year or so. I finally tried breaking up creating into shorter sessions. On one day I made some of my own distressed cardstock in different colors - red, green, yellow - to have on hand for die cutting at a later date. On another day I sat in front of the TV and did some die cutting and gluing. Finally, I spent some time in my craft room creating the backgrounds above, then put together my cards!

Copyright Notice: ©Mary Dimercurio Prasad. All rights reserved. Any illegal reproduction of this content, including images, will result in immediate legal action. 

Disclaimer:  Please help support my work in this small way - just use my links if you plan to purchase anything - there's no extra cost to you. Here's the official jargon: links, affiliate links, and cookies may be used in this post and on this site. Using this site implies your consent. I participate in the Amazon Services LLC Associates Program, Share a Sale, and other affiliate programs; these affiliate advertising programs provide a means for me to earn fees by linking to amazon.com and/or other affiliated sites. This helps offset a small portion of my crafting addiction... uh, hobby. I am truly thankful for your kind support! I also receive free products from companies, possibly monetary compensation, and sometimes free products for review. Regardless, all opinions are my own. Google and Blogger use cookies to provide and improve their services. See Notice at the bottom of this blog for a longer description and/or see the full Privacy Policy
 for even more details.

Making the Cards

I created two cards at the same time. Although they are similar, the do have slight differences - the biggest difference being how I did the sentiment on each card. I cut out the word "THANKS" from the label for one sentiment and used the letters themselves as the sentiment on the other card.

1. You will create three distress backgrounds for the flowers, one each in red, green, and yellow. Be sure to vary each one across its sheet so you may die cut different shades in the next step. To do this, start by using a blending tool to ink up 3 half sheets of White Heavystock with various shades of red, green, or yellow Distress Inks - one sheet per color but several ink colors per sheet (or just vary the amount so you get lighter and darker shades). Splatter each with water, dab with paper towel to create lighter splats. Using one color at a time, tap ink pad(s) on craft sheet, spray with water, break up by running your fingers through it to create droplets, then tap paper into it. Dry with heat tool and repeat. You may do each step again until you get a very distress background with varied areas of each color.


2. Using Bloom Colorize dies, cut two sets of roses from different areas of the red distressed background. I used the lighter areas for the upper layers on everything. Similarly, die cut two sets of flower buds from yellow and leaves from green. Assemble as shown then set aside.

3. Cut light pink cardstock into two 5 1/2 x 8 1/2 inch pieces (I actually used two different shades of light pink because I had scraps); fold in half to create two 4 1/4 x 5 1/2 inch card bases. Set these aside for now. For the backgrounds, cut two pieces of light pink cardstock to 4 1/4 x 5 1/2 inches (these will be cut down another 1/4 inch later, although you can start with the smaller size if you don't want to cut them down after inking, etc.).

4. Optional: stamp backgrounds with Picket Fence Distress Ink using Stampers Anonymous Scrollwork stamps. Dry with heat tool. This will give it a very subtle pattern below the stenciling.

5. Using a blending brush, lightly ink over opposite areas with a light pink Distress Ink or Distress Oxide Ink such as Tattered Rose or Spun Sugar. See photos. Do the same on the reverse areas with a light blue ink such as Tumbled Glass or Speckled Egg. You are just creating a light color as the base for the next step.

6. Using a blending brush, ink small random sections through Mini Set 49 Layering Stencil THMS148 in similar pink and blue colors but in slightly darker shades (or heavier application). Note: I extended the blue area over to where I planned to put the die cut "THANKS" later. Optional: splatter same color Distress Stains across the backgrounds.

7. Using Field Notes stamps, stamp in various areas using contrasting or slightly darker Distress Inks.

8. Apply texture paste through Gothic Layering Stencil to random sections. Set aside to dry.

9. Using oval label from Vintage Labels, apply Speckled Egg Distress Archival Ink by tapping gently over label die (cutting side), making sure to cover it well. Place a piece of pink cardstock, larger than label die, onto cutting pad. Carefully place inked die on pink cardstock making sure ink only touches once and does not shift; temporarily tape in place, then die cut. Arrange the letters THANKS from Alphanumeric Label dies onto the edge of a Post-it note or washi tape, cutting side up, making sure they are straight. I only put the bottom half on the tape to make it easier to center on the label. Line up on die cut label and run through die cutting machine, making sure to keep the letters.

10. Trim backgrounds to 4 1/8 x 5 3/8 inches. Adhere to card bases. Adhere flowers and label to one card as shown. Adhere flowers and letters to other card as shown.


Wednesday, October 21, 2020

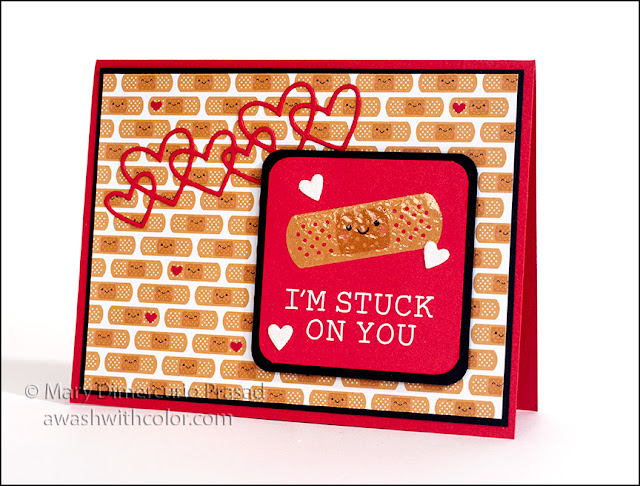
Doodlebug Design Quick Card - Stuck on You

Doodlebug Design Quick Card - Stuck on You

Here's another fairly quick card using Doodlebug Design papers. So Much Pun is part of their "punny" collection, along with So Punny. They have a page or two in each pack that can be cut apart for easy additions to cards. I made this particular card for my husband. I just love how cute and colorful Doodlebug Design products are!

Copyright Notice: ©Mary Dimercurio Prasad. All rights reserved. Any illegal reproduction of this content, including images, will result in immediate legal action.

Disclaimer:  Please help support my work in this small way - just use my links if you plan to purchase anything - there's no extra cost to you. Here's the official jargon: links, affiliate links, and cookies may be used in this post and on this site. Using this site implies your consent. I participate in the Amazon Services LLC Associates Program, Share a Sale, and other affiliate programs; these affiliate advertising programs provide a means for me to earn fees by linking to amazon.com and/or other affiliated sites. This helps offset a small portion of my crafting addiction... uh, hobby. I am truly thankful for your kind support! I also receive free products from companies, possibly monetary compensation, and sometimes free products for review. Regardless, all opinions are my own. Google and Blogger use cookies to provide and improve their services. See Notice at the bottom of this blog for a longer description and/or see the full Privacy Policy for even more details.

Making the Card

1. Cut red cardstock 5 1/2 x 8 1/2 inches; fold in half to form a 4 1/4 x 5 1/2 inch card base. Cut black cardstock 4 x 5 1/4 inches for mat; set aside. In the So Much Pun 6x6 paper pad, find the page with the smiling bandages.  Cut to 3 7/8 inches tall first, watching orientation of bandages (i.e. cut off top or bottom). Next cut to 5 1/8 wide, keeping the leftover strip of bandages for the inside of the card. Adhere to black mat then adhere to card base.

2. From red cardstock, die cut Linked Hearts. Adhere where shown on card base. You may want to wait until you do step 3 before placing and gluing hearts. Note: the hearts I used have been discontinued but I put an alternative in the Supplies list; you may have to change the orientation of these hearts and the pun in step 3.

Doodlebug Design Quick Card - Stuck on You

3. In the So Much Pun 12x12 Paper Pack, find the sheet of square puns and cut out the "I'm stuck on you" pun. Cut black cardstock slightly larger (I just put the pun in a corner of the cardstock, with the amount of space I wanted on the cut sides, then put pencil marks on the other sides to match, and cut). Use the Crop-A-Dile Corner Chomper Tool to round the corners 1/4 inch on both the pun and the black cardstock; adhere together. Adhere to card base as shown using dimensional tape.

4. Optional, use Wink of Stella on main bandage. Once dry, add Glossy Accents over same bandage.

5. From white glitter cardstock, die cut triple hearts using Coffee Charms die. Adhere where shown.

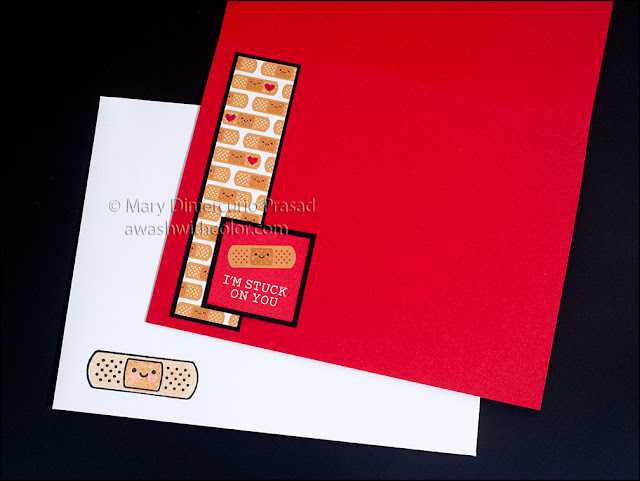
6. Cut red paper with Envelope Liner die for A2 card (sorry, inside liner is not shown). Set aside small red hearts. Make an A2 envelope from white paper using Envelope Board - leave unassembled (assembly in step 7). Stamp bandage and face on front bottom left corner with Memento Tuxedo Black ink (may want to fold envelope temporarily to note where to stamp but lay it all flat again for stamping). Color image with colored pencils.

Doodlebug Design Quick Card - Stuck on You

7. Adhere liner to inside envelope then assemble envelope. Use a bone folder to help with folds.

8. For the inside of the card (image further below), cut a black mat slightly larger than the saved strip of bandages. Adhere together than to inside of card where shown. In the So Much Pun 6x6 Paper Pack, find the sheet of square puns (matching the 12x12 for the front of the card) and cut out the "I'm stuck on you" pun. Cut black cardstock slightly larger; adhere together then adhere inside of card where shown.

9. To add a little more detail to the small bandages on both the front of the card and on the inside strip, glue small red hearts (saved from step 6) as shown. You may have to look closely to see them. Your pattern may vary somewhat depending on how the pattern was printed and cut on your particular sheet. I recommend placing all hearts first then gluing then down once you like the placement. I put 5 on the front and 3 inside the card.

Sunday, June 14, 2020

Quick Cards with Doodlebug Design Papers


Greetings! These fun, cheerful cards are fairly easy and quick to make. I made the card on the left for our postal delivery worker, the card in the middle as a thank you to a couple of friends, and the card on the right for my husband. I also made matching envelopes for the two cards on the right. For the card on the left, I put it in a pearlized metallic envelope with a piece of matching washi tape on the back.

The directions below are for making all three of the above cards, but you could make more or less depending on what you want. There are a lot of punny sayings included in these Doodlebug Design paper pads. Hope your day is full of pun!

Copyright Notice: ©Mary Dimercurio Prasad. All rights reserved. Any illegal reproduction of this content, including images, will result in immediate legal action.

Disclaimer: Please help support my work in this small way - just use my links if you plan to purchase anything - there's no extra cost to you. Here's the official jargon: links, affiliate links, and cookies may be used in this post and on this site. Using this site implies your consent. I participate in the Amazon Services LLC Associates Program, Share a Sale, and other affiliate programs; these affiliate advertising programs provide a means for me to earn fees by linking to amazon.com and/or other affiliated sites. This helps offset a small portion of my crafting addiction... uh, hobby. I am truly thankful for your kind support! I also receive free products from my design team companies, possibly monetary compensation, and sometimes free products for review. Regardless, all opinions are my own. Google and Blogger use cookies to provide and improve their services. See Notice at bottom of blog for a longer description and/or see the full Privacy Policy for even more details.

Making the Cards

1. Use the main dies to cut the card bases as follows: use Stephanie Barnard/Sizzix Framelits Card, Kind Sentiments Step-Ups to cut one base from teal cardstock and Stephanie Barnard/Sizzix Framelits Card, Gift Card Flip-its to cut one base from teal cardstock then another from ultramarine blue cardstock. Note: Sizzix discontinues dies regularly but comes out with new designs continually. Search their website for card dies - and be sure to look at their sales and clearance sections!


2. Use the secondary, decorator, dies from the two sets to cut the backgrounds from the papers shown in the 6x6 Doodlebug Design paper pads (see Supplies for a listing of all pads used). Adhere to cards as shown.

3. Find the page of punny cards in the 12x12 packs - these are what I used as sentiment panels on the fronts of each of the cards. Trim them down to fit as shown. Use Crop-A-Dile Corner Chomper to round the corners of the soda front (see photo above) and added a sticker over "cute" to make it "sweet" since I was giving this as a thank you card. Adhere the waffle panel directly to the card as shown. Adhere the other two using dimensional tape as shown.


3. Find the page of border strips in the 6x6 pads. Adhere where shown on the front or inside of the cards (the soda one is a little hard to see in the step card but it is inside the card - you could also put it on the back if you wanted to write your message there instead).


4. Add blue sequins to the front of the soda card where shown. Optional: add clear Wink of Stella to subjects of cards for some sparkle. I added it to the shooting star, including the tail, the waffles, and the sodas. Add Glossy Accents where desired. I added it to the star (shooting star), syrup (pancakes), and soda bottle but not the can.


5. Stamp soda bottles and waffle on the envelope flaps in Tuxedo Black Memento Ink. Color with Prismacolor pencils as shown below. For the shooting star, I used a pearlized envelope and coordinating washi tape on the back flap (not shown).


Supplies
Follow my blog with Bloglovin so you won't miss any of the doodlebug pun!

Tuesday, July 23, 2019

So Much to be Joyful About Card & Daniel Smith Watercolors


This sweet greeting card is for anyone who needs a little pick-me-up (who doesn't love puppies!). It makes me smile. I put together the scene with some quick masking and a couple stamp sets from Dreamerland Crafts. I used Daniel Smith watercolors to color it. I just love these watercolors. They have some beautifully unique colors, such as Moonglow, used for the boy's shirt, Hematite, used in the shadows, and Buff Titanium, used on the ground. I enjoy making fluffy clouds with the simple technique described in the step-by-step. Now go out and brighten someone's day!

Pssst... if your reading this, leave me a comment! I see lots of hits on my pages but really wonder if anyone actually reads my posts! Heh.

Disclaimer: Please help support my work in this small way - just use my links if you plan to purchase anything - there's no extra cost to you. Here's the official jargon: links, affiliate links, and cookies may be used in this post and on this site. Using this site implies your consent. I participate in the Amazon Services LLC Associates Program, Share a Sale, and other affiliate programs; these affiliate advertising programs provide a means for me to earn fees by linking to amazon.com and/or other affiliated sites. This helps offset a small portion of my crafting addiction... uh, hobby. I am truly thankful for your kind support! I also receive free products from my design team companies, possibly monetary compensation, and sometimes free products for review. Regardless, all opinions are my own. Google and Blogger use cookies to provide and improve their services. See Notice at bottom of blog for a longer description and/or see the full Privacy Policy for even more details.

Making the Card

1. Cut blue cardstock 7x10 inches; fold in half to form a 5x7 inch card base.

2. Cut My Mind's Eye Boy Crazy 12x12 Stitched sheet to 4 3/4 x 6 3/4 inches. Adhere to card base.

3. From Dreamerland Crafts Stamps, stamp bird, kitten, boy with box, and puppies on masking paper using StazOn Jet Black ink. Fussy cut using detail scissors.

4. Use VersaFine Clair Nocturne ink for stamping: stamp puppies at an angle as shown on watercolor paper - leave plenty of room around it for the rest of the scene. When dry, cover with matching mask. Using stamp positioner, stamp boy with box (it's a little tricky but the stamp positioner will make it a lot easier). When dry cover with matching mask. Stamp bushes as shown. Stamp bird and kitten where shown; when dry cover with matching masks. Be sure masks are stuck down well, especially around the edges.

5. Cover berries in bushes using masking fluid. Have a tissue ready. For my painting, I used Daniel Smith watercolors. Once masking fluid is dry, add water to sky then drop in color (I used Ultramarine Blue) starting with the darkest at top and fading out as you get closer to the bushes. Use crumpled tissue to dab in areas of the sky to form clouds. You may use a damp brush (water only) to go over areas you want lightened more; immediatly soak up with tissue. Watercolor the ground area. Once dry, paint bushes. Work in layers, allowing each to dry before adding more color. Paint shadows. Remove masking fluid from berries and paint them. Once the background is done, you may watercolor the subjects. Again work in layers. To blend, use a slightly damp brush to soften just-painted edges. I use a fairly dry brush to add color when I want smooth blending (blot excess on paper towel or rag).


6. Die cut image using square die. I actually used a Spellbinders Grand Nestabilities 4x4 inch square die but they have been discontinued. See supplies (bottom of post) for replacement. For the mat, cut blue cardstock a little larger. I just eyeballed it by placing the image in a corner, leaving the amount I wanted as a border, then used a pencil to mark where I wanted to cut on the other sides. Note: you may have nesting dies that will cut the desired border instead. Adhere image to mat. Adhere to card where shown.

7. Stamp sentiment in VersaFine Onyx Black ink on Boy Crazy paper (I changed inks because some of the detail was lost with the Clair Nocturne ink - my ink pad is fairly new and a bit too juicy). Trim as shown and add tails. Create a mat for it in blue cardstock. Adhere using dimensional tape.

8. Die cut champagne Deco Sheets and blue cardstock to create stars using Sizzix/Stephanie Barnard Triplits Stars die set. Adhere where shown. Add sequins and star confetti where shown.


Supplies
Follow my blog with Bloglovin so you won't miss any of the puppy lovin' fun!

Tuesday, January 8, 2019

What is My Favorite Xyron Product and Why


What is my favorite Xyron product and why? This is the theme for the 2018 Xyron Design Team's last project. I would have to say my favorite is the 9" Creative Station, although it's really a toss up between the permanent adhesive and the double-sided lamination cartridges. I probably use permanent adhesive most often because it is an ideal tool for applying adhesive - it puts adhesive evenly all over whatever you run through it. Not only is it great for making stickers, it is perfect for background papers for cards and super useful for die cuts. I used to hate having to glue things like thin die cut letters/words because the glue would get all over the place. Now it is really easy - just run the cardstock through the the Creative Station with permanent adhesive, die cut, peel, and stick! You can even make your own dimensional tape. For a unique look, create your own designs on cardstock (such as a gradient effect with ink) before running it through and die cutting.

Cartridges are super simple to change, even mid-roll, which I do all the time! As an example of how I use lamination, check out my post on creating watercolor swatch sheets.

Disclaimer: Please help support my work in this small way - just use my links if you plan to purchase anything - there's no extra cost to you. Here's the official jargon: links, affiliate links, and cookies may be used in this post and on this site. Using this site implies your consent. I participate in the Amazon Services LLC Associates Program, Share a Sale, and other affiliate programs; these affiliate advertising programs provide a means for me to earn fees by linking to amazon.com and/or other affiliated sites. This helps offset a small portion of my crafting addiction... uh, hobby. I am truly thankful for your kind support! I also receive free products from my design team companies, possibly monetary compensation, and sometimes free products for review. Regardless, all opinions are my own. Google and Blogger use cookies to provide and improve their services. See Notice at bottom of blog for a longer description and/or see the full Privacy Policy for even more details.

Making the Card

1. Cut Neenah Solar White cardstock about 4 1/4 x 5 1/2 inches. Use a Stamp Platform to stamp large dog (Crazy Dogs), small dog (Mini Cats & Dogs), and bone (Mini Cats & Dogs) in Memento Tuxedo Black ink. Note: I didn't notice until I went to color the images that I had missed the large dog's foot in stamping - I just used a black Copic Multiliner SP to draw the edges then covered the paw with the bone to hide my mistake.

2. Color images with Copic markers (see Supplies for a list of colors I used).

3. Find the page in Puppy Love 6x6 pad with labels - the one with "love at FURst sight;" cut it away from the other labels. Cut a piece of blue cardstock about 1/8 inch bigger (so it will have 1/16" border around it). Use 1/4" Corner Chomper to round all corners on label and blue mat. On the label, go around edges from the back side with E55 Light Carmel.


4. From Puppy Love 6x6 pad find striped page, brown small hearts page, colorful hearts page, and border strips page ("adorable" words and paw prints). Trim colorful hearts to 4 1/2 x 4 3/4 inches. Trim stripes (vertical stripe orientation) to 1 1/2 x 4 3/4 inches. Cut "adorable" and paw strip from the page of strips but leave them connected; trim to 4 3/4 inches wide.

5. Use Stacked Baroque - largest to cut blue cardstock, next largest to cut brown small hearts (vertical orientation, see card photo). On the brown hearts die cut, go around edges from the back side with E55 Light Carmel.

6. Instead of dimensional tape, cut a piece of craft foam a little smaller than "love at FURst sight" label (I used a larger piece - I keep the extra around for other projects). Cut a piece of Neenah Solar White cardstock large enough to die cut "happy" and "anniversary" (Celebration Words: Script) - do not die cut yet.


7. Run everything through the Xyron 9" Creative Station with permanent adhesive.

8. Use Crazy Dogs large dog die and Mini Crazy Cats & Dogs small dog die and bone die to die cut images. Hint: after cutting them out, go around edges with 110 Special Black to go around edges from back side plus fill in any extra white edge areas showing (e.g. if the cutting was a little off). Die cut "happy" and "anniversary" from adhesive backed Neenah Solar White cardstock.

9.  Cut blue cardstock 7x10 inches; fold in half to form a 5x7 inch card base. On inside of card, adhere "happy" and "anniversary" where shown in photo below. Use a Teflon bone folder to rub over the tops of all the letters - this helps adhere the words and removes any ejector hole indents, without adding shine to the cardstock.


10. After rubbing your fingers around all cellophane on top of papers (hint: use a die pick to also go around edges), remove cellophane. To remove backing from large pieces, flip and peel backing away - this reduces the amount of bending. Punch a small hole at the bottom right corner of striped piece where heart brad will go - peel backing partially away and insert heart brad, spreading tines. Adhere heart piece at top then striped piece at bottom, making sure spacing is equal around top/bottom and sides. Adhere "adorable"/paw strip in middle. Adhere brown heart baroque piece to blue baroque piece; adhere to card where shown. Adhere tall dog (I wrapped the tail around the back and used the Teflon bone folder to stick it down well), short dog, and bone as shown. Adhere "love at FURst sight" label to top of craft foam where the cellophane was. Peel off backing and stick to blue mat. Adhere to card front where shown.


Supplies
Follow my blog with Bloglovin so you won't miss any of the Xyron fun!

Wednesday, October 31, 2018

Dog Lover Masculine Birthday Card


One of my first thoughts was of Fall when I saw this super adorable image by Dreamerland Crafts. I paired it with some plaid Halloween paper by Tim Holtz and Idea-ology. I decided to watercolor the image (with M. Graham watercolors), mainly so I could mix colors that would closely match those in the plaid background. I also tried to keep it to a limited palette.

For the painting itself, I used a fairly dry brush technique and glazing to get smooth transitions, building up the layers in the dark areas for contrast. I am working on a watercolor series on my YouTube channel - eventually I hope to show this technique. If you are interested in watercolor, you may want to consider subscribing to my channel so you won't miss anything (hit the bell icon, then you will get notifications when I post).

Disclaimer: Please help support my work in this small way - just use my links if you plan to purchase anything - there's no extra cost to you. Here's the official jargon: links, affiliate links, and cookies may be used in this post and on this site. Using this site implies your consent. I participate in the Amazon Services LLC Associates Program, Share a Sale, and other affiliate programs; these affiliate advertising programs provide a means for me to earn fees by linking to amazon.com and/or other affiliated sites. This helps offset a small portion of my crafting addiction... uh, hobby. I am truly thankful for your kind support! I also receive free products from my design team companies, possibly monetary compensation, and sometimes free products for review. Regardless, all opinions are my own. Google and Blogger use cookies to provide and improve their services. See Notice at bottom of blog for a longer description and/or see the full Privacy Policy for even more details.

Making the Card

0. Note: I made my card with the retired Sizzix Framelits Die Set 14PK - Card, Kind Sentiments Step-Ups (660718). I found a set on the Sizzix site that I believe matches fairly closely, Sizzix Framelits Die Set 15PK - Card, Cute as a Bug Step-Ups (660717)

1. Use main Step-Ups die to cut card base from black cardstock; fold as indicated.

2. Use decorative panel dies to cut plaid sheet from 8x8 Mini Paper Stash Halloween. Adhere to card as shown. Die cut stars strip from antique silver Deco Sheets. Adhere on sides as shown. (If you don't have the die set I used, you could cut other shapes, or even punch a design for the sides.)

3. Stamp Dog Lover (Dreamerland Crafts) on watercolor paper in Nocturne ink using a Stamp Platform. I used half of a 5x7 sheet of hot press watercolor paper since I will be fussy cutting the image.


4. Watercolor image with M. Graham watercolors (or other brand). M. Graham watercolors are professional watercolors, wet easily, and are lightfast. I love using them. In case you missed the post intro, I am doing a watercolor series on my YouTube channel and hope, at some point, to feature the techniques I used to paint this image.

5. Fussy cut image with detail scissors. Hint: move the paper while cutting to make it easier to get into small places and turn corners. Use a black brush tip Copic Multiliner SP (the SP versions are refillable, a better value in the long run plus they don't just go in some landfill) to go around the image from the back side. This hides the white on the sides and gives it a polished look. Adhere to card as shown using dimensional/mounting tape.

6. Using a Stamp Platform, stamp Happy Birthday sentiment (Miscellaneous 02, Dreamerland Crafts) on black cardstock using VersaMark ink. Emboss with Adirondack Clay embossing powder (retired, try Ranger Brick). Trim to a strip and add tails on either end (I cut off the cardstock 1/2 inch from each side of the sentiment, then added tails). Adhere to card as shown using dimensional/mounting tape. Hint: use a black alcohol marker, such as a Sharpie, to go around edges of tape before sticking to image - this will hide any white that may show.

7. Optional: from white or ivory cardstock, die cut another panel from the Step-Ups set. Adhere to back of card for a place to write (you could also put one inside the card).


Supplies
Follow my blog with Bloglovin so you won't miss any of the doggie fun!