Monday, December 25, 2017

Embossed Wreath Christmas Card

Rubbernecker Stamps Ranger Embossed Wreath Card

Although this stamp set by Rubbernecker Stamps is a probably more often used for creating a garden scene, I thought it would be fun to make the stamped pieces into a wreath for a holiday card. Matching dies make it easy to create. I used red tinsel embossing powder for the flowers, which gives them a beautiful sparkly look (unfortunately the sparkle doesn't show up well in the photos but it's really pretty in person). The Liquid Platinum embossing under the edges of the red mat, perfectly matching the sentiment, is an elegant touch to this clean looking holiday card.

Affiliate links may be included in this post. I participate in the Amazon Services LLC Associates Program, an affiliate advertising program that provides a means for me to earn fees by linking to Amazon.com and affiliated sites at no cost to you. This helps offset a small portion of my crafting addiction... uh, hobby. See notice at bottom of blog for a longer description.

Making the Card

1. Cut white cardstock 5 x 8 1/2 inches; fold in half to form a 4 1/4 x 5 inch card base.

2. Cut white cardstock 4 x 4 3/4 inches. Rub VersaMark ink or other embossing ink along the edges so at least 1/8 inch is covered all the way around (you can do one side at a time if desired). Sprinkle with Liquid Platinum embossing powder; heat with heat tool. Adhere to card base.

3. Cut red cardstock* 3 3/8 x 4 5/8 inches. Rub powder tool over center area. Using VersaMark ink or other embossing ink, stamp Merry Christmas sentiment in center or just slightly higher than center. You may want to use a Stamp Platform or stamp positioner for this. Emboss with Liquid Platinum embossing powder. Use a strong liquid adhesive or super tacky tape adhesive to adhere to card base - the areas under the embossing will come up if the adhesive can't stick to it. I used Gem Tac around the edges but regular tape runner everywhere else. *Make sure the red cardstock matches the red tinsel embossing powder; see step 4.

Rubbernecker Stamps Ranger Embossed Holiday Wreath Card

4. Use a powder tool over the surface of a piece of white cardstock. Stamp several flowers (Create a Garden 2) in VersaMark ink or other embossing ink. Emboss with red tinsel embossing powder. I used the Recollections version in Ruby from Michaels but there are several other brands available. Choose your red cardstock to match whatever brand you purchased. Die cut with matching die (Pot Garden Die Set). Stamp several pine boughs in VersaMark ink or other embossing ink. Emboss with verdigris embossing powder (I used the Ranger brand). Die cut with matching die. Stamp a bunch of leaf branches in VersaMark ink or other embossing ink. Emboss with green embossing powder. I used Imagine Crafts Candy Green embossing powder (EB-000-009) but I also recommend Ranger's Green. Die cut with matching die.

5. Use a ball stylus and a molding pad to shape all leaves and pine boughs by rubbing the ball stylus over the leaves/needles (front side), curving them slightly upwards. Note: you could also use the end of a paint brush or die pick and a mouse pad. Arrange leaf branches around sentiment on card to get an idea of spacing. Adhere with liquid adhesive (I prefer Beacon Kids Choice Glue for this - it's thick and dries clear). See photo. Adhere the pine boughs as shown. Use ball stylus and molding pad to shape flowers by placing them face down on the pad and rubbing behind the petal areas. Flip and press ball stylus in center (if glitter gets on pad, just touch some tape to it to remove it). Use dimensional/mounting tape to adhere flowers as shown.

Rubbernecker Stamps Ranger Embossed Wreath Card

Supplies
Follow my blog with Bloglovin so you won't miss any of the Christmas wreath fun!


Sunday, December 17, 2017

Elegant Embossed Christmas Card

Rubbernecker Stamps Elegant Christmas Card with Embossing by Ranger

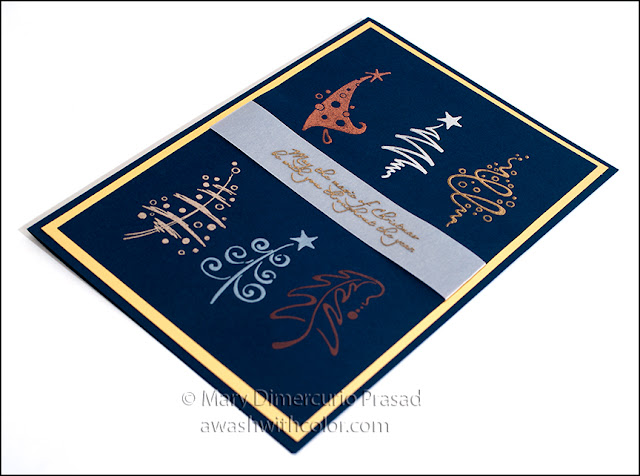
I have collected a lot of metallic embossing powders over the years. When I saw this Christmas Tree Set by Rubbernecker Stamps, I thought I would like to emboss the different trees in variety of metallics on dark cardstock. The touch of gold matting really finishes this elegant card.

Affiliate links may be included in this post. I participate in the Amazon Services LLC Associates Program, an affiliate advertising program that provides a means for me to earn fees by linking to Amazon.com and affiliated sites at no cost to you. This helps offset a small portion of my crafting addiction... uh, hobby. See notice at bottom of blog for a longer description.

Making the Card

1. Cut dark blue cardstock 7 x 10 inches; fold in half to form a 5 x 7 inch card base.

2. Cut gold metallic cardstock 4 3/4 x 6 3/4 inches. Adhere to card base.

3. Cut dark blue cardstock 4 1/2 x 6 1/2 inches. Use a powder tool over the surface. Place cardstock in corner of Stamp Platform then line up stamps in their approximate positions. Be sure to leave enough space in the middle for sentiment. Remove all but one stamp. Note: you could also use a stamp positioner or just eyeball it. Stamp using VersaMark ink or other embossing ink. Emboss in one of the metallic colors. Repeat the process one stamp at a time, using a different metallic embossing powder for each tree until all six have been embossed. You might want to keep in mind the order you would like the embossing colors to be on the final card. Some of my powders are old and no longer manufactured but I also used Ranger powders; I love the way they emboss. Under Supplies, I listed the Ranger powders I used plus recommended a few replacements for the ones no longer made.

4. Emboss sentient from Snowflakes and Stardust Set in gold on vellum. Trim to a strip that's about 5 inches wide. Fold edges around embossed blue cardstock where shown. Hint: add a little adhesive behind the areas where the vellum will go, stick one side in the adhesive then fold around, adhering behind the other side. Adhere to card base.

Rubbernecker Stamps Elegant Christmas Card with Embossing by Ranger

Supplies


Follow my blog with Bloglovin so you won't miss any of the embossing fun!

Thursday, December 14, 2017

Layered Ink Embossed Snowflake Holiday Card

Rubbernecker Stamps Christmas or Holiday Card with Distress Oxide Ink

I love the layered look of this snowflake background. It is pretty easy to achieve. The most difficult part of making this card is remembering where you stamped the embossing ink! I ended up putting the embossing powder across the entire top and let it fall over the whole surface to see where the snowflakes were (over a sheet of paper to catch the extra of course), then added more powder where necessary. Since I wanted the background to really stand out, I just added a simple greeting with a few snowflakes to finish the card.

Affiliate links may be included in this post. I participate in the Amazon Services LLC Associates Program, an affiliate advertising program that provides a means for me to earn fees by linking to Amazon.com and affiliated sites at no cost to you. This helps offset a small portion of my crafting addiction... uh, hobby. See notice at bottom of blog for a longer description.

Making the Card

1. Cut white cardstock 5 1/2 x 8 1/2 inches; fold in half to form a 4 1/4 x 5 1/2 inch card base.

2. Cut teal cardstock 4 x 5 1/4 inches. Adhere to card base.

3. Cut white cardstock 4 1/4 x 5 1/2 inches (larger than the final size for some wiggle room). Use a powder tool over the entire surface. Randomly stamp large snowflakes from Snowflakes and Stardust Set using VersaMark ink or other embossing ink. Use a heat tool to emboss with clear embossing powder.


4. Use an ink blending tool to very lightly apply Broken China Distress Oxide ink - don't worry about streaks or unevenness; they won't be noticeable when finished. See above photo - top left image. Wipe over surface with a paper towel. Distress Oxide inks take a long time to dry. You may want to use the heat tool to speed up the process (be careful not to remelt the embossing - keep the tool moving). Test it before going to the next step by sprinkling some embossing powder over the surface. If any sticks, it is not dry, brush off and dry again. Once dry, use a powder tool over the surface again.

Rubbernecker Stamps Christmas or Holiday Card with Distress Oxide Ink

5. Randomly stamp small snowflakes from Snowflakes and Stardust Set using VersaMark ink or other embossing ink. Emboss with clear embossing powder. Apply Broken China Distress Oxide ink with ink blending tool until completely and evenly covered. Wipe over surface with a paper towel. Once dry, trim to 3 3/4 x 5 inches. Adhere to card base.

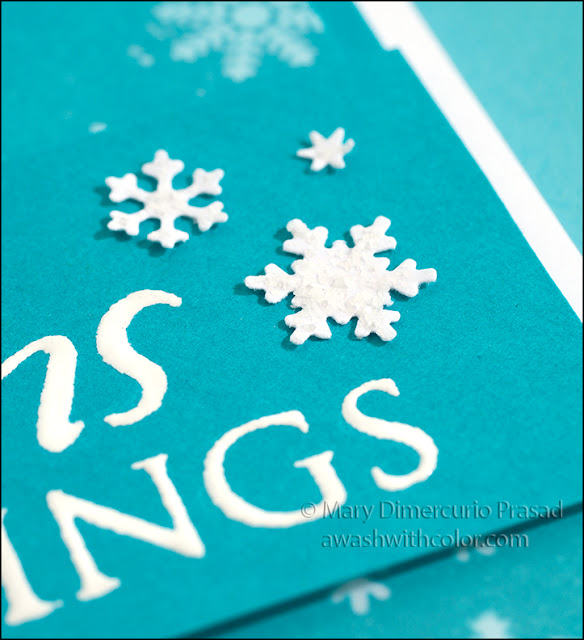
6. Stamp Seasons Greetings on teal cardstock, leaving enough space to cut a strip at least 5 1/4 inches wide with greeting near right side. Emboss with white. Note: there is no apostrophe on this stamp, although you may add one with a VersaMarker to emboss in white or by just using a white gel pen. Trim to 5 1/4 inches wide. Adhere to card using dimensional tape/mounting tape.

Snowflake with Rock CandyDistress Stickles Glitter

7. Use Aspen Flurry Punch All Over the Page on white cardstock to create snowflakes. I actually used the Punch Around the Page Snow Flurry punch but it is no longer manufactured, although you can still find it on eBay or other places online. Adhere snowflakes to sticky side of Post-it Tape. Apply Rock Candy Distress Stickles or Rock Candy Distress Stickles Glitter (I actually used Picket Fence Distress Stickles but it looks like it has been discontinued by Ranger). Let dry completely. Adhere where shown (I used tweezers to place each snowflake with a dab of glue).

Rubbernecker Stamps Christmas or Holiday Card with Distress Oxide Ink

Supplies


Follow my blog with Bloglovin so you won't miss any of the snowflake fun!

Wednesday, December 6, 2017

Friends Are Always There for You Watercolor Card

Dreamerland Crafts stamp, Lawn Fawn paper, Faber-Castell, Watercolor Card


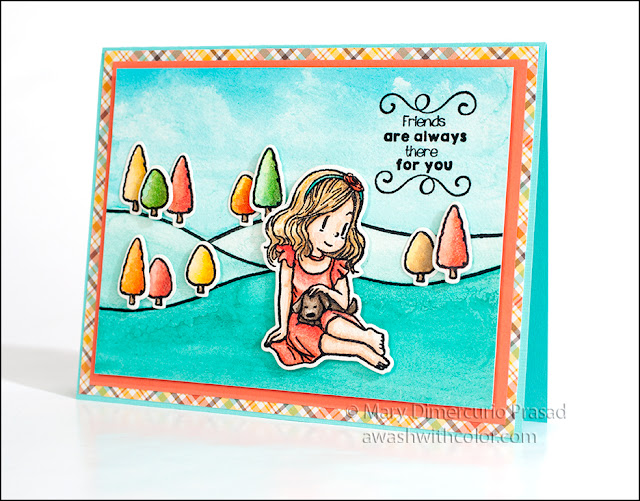
Some of the recent Dreamerland Crafts stamps now have matching dies! This set is perfect for Spring, Summer, and Fall - depending on how you color the trees. It also comes with a kitten, a piglet, and a step ladder. I just love the sweet expression on the girl's face as she's petting the puppy on her lap.

Affiliate links may be included in this post. I participate in the Amazon Services LLC Associates Program, an affiliate advertising program that provides a means for me to earn fees by linking to Amazon.com and affiliated sites at no cost to you. This helps offset a small portion of my crafting addiction... uh, hobby. See notice at bottom of blog for a longer description.

Making the Card

1. Cut sea foam cardstock 5 1/2 x 8 1/2 inches; fold in half to form a 4 1/4 x 5 1/2 inch card base.

2. Cut Lawn Fawn Perfectly Plaid Fall 6x6 patterned paper (diagonal multicolored) 4 1/8 x 5 3/8 inches. Adhere to card base.

3. Cut salmon cardstock 3 7/8 x 5 1/8 inches. Adhere to card base.

Prima Watercolor Confections and Faber-Castell Polychromes colored card

4. Cut watercolor paper 3 5/8 x 4 7/8 inches. Using a Stamp Platform or Stamp Positioner, stamp hills in waterproof black ink (I used VersaFine Onyx Black). Hint: where the lines meet, use a little Post-It tape to mask excess overlap. Watercolor sky in a color similar to the blue in the patterned paper. While wet, use a scrunched up paper towel to create clouds.  I added a little more green to color the grassy areas.

5. On another piece of watercolor paper, stamp the girl and about 10 trees (half tall, half short). Watercolor the trees in Fall colors. I used Prima Watercolor Confections. I colored the girl's dress to match the red-orange line in the patterned paper. Once dry, you may add shading with colored pencils (e.g. Faber-Castell Polychromos). I also use a Prismacolor blender pencil to smooth out the coloring. Die cut each of the pieces. Hint: use a small piece of Post-It tape to hold the dies in place as you cut.

6. Stamp sentiment where shown. Once dry, adhere trees and girl using dimensional tape behind the girl and behind some of the trees (the ones you want in front). I used Lineco glue in a Fineline applicator to adhere the trees that weren't going to be popped up; it's easier to use glue rather than tape due to the texture of the paper.

Prima Watercolor Confections and Faber-Castell Polychromes colored card

Supplies
Follow my blog with Bloglovin so you won't miss any of the watercolor fun!

Thursday, November 30, 2017

Snowflakes and Stardust Christmas Card

Embossed Snowflakes and Stardust Christmas Card with Distress Inks

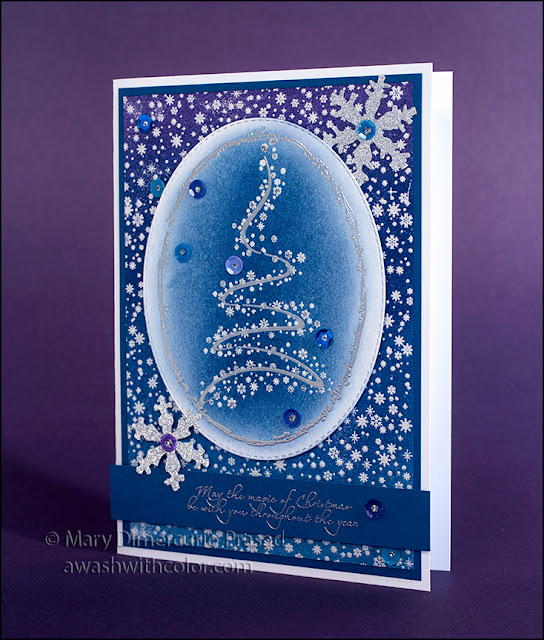
This card has some incredible sparkle and shine, unfortunately not all of it shows in the photographs - but it is really beautiful in person. The Rubbernecker Stamps Snowflake Panel background and Snowflakes and Stardust tree stamps coordinate perfectly for a snowy holiday or Christmas card. Tim Holtz, Idea-ology, and Sizzix products help add to the fun.

Affiliate links may be included in this post. I participate in the Amazon Services LLC Associates Program, an affiliate advertising program that provides a means for me to earn fees by linking to Amazon.com and affiliated sites at no cost to you. This helps offset a small portion of my crafting addiction... uh, hobby. See notice at bottom of blog for a longer description.

Making the Card

1. Cut white cardstock 7 x 10 inches; fold in half to form a 5 x 7 inch card base. Cut blue cardstock 4 3/4 x 6 3/4 inches. Adhere to card base.

2. Cut Canson Bristol XL paper about 5 x 7 inches. You could use regular cardstock but this paper makes blending easy. Use Stamp Platform or stamp positioner to stamp Snowflake Panel in VersaMark Ink or other embossing ink - you will cover the entire panel so you may want to stamp horizontally across the paper, embossing as you go. I recommend using a powder tool before stamping (although I forgot and some powder stuck where I didn't want it to - I didn't bother re-stamping, I figured it added to the snowy look... at least that's what I tell myself). Emboss with Silver Pearl embossing powder.

3. Once the paper has been completely embossed, use an ink blending tool to blend from bottom to top with the following Distress Inks: Stormy SkyFaded JeansChipped SapphireDusty Concord. Be sure to overlap each color as you go. I usually blend up the paper then back down. Trim to 4 1/2 x 6 1/2 inches; add matching ink to edges so they won't stand out. Use a slightly damp paper towel to wipe over embossing. Spray a couple coats of Frost Sheer Shimmer Spritz. Adhere to card base.

Rubbernecker Stamps Snowflakes and Stardust with Distress Inks

4. Cut Canson Bristol XL paper about 5 x 6 inches. Use Stamp Platform or stamp positioner to stamp Snowflakes and Stardust Set tree line (use the one that matches the snowflakes tree stamp) in VersaMark Ink or other embossing ink; emboss with Silver. Next stamp snowflakes tree and emboss with Silver Pearl. Finally stamp Distress Oval Frame and emboss with Silver.

5. Die cut around frame using largest oval from Nested Oval Small Stitch Die Cut Set. Use ink blending tool to blend Stormy Sky Distress Ink starting in center and fading out to edges (leave edges white). Blend Faded Jeans Distress Ink in center area to darken around tree, fading into Stormy Sky ink. Use a slightly damp paper towel to wipe over embossing. Spray with a couple coats of Frost Sheer Shimmer Spritz. Adhere to card base with dimensional/mounting tape where shown.

6. On blue cardstock, stamp sentiment and emboss with Silver. Trim to 5 inches wide, leaving a small amount above and below sentiment. Adhere where shown with dimensional/mounting tape.

7. Die cut Sizzix Mini Snowflakes from silver Deco Sheets (you will need to use the Sizzix Movers & Shapers Base Tray and two cutting pads). My favorite die cutting machine is the Sizzix Big Shot Pro because it is heavy duty and cuts the largest Sizzix Pro dies. If you don't need to cut Pro dies, the next model down is the Sizzix Big Shot Plus. The most economical is the Sizzix Big Shot. Adhere largest snowflake in upper right corner; Deco Sheets are adhesive backed so you just need to peel off the backing. On the smaller snowflake, peel adhesive backing away from area that will touch the sentiment and tree oval only. Add dimensional/mounting tape to other parts. Adhere where shown.

8. Adhere Blue Jeans and Lilac Doodlebug Design sequins where shown. I use Beacon Gem-Tac for gluing sequins. Apply Silver Stickles to centers of sequins as well as randomly along the tree snowflakes.

Snowflakes and Stardust Holiday/Christmas Card with Distress Inks

Supplies
Follow my blog with Bloglovin so you won't miss any of the flurry fun!


Sunday, November 19, 2017

Twas the Night Holiday Card

Rubbernecker Stamps A Visit from St. Nicholas Christmas Card

The background stamp for this card is the entire famous poem "A Visit from St. Nicholas" published anonymously in 1823. I embossed it in Liquid Platinum on red. The color is a beautiful warm silver - perfect for a holiday card. The double bow is dyed with Distress Inks, tied with twine, and fastened with a holiday brad.

Affiliate links may be included in this post. I participate in the Amazon Services LLC Associates Program, an affiliate advertising program that provides a means for me to earn fees by linking to Amazon.com and affiliated sites at no cost to you. This helps offset a small portion of my crafting addiction... uh, hobby. See notice at bottom of blog for a longer description.

Making the Card

1. Cut green cardstock 7 x 10 inches; fold in half to form a 5 x 7 inch card base. Cut Quartz Stardream cardstock 4 3/4 x 6 3/4 inches. Adhere to card base. Stardream cardstock has a subtle shimmer that looks really beautiful in person, but unfortunately doesn't photograph well.

2. Cut red cardstock about 5 x 7 inches (larger than the final for some wiggle room). Rub Powder Tool over surface. Use Stamp Platform or stamp positioner to stamp Twas the Night with VersaMark ink (or other embossing ink). Heat emboss with Liquid Platinum embossing powder. Trim to 4 1/2 x 5 5/8 inches, centering writing. Adhere to card base, centered.

A Visit from St. Nicholas Christmas Card with Distress Ink Bow

3. Trim a piece of vellum (thick if possible) about 3 1/2 x 3 1/2 inches. Rub Powder Tool over surface. Use Stamp Platform or stamp positioner to stamp Happy Holidays Circle with VersaMark ink (or other embossing ink). Heat emboss with Liquid Platinum embossing powder. Use a fairly small paint brush to paint gift and holly in green (Chromium Oxide Green Dark) and red. I used acrylic paints by Golden - I wanted the paint to be opaque so I could use adhesive behind it without it showing. At first I used C.P. Cadmium Red Dark but it didn't match well so I painted over with Naphthol Red Light. You may need two coats. Die cut with 4th largest (2.875 inch) Nested Circle Small Stitch Die. Adhere to card where shown using dimensional/mounting tape.

4. Cut off a length of seam binding, enough for a double bow and tails. Dye with a combination of green Distress Inks or Distress Stains (e.g. Pine Needles and Peeled Paint). Once dry, wrap around your fingers a couple times, leaving a tail on each side. Tie in the middle with a piece of red/white twine. Bend the tines of a holiday brad around the middle. Adhere where shown.

Rubbernecker Stamps A Visit from St. Nicholas Holiday Card

Supplies
*Used C.P. Cadmium Red Dark first but didn't match so painted over with Naphthol Red Light

Follow my blog with Bloglovin so you won't miss any of the holiday fun!