Thursday, January 25, 2018

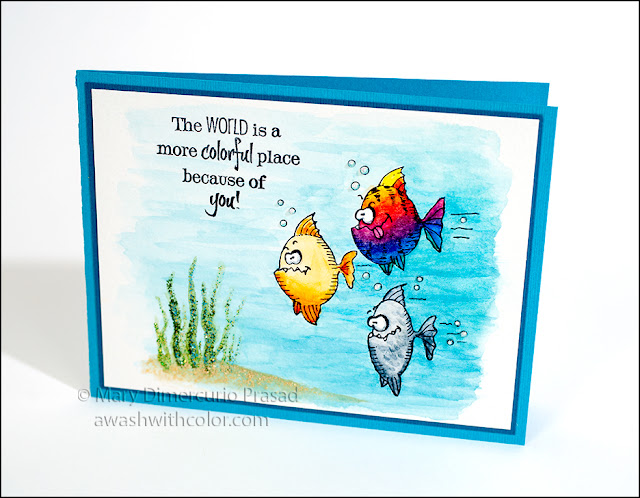
Colorful Place Fish Card Watercolored with Daniel Smith

Rubbernecker Stamps with Daniel Smith Watercolors and Stickles

These fish have the craziest expressions! The original stamp has a worm on a hook with a sign that says "help" but I decided to use a sentiment on the card that didn't really work well with the desperate worm, so I removed it. Watercolor is the perfect medium for coloring this card - the watery background is super easy to do by working in layers. Stickles and Clear Wink of Stella add beautiful sparkle to the card.

Affiliate links may be included in this post. I participate in the Amazon Services LLC Associates Program, an affiliate advertising program that provides a means for me to earn fees by linking to amazon.com and affiliated sites at no cost to you. This helps offset a small portion of my crafting addiction... uh, hobby. See notice at bottom of blog for a longer description.

Making the Card

1. Cut blue cardstock 4 1/4 x 11 inches; fold in half to form a side-folding 4 1/4 x 5 1/2 inch card base. Cut dark blue cardstock 4 x 5 1/4 inches. Adhere to card base.

2. Cut watercolor paper (Strathmore 400 Series) to 4 x 5 1/4 inches (you will trim off a small amount later, I usually make it a little larger for wiggle room when centering). Before inking, you may want to cover the worm on a hook area on the stamp with Post-it tape, or just be very careful when inking so as not to get any on that part of the stamp. Remove the Post-it tape before stamping. Use a Stamp Platform or stamp positioner to stamp fish in waterproof black ink (e.g. Archival Jet Black) on the watercolor piece you just cut. I recommend a positioner because the watercolor paper will probably have texture. I stamped my image a couple times. Stamp the sentiment where shown using the same ink.

Rubbernecker Stamps with Daniel Smith Watercolors and Stickles

3. Watercolor image. I used Daniel Smith Extra Fine watercolors. If you are interested in these watercolors, I highly recommend getting the dot chart. This allows you to try all the colors, getting an idea of which you might like best. The chart also includes transparency and lightfast ratings. Eventually I plan to do a review, so stay tuned! Also paint in the sandy sea bottom and some kelp (I did these fairly lightly since I'll add Stickles later).

4. My bubbles got a bit too much blue on them so I used a white gel pen to create highlights. I still wasn't happy so I tried using Nuvo Crystal Glaze on them. This is the first time I've used it. They dried 3 dimensional but they were dull, not shiny. I'm not sure if this was due to the gel pen or paint but I didn't like it so I added Crystal Stickles on top to give them sparkle and cover the dullness. I finally liked the way it turned out.

5. Add different colors of green Stickles to the Kelp. I used a small brush to apply them - the nozzles were too big for precision. I used: Patina, Lime Green, and Distress Stickles Forest Moss. For the sand I used Distress Stickles Scattered Straw. I don't believe they make Distress Stickles anymore, although you can still find them around. You could try substituting Sandstone, Platinum, or Mercury Glass Stickles for the Scattered Straw and Pine for Forest Moss.

6. Optional: add Clear Wink of Stella Brush to the rainbow fish.

7. Adhere image to card base.

Rubbernecker Stamps with Daniel Smith Extra Fine Watercolors

Supplies
Follow my blog with Bloglovin so you won't miss any of the colorful fish fun!

Friday, January 19, 2018

Valentine's Day Karen Burniston Tag Book Doodlebug Card


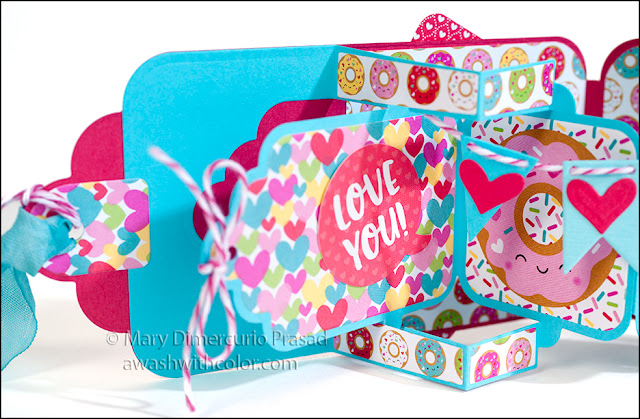
Karen Burniston Pop-up Card with Doodlebug Design Papers

I have been anxious to use the Tag Book Pop-up die set since I got it! It makes an amazing card - and can even be used to make a mini album. Although it might seem a little intimidating, it is actually quite straightforward to assemble (and a lot easier than it looks, especially with Karen's assembly video). The decorator dies that Karen put in the set make decorating a breeze.

The Doodlebug Design Cream & Sugar papers are delightful. Even the small donuts have smiling faces - so cute and colorful.

Affiliate links may be included in this post. I participate in the Amazon Services LLC Associates Program, an affiliate advertising program that provides a means for me to earn fees by linking to amazon.com and affiliated sites at no cost to you. This helps offset a small portion of my crafting addiction... uh, hobby. See notice at bottom of blog for a longer description.

Karen Burniston Pop-up Card with Doodlebug Design Papers

Making the Card

1. Using the red cardstock for the exterior tags and blue for the interior, assemble the Tag Book Pop-up according to the instructions in the video below. I cut the arm enforcement pieces using the donut patterned paper in the Cream & Sugar 6x6 Paper Pad.


2. To decorate the inside tags, use the tag die (Tag Book Pop-up) to cut one from the colorful heart paper (Cream & Sugar 6x6 Paper Pad) and one from the page with the teacups (Cream & Sugar 6x6 Paper Pad). Be careful when lining up, you may want to use Post-it tape to hold the die in place while running it through the machine. Note: there will be a small amount of pink along the bottom edge from the image below the teacups. Adhere as shown. Add the "Love You!" sticker (Cream & Sugar 12x12 Paper Pack) where shown.

Karen Burniston in Cahoots with Riley and Company Pop-up Dies

3. Use the square die with rounded corners (Tag Book Pop-up) to cut out the donut and milk & cookie (Cream & Sugar 6x6 Paper Pad). Adhere where shown. Die cut two of the large tag reinforcers from colorful heart paper (Cream & Sugar 6x6 Paper Pad); adhere to each large tag inside card (i.e. the card covers inside).

Karen Burniston in Cahoots with Riley and Company Pop-up Dies

4. Cut 2 pieces of the donut patterned paper (Cream & Sugar 6x6 Paper Pad) to 2 7/8 x 2 7/8 inches. Use 1/2 inch corner rounder on the right side of one (this will go on the left side inside) and on the left (this will go on the right side inside). Adhere inside, lining up wth rounded edges.

5. Cut a piece from the smiling food patterned paper (Cream & Sugar 6x6 Paper Pad) to 2 7/8 x 4 7/8 inches. Use 1/2 inch corner rounder on all corners. Adhere to front of card. Trim mini notebook page (Cream & Sugar 6x6 Paper Pad) and use 1/4 inch corner rounder to round corners. Die cut paperclip (Tag Book Pop-Up) from blue cardstock. Adhere to note paper as shown. Adhere to front of card.

6. Die cut a large tag reinforcer from pink gingham (Gingham-Linen Rainbow Petite Prints 6x6 Pad); adhere to outside tag as shown. Die cut two of each type of banner (Twist Panel Pop-up) from both blue and light blue cardstock. Die cut five hearts (Tag Book Pop-up) from red cardstock. Adhere one heart to each banner and one to the front pink gingham tag reinforcer. Cut about 6 or 7 inches of dark pink/light pink/white twine; string banners along twine. Glue ends of twine behind upper arms (in front of cutout area, but not in it) - one on each side - so that the banner will droop a little when card is opened all the way. Once dry, trim any extra.

Karen Burniston Tag Book Pop-up Card with Doodle Bug Design


7. Cut two pieces of 8 inch twine; loop through front and back tag holes (I fold the twine in half, push the fold through the hole then stick the two ends through and gently tighten). Cut two pieces of 7 inch twine; tie bows on inside tag holes.

8. Cut a piece of white seam binding about 15 inches long. Use Broken China Distress Ink and Distress Oxide Ink, along with water, to color the seam binding. Let dry (I don't use a heat tool for this since it sometimes fades the color). Cut in half and loop one piece through the front and one piece through the back tag holes.

9. Finally place cover stickers from the Cream & Sugar 12x12 Paper Pack. (I used a craft knife to cut out the middle of the donut). Use dimensional tape to adhere donut where shown. Use double dimensional tape to adhere "hugs & kisses" where shown.

Karen Burniston Tag Book Pop-up Card with Doodle Bug Design

Supplies
Follow my blog with Bloglovin so you won't miss any of the Valentine's Day fun!

Thursday, January 11, 2018

Let's Just See Arteza Colored Greeting Card

Rubbernecker Stamps Bear with Arteza Expert colored pencils

The Rubbernecker Stamps I used for this card really amuse me. I love the bear's expression - it could be used with a number of funny sentiments. This particular sentiment cracked me up - as those who know me can attest, I don't often hold back.

I decided to use a dark brown ink (Memento Espresso Truffle) rather than black so it wouldn't look so stark against all the browns in the card. I colored the image with the 72 set of Arteza Expert colored pencils. They are waxed based pencils, like Prismacolors. This is the first time I used them and I think I like them as much as my Prismacolors, possibly more. The only drawback is that there aren't as many colors. The good news is, they will likely work well together! Something to try in the future.

Affiliate links may be included in this post. I participate in the Amazon Services LLC Associates Program, an affiliate advertising program that provides a means for me to earn fees by linking to amazon.com and affiliated sites at no cost to you. This helps offset a small portion of my crafting addiction... uh, hobby. See notice at bottom of blog for a longer description.

Making the Card

1. Note: I used two versions of the Neenah Environment Desert Storm cardstock: 80lb cover for the colored image and double thick cover 120lb for the card base itself (they also have a 100lb cover version, which may have replaced the 120lb since I don't see 8 1/2 x 11 inch listed on Neenah Paper's website anymore). Cut (120lb) Desert Storm cardstock to 7x10 inches; fold in half to form a 5x7 inch card base. Cut dark brown cardstock 4 1/2 x 6 1/2 inches; adhere to center of card base. Cut light blue cardstock 4 1/8 x 6 1/8 inches; adhere to card base as shown.

2. Cut (80lb) Desert Storm cardstock to 4x5 inches. Use a Stamp Platform or stamp positioner to stamp Distress Oval Frame with Memento Espresso Truffle in center. Inside the oval, stamp Bear with Espresso Truffle. Color with colored pencils. I used Arteza Expert set of 72 colored pencils. For this image, I mainly used browns and golds, plus white under the lighter areas and as highlights. To get lighter shades of browns, I combined colors by putting the browns over white or light gold, or just used less pressure. I drew the ground line and pebbles in a very fine tipped black 0.05 Copic Multiliner (which is also waterproof and alcohol marker friendly) and went over some of the lines of the image that became slightly faded from the colored pencils.

Rubbernecker Stamps Bear with Arteza Expert colored pencils

3. Die cut image using largest Nested Oval Small Stitch die. Adhere to card where shown using dimensional/mounting tape. Stamp sentiment on Neenah Environment Desert Storm cardstock. Trim, leaving room for tails on right side. Add tails by cutting a V into the right side (I usually put a pencil dot in the middle to mark the point I want to cut to). Cut a piece of dark brown cardstock so it will be about 1/8 inch larger all around (this time I cut a strip that was longer than I needed and 1/4 inch wider than the sentiment cardstock, although sometimes I just eyeball it by marking with a pencil where I want to cut). Adhere to card base with a double thickness of dimensional/mounting tape (be careful not to put any where it will overlap with the image's oval).

4. For the flowers, I used pre-made ones from a couple sources. I colored three of them myself but the other two (the two that look most alike, top and 2nd from bottom) came pre-colored; I bought those at Michaels (one package of blue flowers in different shades of the same hue) in their "dollar" area. The 2nd flower is also from Michels, from their Recollections collection. The others are by Petaloo. I like to buy Petaloo's white or natural colored flowers so I can add my own color to match my cards. I colored the 2nd flower using ColourArte's Silks in Mediterranean Blue. Silks are acrylic paints with a beautiful shimmer, which unfortunately doesn't show up well in photos. Typically I spray the petals with a little water then apply Silks, watered down to the desired intensity. In this case, I gave the middle more concentrated color and the outer petals a bit less. I did the same thing with the largest rose (middle) but using Silks in Chestnut Brown and adding a lot more water as I worked outwards from the middle. I also colored the bottom one with the Chestnut Brown. Note: the new Silks come in cool little bottles (rather than small round plastic screw-top containers - which didn't seem to seal well). I recommend the sample packs. The colors are all gorgeous. ColorArte also makes Twinkling H2Os - watercolors with shimmer. For even more shimmer, I added Sparkle Sheer Shimmer Spritz to some of the flowers.

Rubbernecker Stamps Bear with Arteza Expert colored pencils

Supplies
Follow my blog with Bloglovin so you won't miss any of the holiday fun!