Monday, November 28, 2016

Winter Bouquet Flourishes and Imagine Crafts Blog Hop


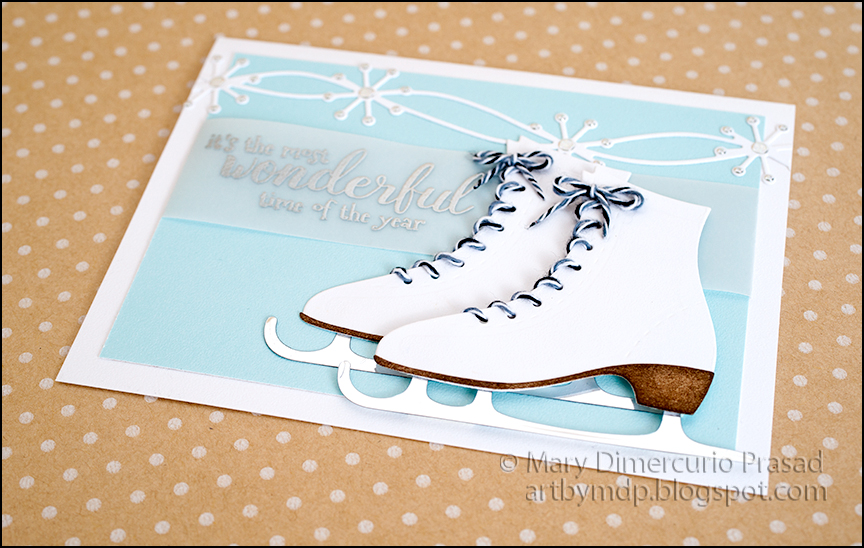
This card has a lot of sparkle - perfect for the holidays. The stamps are by Flourishes, l.c. The sparkle comes from Imagine Crafts, as part of a blog hop! The card is simple to make but looks very elegant.

Be sure to leave a comment in order to win prizes!

Imagine Blog
Barbara Thompson
Toni Storie
Alison Heikkila
Beverly Cole
Kren Kurts
Neva Cole
Roni Johnson
Linda Lucas
Davi Long
Jennifer Vanderbeek
Naomi Gong
Vickie Yeakley
Nadine Carlier
Rebecca Ednie
Gloria Hayoung Lee
Mark Melnick
Shirley Qu
Martha Lucia Gomez
Terre Fry
Mary Prasad <- You are here!
Trisha Traxler
Monica Edwards
Flourishes L.C

Making the Card

1. Cut red cardstock to 5 1/2 x 8 1/2; inches. Fold in half to form a 4 1/4 x 5 1/2 inch card base.

2. Stamp large bouquet and tag with "Winter Cheer" greeting on white cardstock with StazOn Jet Black ink. Color bouquet with Memento Markers, going from dark to light, overlapping colors to shade and blend. Cut around bouquet and tag with detail scissors. Go around outside edges from the back side with Tuxedo Black Memento Marker (this hides the white edges and gives it a finished look). Spray bouquet with Sparkle Sheer Shimmer Spritz. Spray tag with Gold Sheer Shimmer Spritz.

3. Cut about a 6 inch long piece of seam binding. Spray with Gold Sheer Shimmer Spritz.

4. Cut black cardstock 3 3/4 x 5 inches. Spray with Gold irRESISTible Texture Spray. Once dry, spray Gold Sheer Shimmer Spritz over the entire piece. Wrap gold sprayed seam binding around middle where shown, adhering on backside. Adhere to card base.

5. Die cut 3rd smallest Dotted Scallop Oval from white cardstock. Spray with Gold Sheer Shimmer Spritz. Add dots of Gold irRESISTible Pico Embellisher to outside scallops. Let dry. Adhere to center of card.

6. Adhere bouquet with dimensional tape as shown. Adhere tag where shown.


Supplies
  • Memento Markers: Lady Bug, Love Letter, Rhubarb Stalk, Dandelion, New Sprout, Pear Tart, Bamboo Leaves, Cottage Ivy, Tuxedo Black
  • StazOn Ink: Jet Black
  • irRESISTible Texture Spray: Gold, Sparkle
  • irRESISTible Pico Embellisher: Gold
  • Sheer Shimmer Spritz: Gold
  • Flourishes Stamps: Winter Bouquet SSBCA024
  • Elizabeth Craft Designs 1173 Dotted Scallop Ovals
  • Cardstock: White, Black, Red
  • Seam Binding: White
  • Dimensional Tape
Follow my blog with Bloglovin so you won't miss any of the flourish fun!
Affiliates links may be included in this post. See Notice at bottom of blog.

Saturday, November 26, 2016

Embossing and Coloring Sheet Metal with StazOn


Making the Charm

1. Cut dark blue cardstock to 5 1/2 x 8 1/2 inches; fold in half for a 4 1/4 x 5 1/2 inch card base.

2. Cut alcohol marker friendly cardstock 3 3/4 x 5 inches.

3. Follow the instructions for your die cutting machine to make the proper sandwich for Sizzlit sized dies. Emboss the 1 inch SHEET Metal. The good side will face up (not toward the die) since you want to color the raised side.


4. Watch the following video to color the embossed metal and card panel:


5. Adhere panel to card base. Tie ribbon in bow. Open small jump ring, put charm on it then close it. Open medium jump ring and add half the beads, the charm jump ring, then the other half of the beads. Thread through bow center; close jump ring.


Supplies
  • SHEET Metal: Assorted Pack (1 Inch Circle)
  • StazOn Inks: Mustard, Ultramarine, Jet Black
  • GlazOn: Clear
  • Ink Blushers
  • Fantastix
  • 657803 Sizzix DecoEtch Die - Fairy Twilight by Vintaj
  • Stamp Set: Sending Holiday Cheer - Hero Arts CL464
  • Wink of Stella
  • Alcohol Markers (e.g. Copics)
  • Cardstock: Alcohol Marker Friendly (X-Press It Blending Card), Dark Blue
  • Ribbon: Red
  • Silver Jump Rings: Medium, Small
  • Optional: Colored Glass Beads (Red, Orange, Yellow, Green, Blue, Purple)
Follow my blog with Bloglovin so you won't miss any of the charm-ing fun!
Affiliates links may be included in this post. See Notice at bottom of blog.

Friday, November 25, 2016

Holiday Pop-up Sled Card


Here's a fun holiday card for those who remember flying down hills on one of these vintage sleds. I added mountains in the background of the card; as a kid, a big hill seemed like a mountain, especially when trudging back up dragging the sled behind. Using Through the Lens papers makes creating cards easier since no extra coloring is required!


Making the Card

1. Cut Bluebell Soft Finish Cardstock to 6 1/2 x 9 1/2 inches; fold in half. Stencil clouds at top using Titanium White and Neutral Gray Pan Pastel (or other white and gray chalk or ink).

2. Using the mountain tops (Skis), find two pieces of the Stone paper shown: die cut one from the front and one from the back of the paper (you want one opposite the other so the sides will line up in the card) - put the die as closely as possible to the top of the paper; trim excess. Add white acrylic paint to tops of "mountains." Note: I tried using Distress Paint but it didn't work well, kind of disappeared as it dried, so I used straight acrylic paint that I applied with a craft stick. Let dry. The paper may curl slightly; don't worry about it, it will just add a little more dimension.

3. Cut red dotted patterned cardstock 7 x 10 inches. Fold in half. This will be the card base.


4. From Wood paper (red), die cut sled pieces. Assemble. Cut off about 8 inches of twine. String one side of twin upwards through hole in sled piece as shown. Tie a small knot at the end. Repeat on other side.

5. Die cut pop-up piece (Twist Circle Pop-up) - the long "arm" - from Bluebell Soft Finish Cardstock. Optional: trim along one side so it is a bit smaller.

6. Adhere mountains on folded Bluebell Soft Finish Cardstock card as shown. Die cut and assemble pop-up as shown in video below - don't add circle though (due to thickness, I recommend running through machine several times). Remember to adhere to (red dot side of) card base as shown in video.


7. Once the arm is in place, add sled at an angle across it: be sure to check that it will not show outside card before glueing down. Also check that it will close properly (it may need some encouragement at first). Die cut white cardstock using smallest stamp rectangle. Stamp sentiment in black ink. Adhere to sled as shown.

8. Cut chalk sentiments patterned cardstock 4 7/8 x 6 7/8 inches (you could optionally leave extra white space if you like by cutting 4 3/4 x 6 3/4 inches). Adhere to front of card. Die cut white and red cardstock using Postage Stamp Rectangles, smallest and next smallest respectively. Die cut letters in various shades of green and red as shown (Alphabet 1 Caps, Alphabet 2 Lower Case) to form the word "Snow"; adhere to white cardstock stamp rectangle. Adhere to red stamp rectangle using dimensional tape. Adhere to front of card where shown.

9. Die cut pine boughs from green cardstock as shown. Rub over them with stylus on pad to give them some dimension. Adhere under top left corner of white stamp rectangle. Die cut holly leaves and berries in colors shown. Shape leaves by rubbing on back with stylus then, on front sides, drawing lines down middle and adding veins with pointed tool. Use small stylus to rub around back of berries to give them a cup like shape. Adhere all to card as shown. Note: I used Kids Choice Glue - it works really with with these small items.


Supplies

ECD Supplies
Other Supplies
  • Patterned Cardstock: Recollections - Naughty or Nice (Red Dots), Pebbles - Home for Christmas (Chalkboard Sentiments)
  • Cardstock: White, Green, Dark Green, Light Green, Red
  • Twine: Cream (or other light color)
  • Black Ink (e.g. VersaFine Onyx Black)
  • Dimensional Tape
Follow my blog with Bloglovin so you won't miss any of the sledding fun!
Affiliates links may be included in this post. See Notice at bottom of blog.

Tuesday, November 15, 2016

Layered Stamping with Memento Inks, Fall Card


Layering stamps is really popular. To create these cards, I used Memento Dew Drop inks for layering the samping since they come in a huge variety of colors. Their small size makes them easy to store. If you don't have as many ink colors, an alternative is to use embossing for the top layer instead.


Making the Cards

1. Cut light yellow cardstock 4 1/4 x 5 1/2 inches (the final size will be 4 x 5 1/4 inches - I like to have a little extra space then trim later).

2. Watch the video below for stamping and embossing:


3. Cut red and brown cardstock 5 1/2 x 8 1/2 inches; fold each in half to form two card bases 4 1/4 x 5 1/2 inches. Adhere card fronts as shown.


Supplies
  • Memento Dew Drop Inks: Rich Cocoa, Toffee Crunch, Peanut Brittle, Cantaloupe, Dandelion, Tangelo, Morocco, Potter's Clay, Pear Tart, Bamboo Leaves, Olive Grove, Lady Bug, Rhubarb Stalk
  • Embossing Powder: Gold
  • VersaMark Ink
  • VersaMarker
  • VersaFine Ink: Onyx Black
  • Cardstock: Light Yellow, Red, Brown
  • Stamps: Hero Arts Color Layering Grateful Leaves CL987
  • Dies: Hero Arts Color Layering Leaves Frame Cuts DI315
  • Optional: Stamp Press (e.g. We R Precision Press)

Follow my blog with Bloglovin so you won't miss any of the colorful Fall fun!
Affiliates links may be included in this post. See Notice at bottom of blog.

Friday, November 11, 2016

Holiday Card with Ice Skates


When I was a kid, I used to love to ice skate all winter long. This card reminds me of the glide, glide, and sway - of spins and jumps, and skating through the quiet snow. It was a magical and wonderful time of year (but I'm glad to now live in North Carolina!).

Making the Card

1. Cut 85 lb Soft Finish Cardstock to 5 1/2 x 8 1/2 inches; fold in half for a 4 1/4 x 5 1/2 inch card base. Cut Soft Sky Soft Finish Cardstock 3 3/4 x 5 inches. Cut vellum 1 1/4 x 6 inches.

2. Silver emboss sentiment on vellum starting about 1/2 inch from left edge. Wrap around Soft Sky piece from step 1, starting about 1 inch from top, adhering on back using clear double sided adhesive. Adhere to front of card.

3. From 85 lb Soft Finish Cardstock, die cut two of all pieces of skates except blades. Die cut blades from Siver Metallic Shimmer Sheetz.


4. "Lace" skates with twine. Hint: put a small piece of clear double sided adhesive behind the top and bottom lace and stick the ends in them. Tie two small bows. To make a bow, I used tweezers that only open when squeezed, like the ones that come in Susan's Garden Tool Set, to help hold the single loop while I tied around it.

5. Apply Walnut Stain Distress Ink to sole/heel pieces of skates with ink blending tool. Adhere to bottom of skates with glue (e.g. Kids Choice Glue). Adhere blades to skates using clear double sided adhesive on back of skates.

6. Die cut snowflake boarder from 85 lb Soft Finish Cardstock. Add Transparent/Silver Glitter Dots as shown (you don't have to add them to where the skates cover or the parts that will get cut off). Adhere to top of card as shown. Trim off excess.

7. Glue bottom skate to card where shown. Glue on bow. Adhere top skate using dimensional tape as shown. Glue on bow.


Supplies

ECD Supplies
Other Supplies
  • Distress Ink: Walnut Stain
  • Ink Blending Tool
  • Twine: Black/Gray/White
  • Vellum
  • Silver Embossing Powder (e.g. Ranger Silver
  • Embossing Ink (e.g. VersaMark)
  • Dimensional Tape
Follow my blog with Bloglovin so you won't miss any of the ice skating fun!
Affiliates links may be included in this post. See Notice at bottom of blog.