Showing posts with label Irresistible Pico Embellisher. Show all posts

Friday, March 10, 2017

Hedgehog Love Card


Here's a cute card that is perfect for Valentine's day or to tell someone you love them. It was created with Frantic Stamper dies and colored with Copic markers. The background can be varied in pattern by using different colors if desired.

Making the Card

1. Cut red cardstock 4 1/4 x 11 inches. Fold in half to form a 4 1/4 x 5 1/5 inch top folding card base.

2. Cut 3 hearts and the word "Lovely" from red cardstock. Trim ends of "Lovely" to just "Love". Optional: coat each with clear Wink of Stella or other clear glitter pen. Add Glossy Accents to all and set aside to dry.

3. Follow these instructions carefully. Cut a piece of clear double sided adhesive just a hair smaller than the size of the die. Die cut pink cardstock but leave the pieces in the die. You may need to use a metal cutting plate due to the detail. Remove one backing sheet on adhesive. Carefully line up and stick to die cut pieces. Be sure to rub all over, especially on the small triangles at the edges. You may even want to use your die pick to gently push the smaller pieces into the adhesive. Now remove the die cuts as one piece. You may have to replace a few stubborn pieces by hand. Stick to center of card front. Note: you could cut the clear double sided adhesive larger, then trim down after the pieces are in place.


4. Add double sided adhesive to a piece of white cardstock just larger than the die. Die cut from cardstock side (so adhesive will be on the back). Remove white frame from die and carefully adhere over pink frame on card. Hint: I exposed the top part of the adhesive, cutting off the backing sheet just at the top, lined up the bottom and stuck the top down; then I removed the rest of the backing. This made it easier for me to line it all up.

5. Die cut two copies of baby hedgehogs from alcohol marker friendly cardstock. On one copy of each, cut off the hair and discard the rest. These will be layered on top; color these with hair colors. On the full copies, color the hair parts in a mid or dark matching hair color so they won't be so noticeable under the top layer. Note: the list of Copic colors I used is below the supplies. Color the bodies. I used darker colors to fill in eyes and nose on each (lighter on the girl). To give them some dimension and shine, I used Tuxedo Black Pico Embellisher on the boy's eyes and nose and Desert Sand on the girl's (it is rather transparent so be sure to color with brown first).

6. Adhere hair to each hedgehog using dimensional tape. Adhere hedgehogs to card front as shown using dimensional tape. Adhere hearts and "Love" where shown.


Supplies
  • Frantic Stamper Dies: Argyle Card Panel (FRA-DIE-10104), Mom and Baby Hedgehogs (FRA-DIE-10146), Lovely & Gorgeous (FRA-DIE-10124)
  • Cardstock: Red, Pink, White
  • Clear Double Sided Adhesive
  • Optional: Wink of Stella (Clear)
  • Glossy Accents
  • Alcohol Marker Friendly Cardstock
  • Alcohol Markers (e.g. Copic)
  • Irresistible Pico Embellisher: Tuxedo Black, Desert Sand
  • Dimensional Tape
Copic Markers Used: W10, E47, E44, E43, E42, E41, E01, E02

Follow my blog with Bloglovin so you won't miss any of the hedgehog fun!
Affiliates links may be included in this post. See Notice at bottom of blog.

Thursday, January 26, 2017

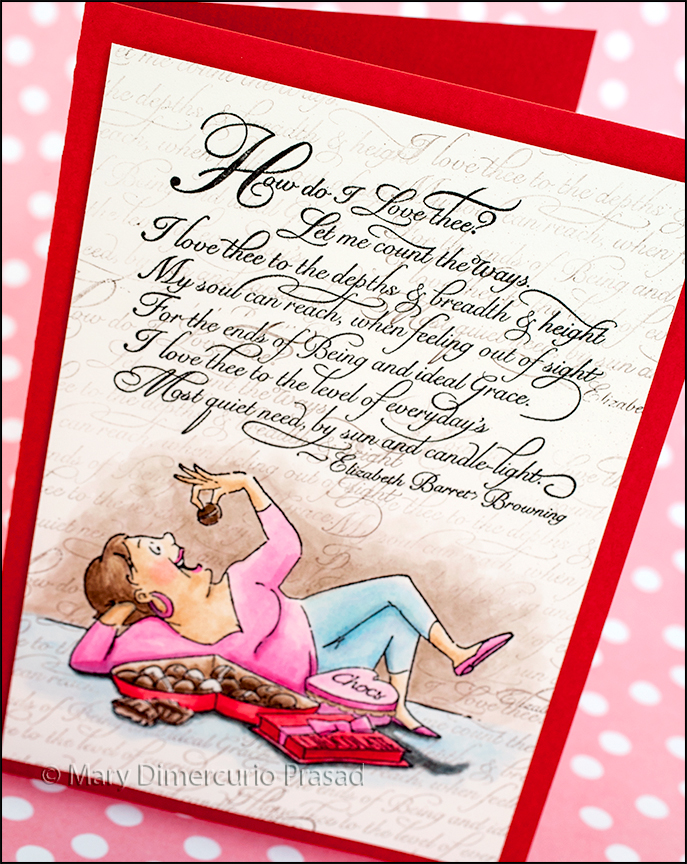
Poetry: Elizabeth Barrett Browning and Chocolate Card


Sorry it has been a while since my last post! I have been working on a new design team - Frantic Stamper! The new dies don't release until next month (February 2017) so even though I've been creating and writing up posts, I can't publish until then! For now, here is a post that I did last year to go with my first video as part of the Imagine Crafts Artist in Residence program. There was a bit of a snafu with getting the video posted on their blog and a change in leadership so this never got released.

The theme for the challenge was Poetry. I had an Elizabeth Barrett Browning poem stamp for the longest time, usually using it as a background for Valentine's Day cards. This one has a little twist - the whimsical lady enjoying boxes of chocolates! You can just imagine her reciting the poem in her head as she eats her chocolates one by one.

Making the Card

Watch the tutorial below for a step-by-step on making the card:


I love how fun this image is, giving a whole new meaning to the poem. I don't know about you, but chocolate has this effect on me.


Unfortunately the Pico Embellisher doesn't show up well in the photos. The chocolates and her earring have a slight 3D feel to them plus a glossy shine and slight shimmer - looks so cool in person!


Supplies

Imagine Crafts Supplies
Other Supplies
  • Masking Material
  • Watercolor Paper (e.g. Arches Hot Press)
  • Stamps: Elizabeth Barrett Browning "How Do I Love Thee", Art Impressions: Love and Chocolate Set
  • Cardstock: Red
  • Brush, Water, Paper Towel
  • Dimensional Tape
Follow my blog with Bloglovin so you won't miss any of the poetic fun!
Affiliates links may be included in this post. See Notice at bottom of page.

Monday, December 26, 2016

Repurposed Box for a Masculine Gift


I tend to keep containers, notepads, and other objects in hopes that I might make something with sometime in the future. In this case, I had a box that came from a grab bag at a craft store. It was a red lacquer-type box with "hello" written in white on the top - not very exciting. The techniques here can be adopted for use in other ways, such as on a cover for a notepad or in multi-media artwork. Creative Medium, by Imagine Crafts, can be used on all types of surfaces - it adheres well and provides enough tooth for easy integration with other mediums. In this case I'm using black gesso as a base. The iridescent and metallic layers look best over black.


Making the Box

1. If the wood finish is shiny or smooth, it's a good idea to sand first. These techniques may be used over paper mâché or even plastic.


2. Watch the video below:


Notes: there are several choices for Creative Medium, different metallics as well as iridescent colors. There are also other choices for Delicata and Brilliance - making for seemingly endless combinations.


Supplies
  • Creative Medium: Clear, Iridescent Green, Metallic Bronze
  • Delicata Ink: Golden Glitz
  • Brilliance Ink: Gamma Green
  • irRESISTible Pico Embellisher: Bronze
  • Sheer Shimmer Spritz: Gold
  • Ink Blushers
  • Multi-Purpose Squeegee and/or Palette Knives
  • Box
  • Acrylic Paint Brush
  • Gears Stencil (e.g. Dreamweaver)
  • Black Gesso (e.g. Liquitex)
  • Felt: Black, Red
  • Optional: Soap Pen
  • Recommended: Craft Mat

Follow my blog with Bloglovin so you won't miss any of the upcycling fun!
Affiliates links may be included in this post. See Notice at bottom of blog.
Monday, November 28, 2016

Winter Bouquet Flourishes and Imagine Crafts Blog Hop


This card has a lot of sparkle - perfect for the holidays. The stamps are by Flourishes, l.c. The sparkle comes from Imagine Crafts, as part of a blog hop! The card is simple to make but looks very elegant.

Be sure to leave a comment in order to win prizes!

Imagine Blog
Barbara Thompson
Toni Storie
Alison Heikkila
Beverly Cole
Kren Kurts
Neva Cole
Roni Johnson
Linda Lucas
Davi Long
Jennifer Vanderbeek
Naomi Gong
Vickie Yeakley
Nadine Carlier
Rebecca Ednie
Gloria Hayoung Lee
Mark Melnick
Shirley Qu
Martha Lucia Gomez
Terre Fry
Mary Prasad <- You are here!
Trisha Traxler
Monica Edwards
Flourishes L.C

Making the Card

1. Cut red cardstock to 5 1/2 x 8 1/2; inches. Fold in half to form a 4 1/4 x 5 1/2 inch card base.

2. Stamp large bouquet and tag with "Winter Cheer" greeting on white cardstock with StazOn Jet Black ink. Color bouquet with Memento Markers, going from dark to light, overlapping colors to shade and blend. Cut around bouquet and tag with detail scissors. Go around outside edges from the back side with Tuxedo Black Memento Marker (this hides the white edges and gives it a finished look). Spray bouquet with Sparkle Sheer Shimmer Spritz. Spray tag with Gold Sheer Shimmer Spritz.

3. Cut about a 6 inch long piece of seam binding. Spray with Gold Sheer Shimmer Spritz.

4. Cut black cardstock 3 3/4 x 5 inches. Spray with Gold irRESISTible Texture Spray. Once dry, spray Gold Sheer Shimmer Spritz over the entire piece. Wrap gold sprayed seam binding around middle where shown, adhering on backside. Adhere to card base.

5. Die cut 3rd smallest Dotted Scallop Oval from white cardstock. Spray with Gold Sheer Shimmer Spritz. Add dots of Gold irRESISTible Pico Embellisher to outside scallops. Let dry. Adhere to center of card.

6. Adhere bouquet with dimensional tape as shown. Adhere tag where shown.


Supplies
  • Memento Markers: Lady Bug, Love Letter, Rhubarb Stalk, Dandelion, New Sprout, Pear Tart, Bamboo Leaves, Cottage Ivy, Tuxedo Black
  • StazOn Ink: Jet Black
  • irRESISTible Texture Spray: Gold, Sparkle
  • irRESISTible Pico Embellisher: Gold
  • Sheer Shimmer Spritz: Gold
  • Flourishes Stamps: Winter Bouquet SSBCA024
  • Elizabeth Craft Designs 1173 Dotted Scallop Ovals
  • Cardstock: White, Black, Red
  • Seam Binding: White
  • Dimensional Tape
Follow my blog with Bloglovin so you won't miss any of the flourish fun!
Affiliates links may be included in this post. See Notice at bottom of blog.

Thursday, August 18, 2016

Elegant Black and White Wedding or Anniversary Card


This elegant card can be used for a wedding or anniversary. I used VersaFine ink to capture the details on the stamp - it stamps crisp and clear. I used my Xyron Creative Station to put permanent adhesive on the delicate die cuts for easy adhesion. The irRESISTible Pico Embellisher adds a nice touch in the corner. For more Xyron inspiration, visit Xyron's Facebook page.

Making the Card

1. Cut white cardstock 5 1/2 x 8 1/2 inches; fold in half to form a 4 1/4 x 5 1/2 inch card base.

2. Die cut black cardstock with both largest and 2nd largest Spellbinders labels dies (S4-465).

3. Use Xyron to add adhesive to the back of black cardstock and white cardstock. Die cut white with largest decorative elements die (S4-467); adhere to largest black from step 2. Adhere to card base. Die cut black with 2nd largest decorative elements die (S4-467); adhere to 2nd largest black from step 2. Adhere to last layer on card base using dimensional tape.

4. Stamp "Congratulations" on white cardstock with VersaFine Black Onyx ink. Use 3rd largest labels die (S4-465) to cut it out, looking through die to line it up. Adhere to last layer on card base using dimensional tape.

5. Tie small bow with black ribbon; adhere as shown. Use irRESISTible Pico Embellisher to make enamel dots where shown (hint: you may make the dots on a craft mat then pop them off to glue on your card later - this way you can try different sizes).


Supplies
  • Cardstock: White, Black
  • VersaFine Black Onyx Ink
  • irRESISTible Pico Embellisher: Tuxedo Black
  • Xyron Creative Station 9"
  • Spellbinders Labels 40 (S4-465) plus Decorative Elements (S4-467)
  • Stamp: Congratulations
  • Black Ribbon
Follow my blog with Bloglovin so you won't miss any of the elegant card making fun!
Affiliates links may be included in this post. See Notice at bottom of blog.

Thursday, July 21, 2016

Get Organized: Labels with Imagine Crafts (Featuring Tsukineko)


This was my first video as part of Imagine Crafts' Artist in Residence Team. I've been on the team now since December 2015 but this didn't get posted so here it is now! The theme was Get Organized. I thought I would make labels for the jars I use to store my craft products. For the binder clips and @ paper clips, I made the labels to match the colors of the items inside.

Making the Labels

Here is the video tutorial of how I made these fun, colorful labels:


I didn't show it in the video but I used StazOn to stamp on the label with irRESISTible texture spray. You may also use StazOn to stamp directly on the recycled plastic before adding irRESISTible pico embellisher.


Supplies

Imagine Crafts Supplies
Other Supplies
  • Spellbinders Nestabilities: Labels Four, Labels Four Small
  • Stamps: Paper Smooches (We Totally Click - Pen, Smarty Pants - Paper Clip, I Heart Art - Pencil and Paint Brush), Lawn Fawn (Smitty's ABCs), TPC Studio (Alphabet 72558)
  • Office Depot Mini Binder Clips, Smartz @ Paper Clips, Coins
  • Alcohol Markers (e.g. Copic)
Follow my blog with Bloglovin so you won't miss any of the organizing fun!
Affiliates links may be included in this post. See Notice at bottom of page.

Saturday, June 25, 2016

Cas-ual Fridays Aces Box Card


Welcome to the Cas-ual Fridays and Imagine Crafts Blog Hop! Leave a comment for a chance to win some awesome prizes!

Here's the list of blog hop participants:

Imagine Crafts Blog
Monica Edwards
Jennifer Ingle
Teresa Abajo
Lydia Evans
Jennifer Vanderbeek
Kelly Griglione
Nadine Carlier
Shona Chambers
Vicki Dutcher
Alison Heikkila
Jeanne Jachna
Neva Cole
Archana Bhurke
Mary Prasad    <-- You are here!
Nora Noll
Katharina Frei
Diane Jaquay
Roni Johnson
Joanna Harty
Jowilna Nolte
Lisa Lahiff
Terre Fry
Bonnie Sharp
Martha Lucia Gomez
Kimberly Rendino
Mark Melnick
CAS-ual Fridays Blog

The Cas-ual Fridays In the Cards stamps and Shuffle dies help to make the perfect box for the card player in your life. There are a lot of sentiments in the stamp set, all centered around playing cards, yet fitting for many different occasions.

Making the Card

1. Die cut black cardstock using the main die from the box card set (there are other box card sets out there including this one from Sizzix). Fold and assemble. Die cut white cardstock with long die for back (this is where you will write your message). You may want to hold off on adhering the piece until you have written your message.


2. Die cut white cardstock 4 times using Shuffle playing card die. Stamp each card as shown using Lady Bug and Tuxedo Black inks. I chose the ace of hearts on which to put the sentiment after stamping the playing card elements. Adhere where shown; note: the ace of spades is adhered to the front inside panel at an angle.


3. Using the same playing card die (instead of the one included with the box card), die cut papers shown for box sides and front flap (My Mind's Eye 6x6 pad, see supplies). From black cardstock, die cut 3 spades and 3 clubs. From red cardstock die cut 2 diamonds and 2 hearts. I chose papers with more black on which to put the red card elements and more white for the black elements. Coat one heart and one diamond in Lady Bug irRESISTible Pico Embellisher. Coat one spade and one club in Tuxedo Black irRESISTible Pico Embellisher.

4. Once dry, adhere embellished heart at top right corner of ace of hearts with dimensional tape. Adhere embellished diamond to front ace of spades card as shown. Sandwich black wire between embellished spade and unembellished spade, leaving enough wire for it to stick up above box plus extra to adhere inside box. Use a square of black cardstock to sandwich other end of wire and adhere inside box so it sticks up as shown. Do the same with the embellished club.

5. Adhere one heart to front flap; glue a crystal to it as shown. Adhere spade, club, and diamond on sides as shown.


6. Die cut Stars Triplits (661118) using package numbering as listed below:
  • star 1 red cardstock, 3 copies
  • star 3 black cardstock - add Tuxedo Black irRESISTible Pico Embellisher, glue to center of star 1 red
  • star 4 black cardstock, 2 copies
  • star 2 red cardstock (decorative inside die), adhere to center of star 4 black. Keep inside little star to adhere to other star 4 black
7. Sandwich black wire between embellished star 3 black/star 1 red and plain star 1 red. Adhere inside box at front with scrap black cardstock. Adhere star 1 red to ace of clubs where shown; adhere crystals as shown. Adhere tiny clear rhinestone to center of star 4 black with tiny red star; adhere to ace of diamonds. Adhere red crystal to center of star 2 red/star 4 black; adhere to top of ace of spades using dimensional tape.

8. Die cut letter "A" from Alphanumerics (660056) out of red cardstock and black cardstock (optional: to make it thicker, you may also die cut black craft foam and add it to the sandwich). Coat red "A" with Lady Bug irRESISTible Pico Embellisher; let dry. Add black micro rhinestones to front of "A". Sandwich wire between red and black "A"s (add foam die cut if desired). Add to back inside panel with piece of black cardstock to cover the wire at the other end inside box.

Closed Box Card
Supplies
Follow my blog with Bloglovin so you won't miss any of the box card fun!
Here's your next stop on the blog hop: Nora Noll

Affiliates links may be included in this post. See Notice at bottom of blog.

Wednesday, March 9, 2016

Clay Embellishments


Makin's Clay is a no bake polymer clay that comes in several colors. I used black so that the iridescent Creative Mediums and irRESISTible products would really stand out. Use these embellishments for decorating cards and other projects.

Making the Embellishments


The following video is a step-by-step tutorial on how to make these embellishments.


Supplies


Imagine Crafts Supplies
  • Creative Medium: Iridescent-Pink, Chartruse, Turquioise, Purple; Metallic-Silver
  • irRESISTible Texture Spray: Silver
  • irRESISTible Pico Embellisher: Shimmer, Tuxedo Black, Wedding Dress
  • StazOn: Blazing Red, Cactus Green
  • Ink Blushers
  • Palette Knives
Other Supplies
  • Makin's Clay: Black
  • Optional: Pasta/Clay Machine or Clay Roller
  • Dies, e.g. Sizzix/Tim Holtz Movers and Shapers
  • Stencils, e.g. Heidi Swapp (Dots/Hearts/Stars), Crafters Workshop (Butterflies)
Follow my blog with Bloglovin so you won't miss any of the embellishment fun!

Monday, February 15, 2016

Textured Watercolor Valentine's Day Card

Made as part of the Imagine Crafts Artist in Residence Team

I made this card for my husband for Valentine's day (which is why it posted after instead of before... he reads my posts!). Not only was the image fun to color, the flowers were fun to make too - and really easy. The only tricky part was drying them with the heat tool. Next time I think I will put them in a box so they won't blow around so much!

Making the Card

Card base: cream cardstock 5x7 inches (cut 7x10 inches, fold in half)
Brown paper: 3 15/16 x 5 3/16 inches, 4 1/2 x 6 1/4 inches, 4 1/2 x 5 3/4 inches
Striped paper: 4 1/4 x 6 inches
Newsprint paper: 4 1/4 x 5 1/2 inches


For a step-by-step, watch the video below!


Supplies


Imagine Crafts Supplies
  • Memento Markers: Angel Pink, Summer Sky, Dandelion, Danube Blue, New Sprout, London Fog
  • Memento Dew Drop Inks: Desert Sand, Toffee Crunch, Peanut Brittle, Dandelion, Rich Cocoa
  • Ink Potion No. 9
  • VersaFine: Onyx Black
  • Embossing Powder: Black
  • Sheer Shimmer Spritz: Sparkle
  • irRESISTible Pico Embellisher: Shimmer
Other Supplies
  • Cardstock: Cream, Brown
  • Glossy Cardstock
  • Stamp: Lili of the Valley Love Balloon
  • Patterned Paper: 6x6 Pad Lost & Found Madison Avenue
  • Lawn Fawn Small Stitched Rectangle Stackables
  • Petaloo DIY Paintables (Bulk Packs)
  • Optional: Half Pearls

Follow my blog with Bloglovin so you won't miss any of the Valentine fun!