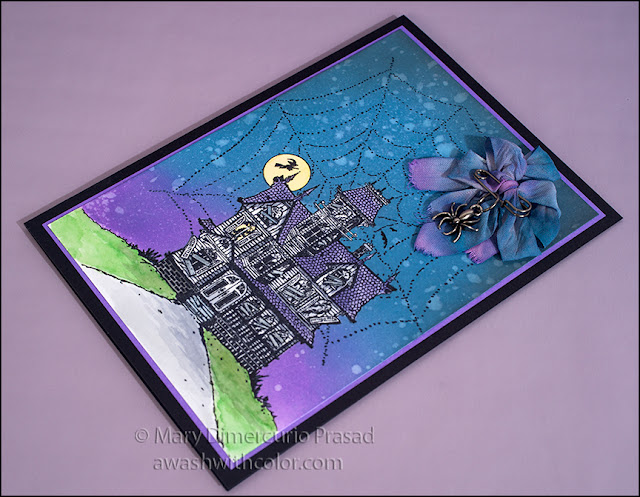
While watching YouTube late one night, I came across the art of Feliza Estrada. Her illustrations are so adorable; I contacted her to see if she would like to do a collaboration. She said she would be interested so we started to make plans. Since Halloween is just around the corner, we thought it would be the perfect theme. She drew this cute witch with her broom, black cat, and pot of candy (her video is below). I scaled it for a card, printed it on alcohol marker friendly cardstock, and colored it with my trusty Copic markers (plus a few ultra fine tipped Sharpies for the candy).
Affiliate links may be included in this post. I participate in the Amazon Services LLC Associates Program, an affiliate advertising program that provides a means for me to earn fees by linking to Amazon.com and affiliated sites at no cost to you. This helps offset a small portion of my crafting addiction... uh, hobby. See notice at bottom of blog for a longer description.
1. Cut dark blue cardstock to 7 x 10 inches; fold in half to form a 5 x 7 inch card base.
2. Cut blue cardstock about 5 x 6 3/4 inches. Unfortunately the Martha Stewart Spider Web punches that I used are discontinued, although you can still find them or other Halloween themed ones. You could use a die cutting machine to cut a similar web pattern around the edges. Note: I couldn't find the brochure that came with the punches so I sort of winged it on the size; it's not perfect but worked OK. Use the punches to punch around the blue cardstock. Adhere to card base (see step 5 for the liquid adhesive that I use for small areas).
3. Print image on alcohol marker friendly cardstock. I'm not sure if Feliza, the illustrator, is going to sell or otherwise make this image available. If she does, just note that you may have to resize it for your card. You can use any Halloween themed stamped image or digital image - just be sure the ink is also alcohol marker friendly or use a laser printer (many ink jet printers do not work well with these markers). Watch the following video to see how I colored the image using Copic Markers and Sharpies. I used a white Sakura Gelly Roll pen for the highlights in the eyes.
4. Trim colored image to about 3 1/4 x 5 1/4. Die cut light purple cardstock with largest Romantic Rectangles. Adhere image to it.
5. Add some double-sided tape to the back of the light purple cardstock. Stick one end of the black/gray/white twine in it and wrap as shown, sticking the other end in some tape as well. Adhere to card base: I recommend Lineco liquid adhesive in a Fineline applicator bottle to get around all the small lace edges.
6. Attach spider shape token to twine as shown using antique silver jump ring.
Watch how Feliza Estrada draws her image in this video:
Supplies
- Alcohol Marker Friendly Cardstock: X-Press It Blending Card
- Copic Markers/Sharpies
- Copic Multiliner .2, .05
- Cardstock: Dark Blue, Blue, Light Purple
- Crop-A-Dile Corner Chomper 1/2"/1/4"
- Spellbinders Dies: Nestabilities Romantic Rectangles (S5-090)
- Martha Stewart Punches: Punch Around the Page Spider Web
- Black/Gray/White Twine
- Idea-Ology Tim Holtz Shape Token: Spider
- Idea-Ology Tim Holtz Jump Ring: Antique Silver
- Lineco Adhesive
- Fineline Applicator 20 Gauge
- Sakura Gelly Roll: White Gel Pen
- Dress, Bow: V99, V95, V93, V91
- Skin: E00, E000, E0000, E13, E11
- Cheeks: E95, E01 - Blend with skin colors above
- Inside Cat Ears/Cat Nose/Girl's Tongue: RV32, R56
- Cat, Shoes, Hair, Cauldron: N9, N7, N5
- Ground/Shadow: N7, N5, N3, N1
- Eyes: YG95, YG67
- Broom Stick: E27, E23, E59, E34, E29
- Bristles: E29, E49, E47, E35
- Background: B99, B97, B95, B93, B91
- Colorless Blender - Used to lighten areas, blend, and fix mistakes.
Follow my blog with Bloglovin so you won't miss any of the witchy fun!


