Showing posts with label Faber-Castell. Show all posts

Monday, June 10, 2019

No Line Coloring with Watercolor/Gouache Greeting Card


Recently I posted a no line coloring card using only colored pencils (here's another example as well). This time I used gouache to block in the colors and then went over the image with Polychromos colored pencils to add gradients and details. Gouache reactivates when painted over so it's difficult to achieve smooth gradients, especially if the gouache is student grade. I first tried Arteza Gouache, before I planned to use colored pencils, but it was really not working for me so I switched to Holbein Gouache.* It was a little better but still moved the paint too much. If you are going to use colored pencils in the end as recommended, either gouache should work.

*A note about gouache: there are two types of gouache, one that reactivates with water and one that does not. The latter is called Acryl or Acryla gouache (depending on brand); these are more like acrylic paint. They are permanent once dry, thus you may layer these without affecting the previous (dried) layers.

Disclaimer: Please help support my work in this small way - just use my links if you plan to purchase anything - there's no extra cost to you. Here's the official jargon: links, affiliate links, and cookies may be used in this post and on this site. Using this site implies your consent. I participate in the Amazon Services LLC Associates Program, Share a Sale, and other affiliate programs; these affiliate advertising programs provide a means for me to earn fees by linking to amazon.com and/or other affiliated sites. This helps offset a small portion of my crafting addiction... uh, hobby. I am truly thankful for your kind support! I also receive free products from my design team companies, possibly monetary compensation, and sometimes free products for review. Regardless, all opinions are my own. Google and Blogger use cookies to provide and improve their services. See Notice at bottom of blog for a longer description and/or see the full Privacy Policy for even more details.

Making the Card

1. Cut watercolor paper to about 4x6 inches or so. I used 5x7 precut sheets. Use Stamp Platform and Antique Linen Distress Ink to stamp Just Dance with Me (Dreamerland Crafts). The Distress Ink will react with water and should just about disappear while painting.

2. Use a Copic Multiliner SP Black .3 pen to trace the eyes, eye brows, and mouths - be sure to do this before coloring or you might not be able to see where to put them. Use gouache to block in colors of the image (I used Holbein and some Arteza - see introduction for more information). You can mix darker and lighter colors trying to blend as you go but you may not get a great gradient. Also, details will be easier to add with color pencil (next step).


3. Once the image has dried, use Polychromos colored pencils to add shading, gradients, and details. I found this especially useful for the hair and cheeks. Keep the pencils out for the next step.

4. Use a pair of detail scissors and a craft knife (on a self-healing mat) to cut around image. Use colored pencils to gently go around outside of image in matching colors to hide white edges.

5. Cut white Soft-Finish Cardstock to 5 1/2 x 8 1/2 inches; fold in half to form a 4 1/4 x 5 1/2 inch card base. I like the soft texture on the front of this cardstock and, since the reverse side is smooth, it is easy to write inside the card. Cut purple plaid paper (Perfectly Plaid Rainbow, Lawn Fawn) to 4 x 5 1/4 inches. Adhere to card base.

6. Die cut white Soft-Finish Cardstock using die from Double-Stitched Circle Set (or other stitched circle set) - see the image below for size. Use the next size up to die cut blue cardstock. Adhere white circle to blue. Adhere to card where shown (if you want to check placement, just hold off gluing until later). Use dimensional/mounting tape to adhere colored image to white circle.

7. Prep a the back of a piece of white Soft Finish Cardstock with powder tool; stamp "Just dance with me" using Purple Hydrangea VersaMagic ink (I recommend using Stamp Platform, especially if you want to stamp on the front of the cardstock where there is texture). Heat emboss using Silver Pearl Ranger Embossing Powder (you may also use clear but the pearl gives it a beautiful subtle shimmer). Die cut with stitched circle. Adhere to card where shown using dimensional/mounting tape.

8. Adhere purple sequins where shown; I recommend using a Crystal Ninja Tanto pick up tool for placement.


Supplies
Follow my blog with Bloglovin so you won't miss any of the dancing fun!

Wednesday, April 3, 2019

Cute Teddy Bear No Line Coloring Birthday Card


Here is a little scene I put together using Dreamerland Crafts stamps, Distress Oxide inks, and Faber-Castell Polychromos colored pencils. I used Memento Desert Sand to stamp the image for no line coloring. It's helpful to have a black stamped image nearby as well in case you can't see some of the lines (I didn't do this and accidentally colored her dress a bit longer in back than it was on the stamp, oops!).

Instead of solvent blending, I used lighter and medium colors to blend over sections that needed smoothing. Overall I kept some of the texture since I liked the look. Since I wanted the focus to be on the main image, I kept the background and card simple. Have you tried no line coloring?

Disclaimer: Please help support my work in this small way - just use my links if you plan to purchase anything - there's no extra cost to you. Here's the official jargon: links, affiliate links, and cookies may be used in this post and on this site. Using this site implies your consent. I participate in the Amazon Services LLC Associates Program, Share a Sale, and other affiliate programs; these affiliate advertising programs provide a means for me to earn fees by linking to amazon.com and/or other affiliated sites. This helps offset a small portion of my crafting addiction... uh, hobby. I am truly thankful for your kind support! I also receive free products from my design team companies, possibly monetary compensation, and sometimes free products for review. Regardless, all opinions are my own. Google and Blogger use cookies to provide and improve their services. See Notice at bottom of blog for a longer description and/or see the full Privacy Policy for even more details.

Making the Card

1. Use Stamp Platform to stamp Cute Teddy Bear in StazOn Jet Black ink on Stamp Masking Paper, leaving stamp mounted for step 2. Fussy cut around image using detail scissors. Use craft knife on a cutting mat to cut around inside areas.

2. Cut a piece of Canson Bristol Paper about 5x6 inches (it doesn't need to be this big but I like to leave some of wiggle room for stamping and die cutting). Stamp Cute Teddy Bear (Dreamerland Crafts stamp set) in Memento Desert Sand ink leaving a bit more room on the left side for flowers and butterflies.

3. Use black Copic Multiliner SP to fill in bear's eye, nose, and mouth and girls's eye and mouth. The SP versions of Multiliners are more economical in the long run as they are refillable and the nibs can be changed - they also reduce the amount of plastic going into land fills. (Note: I used sepia for her mouth and cool gray for her eye; the mouth looks OK but you can't really tell in the eye.)

4. Place mask over image. I recommend working on a craft sheet. Use another mask to make a slight hill. It will start near the bottom of the stump - see photo (you may also use Post-it Tape). I just cut a slight arc with my scissors, keeping both pieces. Cover the bottom while blending the sky, then do the reverse when blending the grass area. With a blending tool using Salty Ocean Distress Oxide ink, start from the top just off the paper using circular motions to create the sky, stopping short of the grass line. Change the masks to blend the grass area in a similar manner using Mowed Lawn and Lucky Clover Distress Oxide inks (using two colors gives it some variation and shading). Remove the mask covering the sky area. Using the same colors for the lawn and the Just Dance with Me (Dreamerland Crafts) grass stamp, use 2nd and 3rd generation stamping to cover the hill side with grass (2nd/3rd generation stamping is done by inking stamp and stamping off on a piece of scrap paper, then, without re-inking, stamping in the image area a couple times for lighter stamping).


5. Stamp butterflies and flowers where shown using stamps from Just Dance with Me. I stamped the butterflies with Ripe Persimmon Distress Oxide ink and flowers with Candied Apple and Mustard Seed. Hint: I used the corner of my stamp pad to ink flowers individually so I could stamp flowers in different colors at the same time. Alternatively, you could ink and stamp each flower one at a time, cleaning stamp in between.

6. Use Faber-Castell Polychromos colored pencils to color image, add stems and leaves to flowers, color centers of flowers, and draw bodies on butterflies. Use a light touch in small oval motions to cover areas with pencil, building up layers. Also blend with pencils, e.g. by going over light colored areas with white or cream pencils to create and blend highlights.

7. Cut black cardstock 5x10 inches; fold in half to form a 5x5 inch card base. Cut patterned paper 4 3/4 x 4 3/4 inches. I used a sheet from My Mind's Eye: Filled with Love but it is likely hard to find; you may want to check out Doodlebug Design's Rainbow Petite Prints papers - they have many colors and light patterns that are perfect for backgrounds. Adhere to card base. Pick out two circular dies, such as those from Hero Arts Infinity Dies Nesting Circle dies, that will fit on the front of the card as shown. To die cut image, use the next smaller Large Dotted Circle Stackables die that will fit inside the two you selected.

8. Use Stamp Platform to stamp Happy Birthday (Dreamerland Crafts Birthday 11) in Memento Tuxedo Black ink where shown on image (note: I cut my sentiment stamp so that I may stack the words - if you don't want to cut your stamp, then you will have to mask or ink selectively). Die cut brown cardstock and black cardstock with selected circle dies; adhere each as shown to the front of the card, with the image on top.


Supplies
Follow my blog with Bloglovin so you won't miss any of the artsy fun!

Monday, February 18, 2019

Sweet Puppy Pop-up Birthday Card


I used this sweet Dreamerland Crafts stamp "Love My Puppy" as the foundation for my Spinner Square Pop-up birthday card. I wanted to have the image peeking through a front window in the card, then when opened, have the sentiment move down as the image pops up. The fun Doodlebug Design papers I used - Sugar Shoppe - are older (from 2014) although you can still find some around. Of course you can substitute some of the newer Doodlebug Design papers, just adjust the colors to match.

Once again I'm testing Lavender Spike Oil as my blending solvent. It has a very strong smell of lavender so if you don't like lavender, I don't recommend it. The fumes are not toxic (unlike other popular solvents). This time I'm using it with oil based pencils - Faber-Castell Polychromos. I must say, they blended beautifully.

Disclaimer: Please help support my work in this small way - just use my links if you plan to purchase anything - there's no extra cost to you. Here's the official jargon: links, affiliate links, and cookies may be used in this post and on this site. Using this site implies your consent. I participate in the Amazon Services LLC Associates Program, Share a Sale, and other affiliate programs; these affiliate advertising programs provide a means for me to earn fees by linking to amazon.com and/or other affiliated sites. This helps offset a small portion of my crafting addiction... uh, hobby. I am truly thankful for your kind support! I also receive free products from my design team companies, possibly monetary compensation, and sometimes free products for review. Regardless, all opinions are my own. Google and Blogger use cookies to provide and improve their services. See Notice at bottom of blog for a longer description and/or see the full Privacy Policy for even more details.


Making the Card

1. Use Stamp Platform to stamp Love My Puppy (Dreamerland Crafts) on Strathmore 500 Bristol Plate in Memento Tuxedo Black ink. Use Black Copic Multiliner SP .3 to draw a ground line across image background.


2. Color image using Faber-Castell Polychromos colored pencils, blending with Lavender Spike Oil and blending stumps. Note: I use a Kum Long Point Sharpener to sharpen my pencils - it gives you a very fine point in two steps. Once the image has been colored, use the largest square from Spinner Square Pop-up to die cut image. This will be your pop-up platform (step 3).

3. Before assembling the card, watch the video below - specific notes follow. I recommend watching the video then looking at the notes, and finally assembling the card while watching the video a second time.


Cut teal cardstock for the base card as shown in the video, 4 1/4 x 11 inches. Die cut teal for the arm - mark with Xs where shown. Cut the inside papers - see photos for the patterns I used; note: I used 4 x 5 5/16 inches instead of 4 x 5 1/4 inches to put the inside edges a little closer to the fold. Remember to only tack down the left side of the window sheet (inside left) as shown in the video. I used recycled plastic packaging for the window. For the front of the card, I cut the paper to 4 x 5 1/4 inches. You could adhere it to the front temporarily and try to cut through 3 layers but it probably won't cut all the way through. I recommend cutting two layers as in the video, removing the resulting cut squares (keep them), adhering the front patterned paper, then fitting the die into the hole to cut the front.

Cut frame, from diagonal teal striped side of paper, as shown in video. Keep squares that fall out of windows. I used the teal one for the rectangle that moves inside. For adhesive, Lineco in a fine tip bottle (shown in video) works very well; it creates a strong bond, and dries quickly.


4. For the sentiment, use the leftover inside square from the front of the card - the backside has light teal stripes. Use Stamp Platform to stamp "Happy Birthday" (Birthday 11) in VersaMark ink. Heat emboss with Gun Metal (note: I cut my stamp words apart; if you do not want to cut them, then you will have to mask them). Trim to fit on movable arm and adhere (I used removable tape to test before gluing down to make sure it wouldn't stick out of card when closed).

5. Using balloon from Birthday Charms, cut three from teal cardstock, one from yellow cardstock, and one from dark pink cardstock. Be sure to keep all holes! You will glue them back in and flatten with a Teflon bone folder (which flattens but won't make the paper shiny). Use white Gelly Roll to draw shine on balloon (you may use the stencil provided with the die). Note where each balloon goes on the card (the teal ones should all line up), cut twine for strings, adhere top of twine where it will be behind each balloon (if it helps mark with pencil first). Adhere balloons where shown, using dimensional tape to pop up dark pink balloon on front of card. Die cut small heart (Birthday Charms) from dark pink cardstock; adhere where shown, gluing front balloon strings together. Adhere sequins where shown (note: be sure sequins do not interfere with arm movement).


Supplies
Follow my blog with Bloglovin so you won't miss any of the sweet puppy fun!

Tuesday, May 22, 2018

Dog Days Summer Greeting Card and Giveaway!


The Xyron Design Team was given a summer theme for this June project. I went through my stamps and found a sweet little dog sniffing a flower, by Whipper Snapper Designs. I thought it would be fun to do a play on words with "The Dog Days of Summer."

I recently colored an image with Arteza watercolor pencils; this time I decided to use my Faber-Castell Albrecht Dürer watercolor pencils and Strathmore Series 500 Watercolor Paper to see how they performed in comparison. I still need some practice layering (watercolor pencils seem to reactivate more easily than watercolor even when dry on paper) but these were much easier to work with than the Arteza combo.

Giveaway: Xyron is giving one lucky person a Mega Runner! Yay! To enter, leave a comment below. I will choose a winner randomly and make the announcement here on my blog next week - the person will have a week to respond. Note: I will try to email if the winner has a valid address listed in their profile (please do not put your email address in your comment). If you would like an extra entry, just subscribe to my YouTube channel and tell me in your comment here that you did so.

The Mega Runner comes with a 1/2 inch wide 100 foot roll of strong adhesive. Refills are available in 1/2 inch and 1/4 inch versions.

Affiliate links may be included in this post. I participate in the Amazon Services LLC Associates Program, Share a Sale, and other affiliate programs; these affiliate advertising programs provide a means for me to earn fees by linking to amazon.com and/or other affiliated sites at no cost to you. This helps offset a small portion of my crafting addiction... uh, hobby. I am truly thankful for your kind support! I also receive free products from my design team companies. Regardless, all opinions are my own. I do not get paid for my posts unless otherwise specified. Cookies may be used on this site. See notice at bottom of blog for a longer description.

Making the Card

1. Using VersaFine Clair Nocturne ink, stamp Sweet Sniffs of Spring (Whipper Snapper Designs) on Strathmore watercolor paper (I recommend a Stamp Platform or Misti due to the texture on the paper). Although it is waterproof, it is a pigment ink, which usually takes a while to completely dry, so you may want to use a heat tool to set the ink.

2. Color image with Faber-Castell Albrecht Dürer watercolor pencils, using a waterbrush or watercolor brush and water to blend the colors. You may go over darker areas with pencil while paper is slightly damp to get more pigment lay-down. You may find a list of colors I used below Supplies.

Xyron Whipper Snapper Designs Doodlebug Design Puppy Love Card

3. Die cut image with Cross-Stitched Oval. Using the next size up oval, die cut the grass background paper (Puppy Love Paper Pad). Note: I highly recommend the Sizzix machines for die cutting. I have been very happy with mine!

4. Cut green cardstock 7x10 inches; fold in half to form a 5x7 inch card base. Cut blue cardstock 4 3/4 x 6 3/4 inches. Adhere to card base using Mega Runner (see photo below). Cut dog scrabble patterned paper (Doodlebug Design Puppy Love) 4 5/8 x 5 1/4 inches. Adhere to bottom part of card as shown above.


5. Cut blue gingham patterned paper (Doodlebug Design Gingham-Linen Rainbow Petite Prints) 1 1/4 x 4 5/8 inches. Use Cricut Maker or other digital cutting machine to cut "The Days of Summer" from green cardstock (I used a system font that I thought would be fun with this card - I also welded some of the letters together). Use a Xyron 1.5" Create-a-Sticker to put adhesive on the backs of the words/letters (see photo above). Arrange words and Mini-Scrabble letters (don't stick down the Scrabble letters yet though) on blue gingham piece, leaving room for bone and paw brads. Note: the brads I used came colored - if you can't find them already colored, you could paint them using Vintage Patina in Onyx and Marble, which is made to stick to metal. Add brads where shown. Hint: I used a soft mallet and cutting mat to lightly tap the prongs flat behind the paper. Use Mega Runner to adhere to top of card base as shown (avoid brads). Adhere Scrabble letters.


6. Adhere die cut grass oval where shown. Adhere watercolored dog oval using dimensional adhesive. Watch the following video to create dimensional adhesive using a Xyron 9" Creative Station with Permanent Adhesive.


Supplies
Colors of Faber-Castell Albrecht Dürer Watercolor Pencils Used
  • Grass/Leaf 267, 170, 205
  • Collar/Flower 219, 115
  • Dog 176, 182, 179, 199
  • Sky 120
Follow my blog with Bloglovin so you won't miss any of the dog days of fun!

Wednesday, December 6, 2017

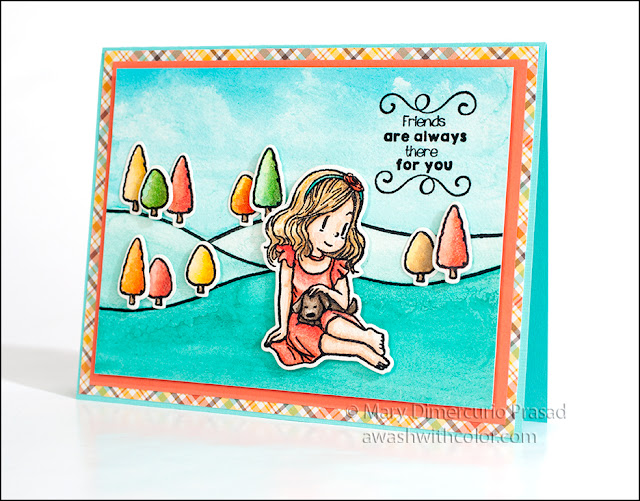
Friends Are Always There for You Watercolor Card

Dreamerland Crafts stamp, Lawn Fawn paper, Faber-Castell, Watercolor Card


Some of the recent Dreamerland Crafts stamps now have matching dies! This set is perfect for Spring, Summer, and Fall - depending on how you color the trees. It also comes with a kitten, a piglet, and a step ladder. I just love the sweet expression on the girl's face as she's petting the puppy on her lap.

Affiliate links may be included in this post. I participate in the Amazon Services LLC Associates Program, an affiliate advertising program that provides a means for me to earn fees by linking to Amazon.com and affiliated sites at no cost to you. This helps offset a small portion of my crafting addiction... uh, hobby. See notice at bottom of blog for a longer description.

Making the Card

1. Cut sea foam cardstock 5 1/2 x 8 1/2 inches; fold in half to form a 4 1/4 x 5 1/2 inch card base.

2. Cut Lawn Fawn Perfectly Plaid Fall 6x6 patterned paper (diagonal multicolored) 4 1/8 x 5 3/8 inches. Adhere to card base.

3. Cut salmon cardstock 3 7/8 x 5 1/8 inches. Adhere to card base.

Prima Watercolor Confections and Faber-Castell Polychromes colored card

4. Cut watercolor paper 3 5/8 x 4 7/8 inches. Using a Stamp Platform or Stamp Positioner, stamp hills in waterproof black ink (I used VersaFine Onyx Black). Hint: where the lines meet, use a little Post-It tape to mask excess overlap. Watercolor sky in a color similar to the blue in the patterned paper. While wet, use a scrunched up paper towel to create clouds.  I added a little more green to color the grassy areas.

5. On another piece of watercolor paper, stamp the girl and about 10 trees (half tall, half short). Watercolor the trees in Fall colors. I used Prima Watercolor Confections. I colored the girl's dress to match the red-orange line in the patterned paper. Once dry, you may add shading with colored pencils (e.g. Faber-Castell Polychromos). I also use a Prismacolor blender pencil to smooth out the coloring. Die cut each of the pieces. Hint: use a small piece of Post-It tape to hold the dies in place as you cut.

6. Stamp sentiment where shown. Once dry, adhere trees and girl using dimensional tape behind the girl and behind some of the trees (the ones you want in front). I used Lineco glue in a Fineline applicator to adhere the trees that weren't going to be popped up; it's easier to use glue rather than tape due to the texture of the paper.

Prima Watercolor Confections and Faber-Castell Polychromes colored card

Supplies
Follow my blog with Bloglovin so you won't miss any of the watercolor fun!

Thursday, November 16, 2017

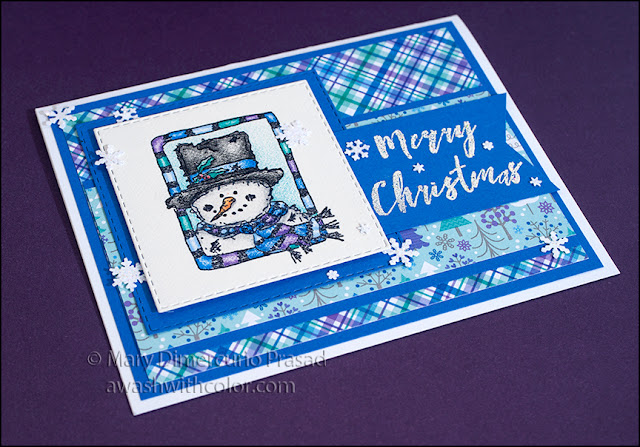
Frosty in a Frame Christmas Card

Rubbernecker Stamps Frosty in Frame using Faber-Castell Polychromos

This little Frosty stamp is so adorable. I love the sketched look. I wanted my coloring to have a similar look so I used a slightly textured paper with my trusty Faber-Castell Polychromos colored pencils. I matched the colors to the Doodlebug Design background papers. The list of colors is near the end of this post, following the list of supplies. Clear Wink of Stella adds a subtle shimmer to the snowman (unfortunately it doesn't photograph well; see closeup below).

Affiliate links may be included in this post. I participate in the Amazon Services LLC Associates Program, an affiliate advertising program that provides a means for me to earn fees by linking to Amazon.com and affiliated sites at no cost to you. This helps offset a small portion of my crafting addiction... uh, hobby. See notice at bottom of blog for a longer description.

Making the Card

1. Cut white cardstock 5 1/2 x 8 1/2 inches; fold in half to form a 4 1/4 inch x 5 1/2 inch card base. Cut blue cardstock 4 x 5 1/4 inches. Adhere to card base. Cut plaid patterned paper (Doodlebug Design Polar Pals) 3 3/4 x 5 inches. Adhere to card base.

2. Cut blue cardstock 2 1/2 x 5 inches. Cut tree patterned paper (Doodlebug Design Polar Pals) 2 1/4 x 5 inches. Adhere to center of blue. Adhere to card base where shown.

3. Use Stamp Platform or stamp positioner to stamp Frosty in Small Frame with Jet Black Archival Ink on Strathmore 500 Bristol Vellum Surface paper. Note: you could use regular cardstock but I like the extra tooth and texture this paper provides; it may need to be stamped a couple times due to the texture. Color with colored pencils. I used Faber-Castell Polychromos; the list of colors that I used is below the list of supplies. Add Clear Wink of Stella to white parts of snowman - it's subtle; you can barely see it in the photo (it looks better in person). Let it dry and add more if desired. Die cut with 4th largest Nested Square Die.


4. Die cut blue cardstock with 3rd largest Nested Square Die. Adhere colored Frosty in Frame using dimensional/mounting tape - leaving room to slide the sentiment banner under.

Rubbernecker Stamps Frosty in Frame using Faber-Castell Polychromos

5. Use Stamp Platform or stamp positioner to stamp Merry Christmas with VersaMark Ink (or other embossing ink) on blue cardstock, leaving enough room to trim and add tail. Emboss with Snowflake Embossing Tinsel. Note: using the Stamp Platform or stamp positioner allows you to stamp again if you don't like the first result. Trim and cut tails. Adhere to card where shown, between the snowman and its mat.

6. Use Aspen Flurry Punch All Over the Page on white cardstock to create snowflakes. I actually used the Punch Around the Page Snow Flurry punch but it is no longer manufactured, although you can still find it on eBay or other places online. Adhere snowflakes to sticky side of Post-it Tape. Apply Star Dust Stickles. Let dry completely. Adhere where shown (I used tweezers to place each snowflake with a dab of glue).

Rubbernecker Stamps Frosty in Frame using Faber-Castell Polychromos

Supplies
Faber-Castell Polychromes Colored Pencils Used:
Cold Gray III 232, Black 199, Terracotta 186, Deep Red 223, Purple Violet 156, Violet 138, Helioblue-Reddish 151, Cobalt Blue 145, Sky Blue 146, Cobalt Green 156, Chrome Oxide Green Fiery 276

Follow my blog with Bloglovin so you won't miss any of the frosty fun!

Sunday, October 22, 2017

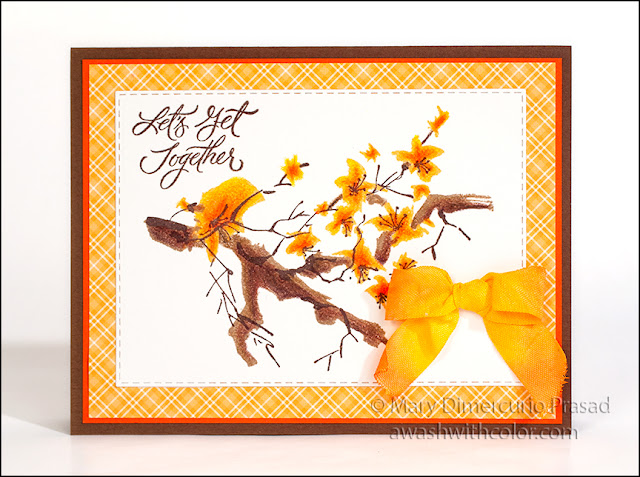
Fall Branch Greeting Card

Rubbernecker Stamps Branch Blossoms with Faber-Castell Polychromos

Although the main Rubbernecker Stamp's image is part of their watercolor stamp collection, I decided to stamp it in dye ink (Memento) and enhance it with colored pencils (Faber-Castell Polychromos). I colored the flowers in Autumn colors for a Fall greeting card. The Fireworks! spray custom colored bow matches perfectly, as does the Lawn Fawn Perfectly Plaid Fall background paper.

Affiliate links may be included in this post. I participate in the Amazon Services LLC Associates Program, an affiliate advertising program that provides a means for me to earn fees by linking to Amazon.com and affiliated sites at no cost to you. This helps offset a small portion of my crafting addiction... uh, hobby. See notice at bottom of blog for a longer description.

Making the Card

1. Cut brown cardstock 5 1/2 x 8 1/2 inches; fold in half to form a 4 1/4 x 5 1/2 inch card base. Cut orange cardstock 4 x 5 1/4 inches. Adhere to card base. Cut orange/yellow plaid (Lawn Fawn Perfectly Plaid Fall 6x6 Pad) 3 7/8 x 5 1/8 inches. Adhere to card base.

2. Cut a piece of Strathmore 500 Bristol Vellum to about 4 1/4 x 5 1/2 inches (a bit bigger than necessary for some wiggle room). You could probably use white cardstock but since I'm layering a lot of colors, I decided to use a really good paper for it.

Fall Branch Leaves with Polychromos Colored Pencils

3. Use a Stamp Platform or a stamp positioner to stamp the thick branch layer in Toffee Crunch Memento Ink near the center of the Bristol paper. Position the small branch layer and stamp with Rich Cocoa Memento Ink. Position the flower layer and stamp with Cantaloup Memento Ink.

4. Use colored pencils (Faber-Castell Polychromos) to color the image, layer yellow-oranges to orange-reds on flowers with the darkest at the centers. Add some browns to the branches. You may also add extra flowers or branches, even extend the existing branches if you like.

5. Cut a length of seam binding. Tie a small bow. Spray center with Dandelion Fireworks! Next spray with Cantaloup, overlapping the Dandelion. Finally spray the ends of the bow loops and tails with Tangelo. Set aside to dry.

6. Die cut image using third largest stitched rectangle die, centering the branch but leaving room for the sentiment in the top left corner. Use the Stamp Platform or a stamp positioner to stamp the sentiment in Rich Cocoa Memento Ink where shown. Adhere to card. Adhere bow where shown.

Rubbernecker Stamps Branch Blossoms with Memento Ink

Supplies
Follow my blog with Bloglovin so you won't miss any of the colorful Fall fun!