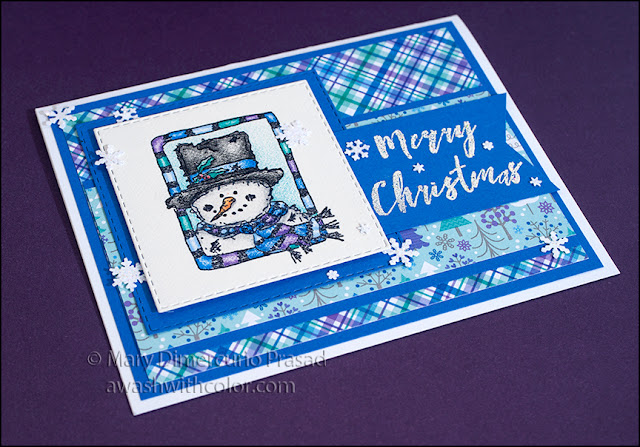
This little Frosty stamp is so adorable. I love the sketched look. I wanted my coloring to have a similar look so I used a slightly textured paper with my trusty Faber-Castell Polychromos colored pencils. I matched the colors to the Doodlebug Design background papers. The list of colors is near the end of this post, following the list of supplies. Clear Wink of Stella adds a subtle shimmer to the snowman (unfortunately it doesn't photograph well; see closeup below).
Affiliate links may be included in this post. I participate in the Amazon Services LLC Associates Program, an affiliate advertising program that provides a means for me to earn fees by linking to Amazon.com and affiliated sites at no cost to you. This helps offset a small portion of my crafting addiction... uh, hobby. See notice at bottom of blog for a longer description.
Making the Card
1. Cut white cardstock 5 1/2 x 8 1/2 inches; fold in half to form a 4 1/4 inch x 5 1/2 inch card base. Cut blue cardstock 4 x 5 1/4 inches. Adhere to card base. Cut plaid patterned paper (Doodlebug Design Polar Pals) 3 3/4 x 5 inches. Adhere to card base.
2. Cut blue cardstock 2 1/2 x 5 inches. Cut tree patterned paper (Doodlebug Design Polar Pals) 2 1/4 x 5 inches. Adhere to center of blue. Adhere to card base where shown.
3. Use Stamp Platform or stamp positioner to stamp Frosty in Small Frame with Jet Black Archival Ink on Strathmore 500 Bristol Vellum Surface paper. Note: you could use regular cardstock but I like the extra tooth and texture this paper provides; it may need to be stamped a couple times due to the texture. Color with colored pencils. I used Faber-Castell Polychromos; the list of colors that I used is below the list of supplies. Add Clear Wink of Stella to white parts of snowman - it's subtle; you can barely see it in the photo (it looks better in person). Let it dry and add more if desired. Die cut with 4th largest Nested Square Die.
4. Die cut blue cardstock with 3rd largest Nested Square Die. Adhere colored Frosty in Frame using dimensional/mounting tape - leaving room to slide the sentiment banner under.
5. Use Stamp Platform or stamp positioner to stamp Merry Christmas with VersaMark Ink (or other embossing ink) on blue cardstock, leaving enough room to trim and add tail. Emboss with Snowflake Embossing Tinsel. Note: using the Stamp Platform or stamp positioner allows you to stamp again if you don't like the first result. Trim and cut tails. Adhere to card where shown, between the snowman and its mat.
6. Use Aspen Flurry Punch All Over the Page on white cardstock to create snowflakes. I actually used the Punch Around the Page Snow Flurry punch but it is no longer manufactured, although you can still find it on eBay or other places online. Adhere snowflakes to sticky side of Post-it Tape. Apply Star Dust Stickles. Let dry completely. Adhere where shown (I used tweezers to place each snowflake with a dab of glue).
Supplies
- Rubbernecker Stamps: Frosty in Frame Small (23-09), Merry Christmas (980-12)
- Rubbernecker Stamps Dies: Nested Square Die Cut Set (5001D)
- Cardstock: White, Blue
- Paper: Strathmore 500 Bristol Vellum Surface
- Patterned Paper: Doodlebug Design 6x6 Pad Polar Pals (5038)
- Archival Ink: Jet Black
- Colored Pencils: Faber-Castell Polychromos
- Wink of Stella: Clear
- Powder Tool
- Heat Tool
- VersaMark Ink or Other Embossing Ink
- Embossing Powder: Snowflake Embossing Tinsel (Ranger)
- Stickles: Star Dust
- Martha Stewart Snow Flurry Punch Around the Page or Aspen Flurry Punch All Over the Page
- Post-it Tape
- Dimensional/Mounting Tape
Faber-Castell Polychromes Colored Pencils Used:
Cold Gray III 232, Black 199, Terracotta 186, Deep Red 223, Purple Violet 156, Violet 138, Helioblue-Reddish 151, Cobalt Blue 145, Sky Blue 146, Cobalt Green 156, Chrome Oxide Green Fiery 276
Cold Gray III 232, Black 199, Terracotta 186, Deep Red 223, Purple Violet 156, Violet 138, Helioblue-Reddish 151, Cobalt Blue 145, Sky Blue 146, Cobalt Green 156, Chrome Oxide Green Fiery 276
Follow my blog with Bloglovin so you won't miss any of the frosty fun!


No comments:
Post a Comment
Thank you for leaving a comment! I read (and appreciate) every one!