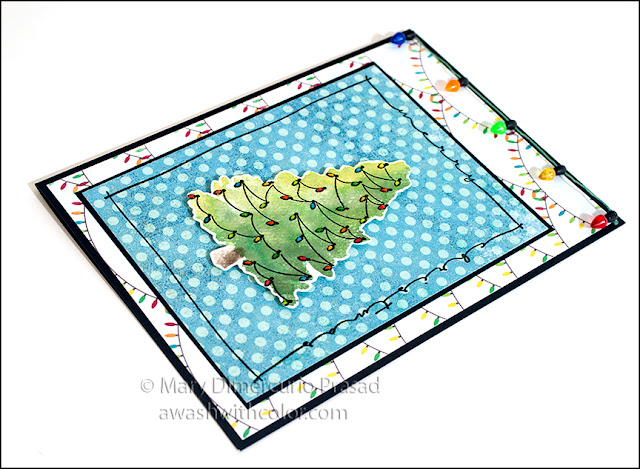
This card features the Watercolor Christmas Tree 2-part stamp by Rubbernecker Stamps. This is a fun technique to do, especially with Color Burst powders. I used a porcelain petal palette to mix up a bunch of greens to paint on the solid tree part of the stamp. I love how they mixed in the final version. I used masking fluid on the light bulbs to protect the colors. As finishing touches, I added Glossy Accents to the lights for shine and dimension, plus Crystal Stickles on some of the dots in the background - creating my own glitter paper!
Affiliate links may be included in this post. I participate in the Amazon Services LLC Associates Program, an affiliate advertising program that provides a means for me to earn fees by linking to Amazon.com and affiliated sites at no cost to you. This helps offset a small portion of my crafting addiction... uh, hobby. See notice at bottom of blog for a longer description.
Making the Card
1. Cut black cardstock 7 x 10 inches; fold in half to form a 5 x 7 inch card base.
2. Cut "At Home" (Christmas lights) patterned paper 4 3/4 x 6 3/4 inches. Cut five lights from string of Holiday Lights (Jolee's by You) leaving some string on each end. Optional: use a yellow alcohol marker to color clear light. I used Copic Y18. Adhere ends behind upper corners of "At Home" paper. Adhere to card base. Note: Use a strong glue to glue down bulbs so they line up across the top.
3. Cut black cardstock 4 1/8 x 5 1/2 inches. Cut "Presents" (dot side) patterned paper 4 x 5 3/8 inches. Prep paper with powder tool. Use Stamp Platform or stamp positioner to stamp Merry Christmas Frame with VersaMark ink (or other embossing ink) on dot side. Emboss with black embossing powder. Add Crystal Stickles to random dots inside frame. Adhere to black cardstock. Adhere to card as shown (I lined it up so there was the same amount of space on bottom and sides, leaving top a little larger).
4. Rub Powder Tool over a piece of Stamping Watercolor Paper. Use Stamp Platform or stamp positioner to stamp lights from Watercolor Christmas Tree stamp in center using VersaMark ink (or other embossing ink). Emboss with black embossing powder. Using a very small brush (e.g. size 00), color bulbs as shown using Color Burst like watercolor. I used: Chartreuse, Gamboge, Lime Green, Ultramarine Blue, Cadmium Scarlet, and Marigold. Allow to dry. Note: I used a porcelain petal palette to mix all my colors.
5. Add dots of masking fluid to each bulb. Allow to dry.
6. Use Stamp Platform or stamp positioner with tree part of Watercolor Christmas Tree stamp lining up with lights. Color stump with Burnt Umber Color Burst, making it darker on one side for shadow. Stamp stump. Wipe off stamp with damp cloth. Use a variety of greens to cover tree part of stamp, making it darker on the same side as you made the stump dark (do not color over stump area). I used Color Burst colors: Lime Green, Chartreuse, Olive Green, Terre Verte, and Pthalo Green (you probably only need a couple of these - just add some brown or other colors to vary shades). Stamp tree. Clean stamp. Use a brush to fill in any spots as desired. Optional: flick dark color green over tree - it doesn't show well on mine but it does add a bit more texture. Note: I used a porcelain petal palette to mix all my colors.
7. Once dry, use your finger to roll off masking fluid. Fussy cut or die cut tree. Add Glossy Accents to each light bulb. Let dry completely. Adhere tree as shown using dimensional/mounting tape.
Supplies
- Rubbernecker Stamps Stamping Watercolor Paper Uncoated 110#
- Watercolor Christmas Tree (954)
- Watercolor Christmas Tree Die Cut (954D)
- Merry Christmas Frame (987)
- Color Burst
- Porcelain Petal Palette (Optional)
- Cardstock: Black
- Alcohol Marker (Optional): Copic Y18
- Holiday Lights (Jolee's by You/EK Success)
- Patterned Paper - My Mind's Eye Winter Wonderland: At Home (WW1057), Presents (WW1059)
- Stamp Platform or Stamp Positioner
- VersaMark Ink or Other Embossing Ink
- Embossing Powder: Ranger Super Fine Detail Black
- Powder Tool
- Heat Tool
- Masking Fluid (Molotow Pump Marker 2mm)
- Dimensional/Mounting Tape
- Glossy Accents
- Stickles: Crystal


No comments:
Post a Comment
Thank you for leaving a comment! I read (and appreciate) every one!