Showing posts with label Stickles. Show all posts

Thursday, November 16, 2017

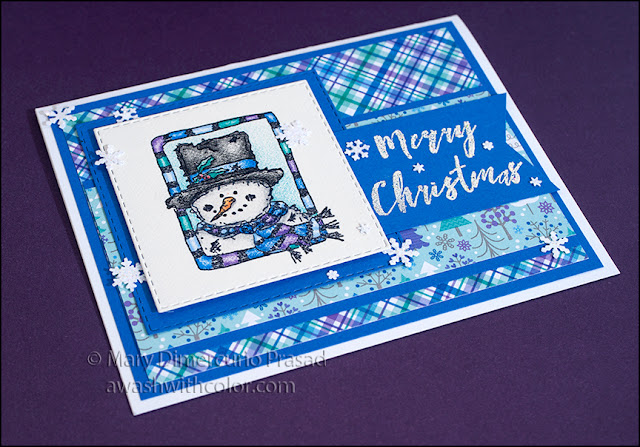
Frosty in a Frame Christmas Card

Rubbernecker Stamps Frosty in Frame using Faber-Castell Polychromos

This little Frosty stamp is so adorable. I love the sketched look. I wanted my coloring to have a similar look so I used a slightly textured paper with my trusty Faber-Castell Polychromos colored pencils. I matched the colors to the Doodlebug Design background papers. The list of colors is near the end of this post, following the list of supplies. Clear Wink of Stella adds a subtle shimmer to the snowman (unfortunately it doesn't photograph well; see closeup below).

Affiliate links may be included in this post. I participate in the Amazon Services LLC Associates Program, an affiliate advertising program that provides a means for me to earn fees by linking to Amazon.com and affiliated sites at no cost to you. This helps offset a small portion of my crafting addiction... uh, hobby. See notice at bottom of blog for a longer description.

Making the Card

1. Cut white cardstock 5 1/2 x 8 1/2 inches; fold in half to form a 4 1/4 inch x 5 1/2 inch card base. Cut blue cardstock 4 x 5 1/4 inches. Adhere to card base. Cut plaid patterned paper (Doodlebug Design Polar Pals) 3 3/4 x 5 inches. Adhere to card base.

2. Cut blue cardstock 2 1/2 x 5 inches. Cut tree patterned paper (Doodlebug Design Polar Pals) 2 1/4 x 5 inches. Adhere to center of blue. Adhere to card base where shown.

3. Use Stamp Platform or stamp positioner to stamp Frosty in Small Frame with Jet Black Archival Ink on Strathmore 500 Bristol Vellum Surface paper. Note: you could use regular cardstock but I like the extra tooth and texture this paper provides; it may need to be stamped a couple times due to the texture. Color with colored pencils. I used Faber-Castell Polychromos; the list of colors that I used is below the list of supplies. Add Clear Wink of Stella to white parts of snowman - it's subtle; you can barely see it in the photo (it looks better in person). Let it dry and add more if desired. Die cut with 4th largest Nested Square Die.


4. Die cut blue cardstock with 3rd largest Nested Square Die. Adhere colored Frosty in Frame using dimensional/mounting tape - leaving room to slide the sentiment banner under.

Rubbernecker Stamps Frosty in Frame using Faber-Castell Polychromos

5. Use Stamp Platform or stamp positioner to stamp Merry Christmas with VersaMark Ink (or other embossing ink) on blue cardstock, leaving enough room to trim and add tail. Emboss with Snowflake Embossing Tinsel. Note: using the Stamp Platform or stamp positioner allows you to stamp again if you don't like the first result. Trim and cut tails. Adhere to card where shown, between the snowman and its mat.

6. Use Aspen Flurry Punch All Over the Page on white cardstock to create snowflakes. I actually used the Punch Around the Page Snow Flurry punch but it is no longer manufactured, although you can still find it on eBay or other places online. Adhere snowflakes to sticky side of Post-it Tape. Apply Star Dust Stickles. Let dry completely. Adhere where shown (I used tweezers to place each snowflake with a dab of glue).

Rubbernecker Stamps Frosty in Frame using Faber-Castell Polychromos

Supplies
Faber-Castell Polychromes Colored Pencils Used:
Cold Gray III 232, Black 199, Terracotta 186, Deep Red 223, Purple Violet 156, Violet 138, Helioblue-Reddish 151, Cobalt Blue 145, Sky Blue 146, Cobalt Green 156, Chrome Oxide Green Fiery 276

Follow my blog with Bloglovin so you won't miss any of the frosty fun!

Sunday, November 5, 2017

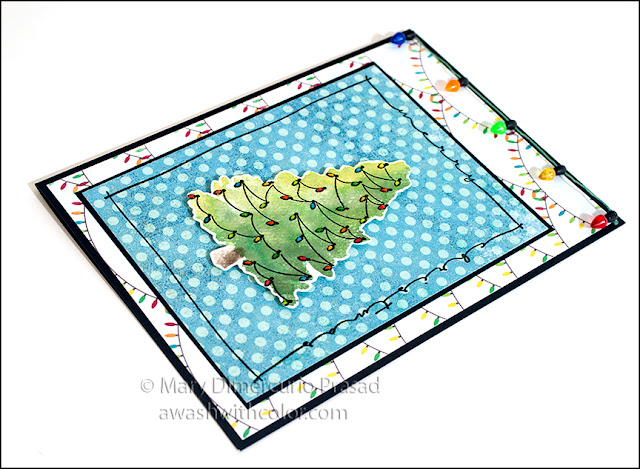
Rubbernecker Stamps Christmas Tree with Frame

Rubbernecker Stamps Color Burst Christmas Tree

This card features the Watercolor Christmas Tree 2-part stamp by Rubbernecker Stamps. This is a fun technique to do, especially with Color Burst powders. I used a porcelain petal palette to mix up a bunch of greens to paint on the solid tree part of the stamp. I love how they mixed in the final version. I used masking fluid on the light bulbs to protect the colors. As finishing touches, I added Glossy Accents to the lights for shine and dimension, plus Crystal Stickles on some of the dots in the background - creating my own glitter paper!

Affiliate links may be included in this post. I participate in the Amazon Services LLC Associates Program, an affiliate advertising program that provides a means for me to earn fees by linking to Amazon.com and affiliated sites at no cost to you. This helps offset a small portion of my crafting addiction... uh, hobby. See notice at bottom of blog for a longer description.

Making the Card

1. Cut black cardstock 7 x 10 inches; fold in half to form a 5 x 7 inch card base.

2. Cut "At Home" (Christmas lights) patterned paper 4 3/4 x 6 3/4 inches. Cut five lights from string of Holiday Lights (Jolee's by You) leaving some string on each end. Optional: use a yellow alcohol marker to color clear light. I used Copic Y18. Adhere ends behind upper corners of "At Home" paper. Adhere to card base. Note: Use a strong glue to glue down bulbs so they line up across the top.

3. Cut black cardstock 4 1/8 x 5 1/2 inches. Cut "Presents" (dot side) patterned paper 4 x 5 3/8 inches. Prep paper with powder tool. Use Stamp Platform or stamp positioner to stamp Merry Christmas Frame with VersaMark ink (or other embossing ink) on dot side. Emboss with black embossing powder. Add Crystal Stickles to random dots inside frame. Adhere to black cardstock. Adhere to card as shown (I lined it up so there was the same amount of space on bottom and sides, leaving top a little larger).

4. Rub Powder Tool over a piece of Stamping Watercolor Paper. Use Stamp Platform or stamp positioner to stamp lights from Watercolor Christmas Tree stamp in center using VersaMark ink (or other embossing ink). Emboss with black embossing powder. Using a very small brush (e.g. size 00), color bulbs as shown using Color Burst like watercolor. I used: Chartreuse, Gamboge, Lime Green, Ultramarine Blue, Cadmium Scarlet, and Marigold. Allow to dry. Note: I used a porcelain petal palette to mix all my colors.

Christmas Tree with Stickles Background

5. Add dots of masking fluid to each bulb. Allow to dry.

6. Use Stamp Platform or stamp positioner with tree part of Watercolor Christmas Tree stamp lining up with lights. Color stump with Burnt Umber Color Burst, making it darker on one side for shadow. Stamp stump. Wipe off stamp with damp cloth. Use a variety of greens to cover tree part of stamp, making it darker on the same side as you made the stump dark (do not color over stump area). I used Color Burst colors: Lime Green, Chartreuse, Olive Green, Terre Verte, and Pthalo Green (you probably only need a couple of these - just add some brown or other colors to vary shades). Stamp tree. Clean stamp. Use a brush to fill in any spots as desired. Optional: flick dark color green over tree - it doesn't show well on mine but it does add a bit more texture. Note: I used a porcelain petal palette to mix all my colors.

7. Once dry, use your finger to roll off masking fluid. Fussy cut or die cut tree. Add Glossy Accents to each light bulb. Let dry completely. Adhere tree as shown using dimensional/mounting tape.

Rubbernecker Stamps Color Burst Christmas Tree

Supplies
Follow my blog with Bloglovin so you won't miss any of the Christmas Tree fun!

Wednesday, May 10, 2017

YNS Sweet Birthday Card Featuring Gumdrops (Challenge)


This post is part of the Your Next Stamp (YNS) Gumdrop Challenge. The challenge is to use YNS Gumdrops on a project. As a special bonus to you, if you visit the Your Next Stamp blog and leave a comment, you will have a chance to win a YNS stamp set of your choice! Comments must be left by May 12, 2017; the winner will be announced on May 14, 2017.

I chose to use the Total Sweetness stamp set. I colored it with Faber-Castell Polychromos pencils on Neenah Desert Storm cardstock. It didn't have quite enough "pop" to go with the brightly colored Gumdrops so I added extra bling with Stickles and a Wink of Stella glitter pen. It's difficult to see all the glitter and shine in the photos but it looks very pretty in person. The result is delicious!

Affiliates links may be included in this post. See Notice at bottom of blog.

Making the Card

1. Cut Desert storm cardstock 5 1/2 x 8 1/2 inches; fold in half to form a 4 1/4 x 5 1/2 inch card base. Cut another piece about 4 x 4 inches. Note: you may trim to the dimensions in step 2 if you have a stamp positioned - I left extra space in case the stamping was off, plus it is easier to color on a larger piece. Stamp the little girl sitting on the banana split sundae in black ink.

2. Color image with your favorite colored pencils. I used Faber-Castell Polychromos. Hint: use a light touch, color in circles, and layer the color. If you press too hard, you will get shiny spots and the tooth of the paper will be destroyed (i.e. it won't take any more color). Trim to 3 x 3 1/4 inches, centering image.

3. Add Wink of Stella to the ice cream, the girl's shirt, and her shoes. Add Glossy Accents to the cherries. Mix Turquoise and Star Dust Stickles then paint on main part of sundae bowl as shown. Add a dot of Thistle Stickles to the center of the daisy in the girl's hair. Set aside to dry.


4. Stamp sentiment on Desert Storm. Punch with 1 1/4 inch circle. Punch pink cardstock with 1 1/2 inch scalloped circle. Add Thistle Stickles all around the edges, be sure to cover the parts that will show. Set aside to dry.

5. Cut pink cardstock to 4 x 5 1/4 inches. Cut smiling tea cup paper (YNS Hugs and Kisses) to 3 7/8 x 5 1/8 inches; adhere to pink cardstock. Adhere these to card base.

6. Cut pink cardstock to 3 1/8 x 3 3/8 inches. Adhere image to this piece then adhere to card as shown. Use dimensional tape to adhere sentiment to scalloped circle with Stickles. Add to card with dimensional tape where shown.

7. Add Gumdrops as shown.


Supplies
  • Stamps: Total Sweetness (Your Next Stamp CYNS562)
  • Patterned Paper: Hugs and Kisses 6x6 Paper Pad (Your Next Stamp YNSPP007)
  • Gumdrops (Your Next Stamp)
  • Cardstock: Desert Storm (Neenah), Pink
  • Colored Pencils (e.g. Faber-Castell Polychromos)
  • Punches: 1 1/4 inch Circle, 1 1/2 inch Scallop Circle (e.g. EK Success)
  • Wink of Stella
  • Stickles: Turquoise, Star Dust, Thistle
  • Glossy Accents
  • Dimensional Tape
Follow my blog with Bloglovin so you won't miss any of the gumdrop fun!

Monday, June 8, 2015

Hyacinthe Mother's Day Card


I made this card for my mother-in-law for Mother's Day using Karen Burniston's Oval Accordion (plus decorator) dies and Susan Tierney Cockburn's Hyacinthe flower dies. I love Hyacinthe flowers - I have some purple ones in my yard; they are so beautiful in the spring. Susan's dies really bring this flower to life.

Making the Card

1. Die cut two accordion frames from double-sided cardstock (e.g. K&Company designer paper from Que Sera Sera). Train the folds but do not adhere together yet. Trim tabs on back panel as per instructions.

2. From light pink cardstock, die cut 3 sets of flourish edges (6 of each size). Adhere to all sides except back; see photos.


3. Die cut Hyacinthe stem and leaves from green cardstock. Watercolor with Mowed Lawn Distress Ink. Use tool set and molding pad to shape the leaves.

4. Die cut Hyacinthe petals from light pink cardstock. You will probably want to cut at least 2 sets, depending on how full you would like your flower. Watercolor each petal with Worn Lipstick Distress Ink, a stripe down the center of each petal. Use tool set and moulding pad to shape petals: give them a curve by rubbing down the back side of each petal. From the front side, gently but firmly press down in center of each with smallest stylus to get petals to form a cup as shown.

5. Adhere stem, leaves and petals onto front card oval as shown: keep in mind that the panel will rotate when assembled.

6. Die cut butterflies from black cardstock. Watercolor wings with Perfect Pearls. Optional: add Glossy Accents to give bodies dimension. Gently bend wings up and adhere to card where shown.


7. Die cut stitched oval from medium pink cardstock. Adhere to card base as shown. Die cut smaller scalloped oval from light pink cardstock. Stamp sentiment. Optional: ink edges with Worn Lipstick Distress ink using ink blending tool. Apply Stickles around edges. Set aside to dry.

8. Die cut flourish edge from green cardstock. Cut both side designs off and adhere one to top of stitched oval as shown. Adhere center piece over bottom of stitched oval (hanging over edges) and trim from back. Adhere sentiment oval to center using dimensional tape.

9. Tie a small bow from light pink ribbon. Adhere bow and half pearls where shown. Glue tabs and assemble card as per instructions.

Supplies

Elizabeth Craft Designs
Other Supplies
  • Designer Paper: K&Company Double-Sided Que Sera Sera 625532
  • Cardstock: Light Pink, Medium Pink, Green, Black
  • Distress Ink: Mowed Lawn, Worn Lipstick
  • Perfect Pearls: Pink Bumball, Sour Apple (Green)
  • Glossy Accents (Optional)
  • The Stamps of Life, stamps4fancylabel (Happy Mother's Day stamps), Black Ink
  • Dimensional Tape
  • Half Pearls
  • Stickles: Tickled Pink
  • Ribbon: Light Pink

Wednesday, February 25, 2015

SVG Cuts Valentine's Day Chemistry Box Card


This is the card I gave my hubby for Valentine's Day. The box card design is basically from SVGCuts Hearts Aflame Kit (with slight modifications). They have awesome designs that may be cut with most (if not all) electronic die cutters on the market. I imported this one to Cricut Design Space so I could cut it with my Cricut Explore machine. The cute characters are from the Lawn Fawn Science of Love stamp and die sets.

The card looks complicated but is actually rather easy to assemble. Amazingly, it closes flat!

Flattened Card
Making the Card

Note: I recommend reading the full instructions and watching the video (at the bottom of the SVGCuts Hearts Aflame page) first before making the card. I planned out the pieces, including stamping and embellishments, then adhered everything before assembling the main card.

1. Import SVGCuts Hearts Aflame files to whatever software program you are using. Check the sizes to be sure they imported correctly; they are listed in the file "Hearts Aflame Box Cards Menu.pdf" that comes with the kit. For Cricut Design Space, you will have to resize everything. I cut a bunch of extra hearts at smaller sizes on different papers as well. To do this on the Cricut, you will have to either edit the SVG files to remove everything except the hearts then import/resize, or locate the hearts on the mat and place papers accordingly (if you don't want to waste good paper, use scrap paper for the stuff you don't want to cut, i.e. the card parts themselves).

2. Optional: ink around some hearts and labels as desired. I used Distress Ink, Worn Lipstick, for the pink (don't remember which blue ink I used). Add Washi tape to labels and writing space (photo further below) as desired.

3. Stamp Lawn Fawn Science of Love characters, beakers, test-tube, and heart vapors on watercolor paper using black waterproof ink. Color with your favorite watercolor paints or pencils (I used Inktense pencils). Die cut each. Optional: add Wink of Stella Clear Glitter to the "chemicals." Add highlights with a white gel pen.

Note the stamped hearts in the background, behind the beakers.
4. Optional: add Stickles (red glitter) and/or Glossy Accents to some of the hearts. Stamp hearts in background on some of the larger hearts.

5. Adhere extra hearts where desired. Adhere characters and chemistry items to card as shown using dimensional tape. Assemble card as shown in the video at the bottom of the SVGCuts Hearts Aflame page.

Under Front Flap
I did a 2nd generation stamp of the test-tubes and hearts just under the sentiment. At the top right, you can see a small heart with red Stickles (topped with Glossy Accents).

Writing Space; note Washi on back and sides.
The above image is the back of the box card. You may write your message here before adhering or after - the box will flatten so it isn't difficult. I really enjoyed making this card!


Supplies
  • SVGCuts Hearts Aflame Kit
  • Cricut/Cricut Design Space or Other Digital Die Cutting Machine
  • Cardstock: Light Blue, Light Pink, Dark Pink, Red
  • Watercolor Paper
  • Watercolor Pencils or Paints (I used Inktense Pencils)
  • Lawn Fawn Science of Love Stamps and Dies
  • Waterproof Ink: Black
  • Enamel Dots
  • Dimensional Tape
  • Optional: Washi Tape, Wink of Stella Clear Glitter, White Gel Pen, Stickles, Glossy Accents