Thursday, November 30, 2017

Snowflakes and Stardust Christmas Card

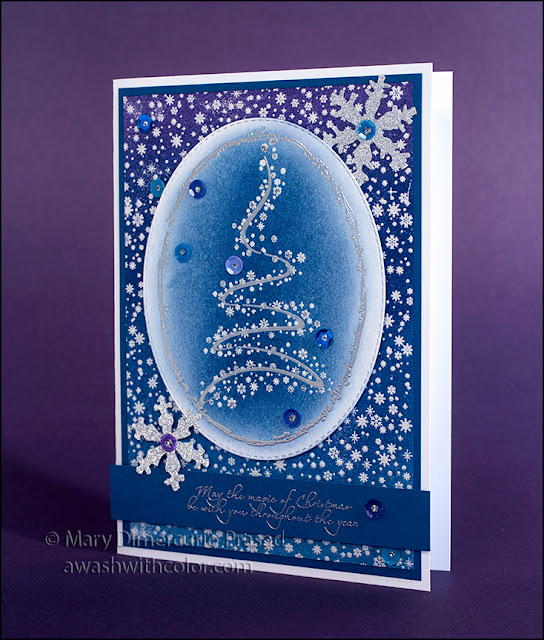
Embossed Snowflakes and Stardust Christmas Card with Distress Inks

This card has some incredible sparkle and shine, unfortunately not all of it shows in the photographs - but it is really beautiful in person. The Rubbernecker Stamps Snowflake Panel background and Snowflakes and Stardust tree stamps coordinate perfectly for a snowy holiday or Christmas card. Tim Holtz, Idea-ology, and Sizzix products help add to the fun.

Affiliate links may be included in this post. I participate in the Amazon Services LLC Associates Program, an affiliate advertising program that provides a means for me to earn fees by linking to Amazon.com and affiliated sites at no cost to you. This helps offset a small portion of my crafting addiction... uh, hobby. See notice at bottom of blog for a longer description.

Making the Card

1. Cut white cardstock 7 x 10 inches; fold in half to form a 5 x 7 inch card base. Cut blue cardstock 4 3/4 x 6 3/4 inches. Adhere to card base.

2. Cut Canson Bristol XL paper about 5 x 7 inches. You could use regular cardstock but this paper makes blending easy. Use Stamp Platform or stamp positioner to stamp Snowflake Panel in VersaMark Ink or other embossing ink - you will cover the entire panel so you may want to stamp horizontally across the paper, embossing as you go. I recommend using a powder tool before stamping (although I forgot and some powder stuck where I didn't want it to - I didn't bother re-stamping, I figured it added to the snowy look... at least that's what I tell myself). Emboss with Silver Pearl embossing powder.

3. Once the paper has been completely embossed, use an ink blending tool to blend from bottom to top with the following Distress Inks: Stormy SkyFaded JeansChipped SapphireDusty Concord. Be sure to overlap each color as you go. I usually blend up the paper then back down. Trim to 4 1/2 x 6 1/2 inches; add matching ink to edges so they won't stand out. Use a slightly damp paper towel to wipe over embossing. Spray a couple coats of Frost Sheer Shimmer Spritz. Adhere to card base.

Rubbernecker Stamps Snowflakes and Stardust with Distress Inks

4. Cut Canson Bristol XL paper about 5 x 6 inches. Use Stamp Platform or stamp positioner to stamp Snowflakes and Stardust Set tree line (use the one that matches the snowflakes tree stamp) in VersaMark Ink or other embossing ink; emboss with Silver. Next stamp snowflakes tree and emboss with Silver Pearl. Finally stamp Distress Oval Frame and emboss with Silver.

5. Die cut around frame using largest oval from Nested Oval Small Stitch Die Cut Set. Use ink blending tool to blend Stormy Sky Distress Ink starting in center and fading out to edges (leave edges white). Blend Faded Jeans Distress Ink in center area to darken around tree, fading into Stormy Sky ink. Use a slightly damp paper towel to wipe over embossing. Spray with a couple coats of Frost Sheer Shimmer Spritz. Adhere to card base with dimensional/mounting tape where shown.

6. On blue cardstock, stamp sentiment and emboss with Silver. Trim to 5 inches wide, leaving a small amount above and below sentiment. Adhere where shown with dimensional/mounting tape.

7. Die cut Sizzix Mini Snowflakes from silver Deco Sheets (you will need to use the Sizzix Movers & Shapers Base Tray and two cutting pads). My favorite die cutting machine is the Sizzix Big Shot Pro because it is heavy duty and cuts the largest Sizzix Pro dies. If you don't need to cut Pro dies, the next model down is the Sizzix Big Shot Plus. The most economical is the Sizzix Big Shot. Adhere largest snowflake in upper right corner; Deco Sheets are adhesive backed so you just need to peel off the backing. On the smaller snowflake, peel adhesive backing away from area that will touch the sentiment and tree oval only. Add dimensional/mounting tape to other parts. Adhere where shown.

8. Adhere Blue Jeans and Lilac Doodlebug Design sequins where shown. I use Beacon Gem-Tac for gluing sequins. Apply Silver Stickles to centers of sequins as well as randomly along the tree snowflakes.

Snowflakes and Stardust Holiday/Christmas Card with Distress Inks

Supplies
Follow my blog with Bloglovin so you won't miss any of the flurry fun!


Sunday, November 19, 2017

Twas the Night Holiday Card

Rubbernecker Stamps A Visit from St. Nicholas Christmas Card

The background stamp for this card is the entire famous poem "A Visit from St. Nicholas" published anonymously in 1823. I embossed it in Liquid Platinum on red. The color is a beautiful warm silver - perfect for a holiday card. The double bow is dyed with Distress Inks, tied with twine, and fastened with a holiday brad.

Affiliate links may be included in this post. I participate in the Amazon Services LLC Associates Program, an affiliate advertising program that provides a means for me to earn fees by linking to Amazon.com and affiliated sites at no cost to you. This helps offset a small portion of my crafting addiction... uh, hobby. See notice at bottom of blog for a longer description.

Making the Card

1. Cut green cardstock 7 x 10 inches; fold in half to form a 5 x 7 inch card base. Cut Quartz Stardream cardstock 4 3/4 x 6 3/4 inches. Adhere to card base. Stardream cardstock has a subtle shimmer that looks really beautiful in person, but unfortunately doesn't photograph well.

2. Cut red cardstock about 5 x 7 inches (larger than the final for some wiggle room). Rub Powder Tool over surface. Use Stamp Platform or stamp positioner to stamp Twas the Night with VersaMark ink (or other embossing ink). Heat emboss with Liquid Platinum embossing powder. Trim to 4 1/2 x 5 5/8 inches, centering writing. Adhere to card base, centered.

A Visit from St. Nicholas Christmas Card with Distress Ink Bow

3. Trim a piece of vellum (thick if possible) about 3 1/2 x 3 1/2 inches. Rub Powder Tool over surface. Use Stamp Platform or stamp positioner to stamp Happy Holidays Circle with VersaMark ink (or other embossing ink). Heat emboss with Liquid Platinum embossing powder. Use a fairly small paint brush to paint gift and holly in green (Chromium Oxide Green Dark) and red. I used acrylic paints by Golden - I wanted the paint to be opaque so I could use adhesive behind it without it showing. At first I used C.P. Cadmium Red Dark but it didn't match well so I painted over with Naphthol Red Light. You may need two coats. Die cut with 4th largest (2.875 inch) Nested Circle Small Stitch Die. Adhere to card where shown using dimensional/mounting tape.

4. Cut off a length of seam binding, enough for a double bow and tails. Dye with a combination of green Distress Inks or Distress Stains (e.g. Pine Needles and Peeled Paint). Once dry, wrap around your fingers a couple times, leaving a tail on each side. Tie in the middle with a piece of red/white twine. Bend the tines of a holiday brad around the middle. Adhere where shown.

Rubbernecker Stamps A Visit from St. Nicholas Holiday Card

Supplies
*Used C.P. Cadmium Red Dark first but didn't match so painted over with Naphthol Red Light

Follow my blog with Bloglovin so you won't miss any of the holiday fun!

Thursday, November 16, 2017

Frosty in a Frame Christmas Card

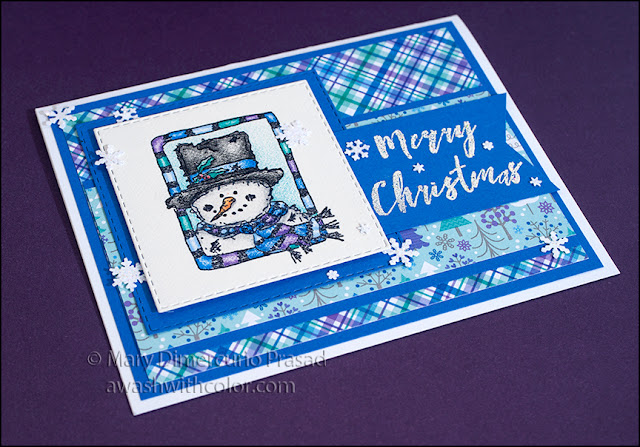
Rubbernecker Stamps Frosty in Frame using Faber-Castell Polychromos

This little Frosty stamp is so adorable. I love the sketched look. I wanted my coloring to have a similar look so I used a slightly textured paper with my trusty Faber-Castell Polychromos colored pencils. I matched the colors to the Doodlebug Design background papers. The list of colors is near the end of this post, following the list of supplies. Clear Wink of Stella adds a subtle shimmer to the snowman (unfortunately it doesn't photograph well; see closeup below).

Affiliate links may be included in this post. I participate in the Amazon Services LLC Associates Program, an affiliate advertising program that provides a means for me to earn fees by linking to Amazon.com and affiliated sites at no cost to you. This helps offset a small portion of my crafting addiction... uh, hobby. See notice at bottom of blog for a longer description.

Making the Card

1. Cut white cardstock 5 1/2 x 8 1/2 inches; fold in half to form a 4 1/4 inch x 5 1/2 inch card base. Cut blue cardstock 4 x 5 1/4 inches. Adhere to card base. Cut plaid patterned paper (Doodlebug Design Polar Pals) 3 3/4 x 5 inches. Adhere to card base.

2. Cut blue cardstock 2 1/2 x 5 inches. Cut tree patterned paper (Doodlebug Design Polar Pals) 2 1/4 x 5 inches. Adhere to center of blue. Adhere to card base where shown.

3. Use Stamp Platform or stamp positioner to stamp Frosty in Small Frame with Jet Black Archival Ink on Strathmore 500 Bristol Vellum Surface paper. Note: you could use regular cardstock but I like the extra tooth and texture this paper provides; it may need to be stamped a couple times due to the texture. Color with colored pencils. I used Faber-Castell Polychromos; the list of colors that I used is below the list of supplies. Add Clear Wink of Stella to white parts of snowman - it's subtle; you can barely see it in the photo (it looks better in person). Let it dry and add more if desired. Die cut with 4th largest Nested Square Die.


4. Die cut blue cardstock with 3rd largest Nested Square Die. Adhere colored Frosty in Frame using dimensional/mounting tape - leaving room to slide the sentiment banner under.

Rubbernecker Stamps Frosty in Frame using Faber-Castell Polychromos

5. Use Stamp Platform or stamp positioner to stamp Merry Christmas with VersaMark Ink (or other embossing ink) on blue cardstock, leaving enough room to trim and add tail. Emboss with Snowflake Embossing Tinsel. Note: using the Stamp Platform or stamp positioner allows you to stamp again if you don't like the first result. Trim and cut tails. Adhere to card where shown, between the snowman and its mat.

6. Use Aspen Flurry Punch All Over the Page on white cardstock to create snowflakes. I actually used the Punch Around the Page Snow Flurry punch but it is no longer manufactured, although you can still find it on eBay or other places online. Adhere snowflakes to sticky side of Post-it Tape. Apply Star Dust Stickles. Let dry completely. Adhere where shown (I used tweezers to place each snowflake with a dab of glue).

Rubbernecker Stamps Frosty in Frame using Faber-Castell Polychromos

Supplies
Faber-Castell Polychromes Colored Pencils Used:
Cold Gray III 232, Black 199, Terracotta 186, Deep Red 223, Purple Violet 156, Violet 138, Helioblue-Reddish 151, Cobalt Blue 145, Sky Blue 146, Cobalt Green 156, Chrome Oxide Green Fiery 276

Follow my blog with Bloglovin so you won't miss any of the frosty fun!

Sunday, November 5, 2017

Rubbernecker Stamps Christmas Tree with Frame

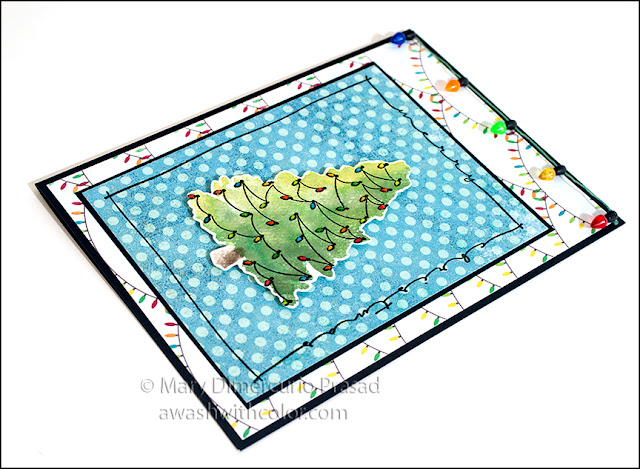
Rubbernecker Stamps Color Burst Christmas Tree

This card features the Watercolor Christmas Tree 2-part stamp by Rubbernecker Stamps. This is a fun technique to do, especially with Color Burst powders. I used a porcelain petal palette to mix up a bunch of greens to paint on the solid tree part of the stamp. I love how they mixed in the final version. I used masking fluid on the light bulbs to protect the colors. As finishing touches, I added Glossy Accents to the lights for shine and dimension, plus Crystal Stickles on some of the dots in the background - creating my own glitter paper!

Affiliate links may be included in this post. I participate in the Amazon Services LLC Associates Program, an affiliate advertising program that provides a means for me to earn fees by linking to Amazon.com and affiliated sites at no cost to you. This helps offset a small portion of my crafting addiction... uh, hobby. See notice at bottom of blog for a longer description.

Making the Card

1. Cut black cardstock 7 x 10 inches; fold in half to form a 5 x 7 inch card base.

2. Cut "At Home" (Christmas lights) patterned paper 4 3/4 x 6 3/4 inches. Cut five lights from string of Holiday Lights (Jolee's by You) leaving some string on each end. Optional: use a yellow alcohol marker to color clear light. I used Copic Y18. Adhere ends behind upper corners of "At Home" paper. Adhere to card base. Note: Use a strong glue to glue down bulbs so they line up across the top.

3. Cut black cardstock 4 1/8 x 5 1/2 inches. Cut "Presents" (dot side) patterned paper 4 x 5 3/8 inches. Prep paper with powder tool. Use Stamp Platform or stamp positioner to stamp Merry Christmas Frame with VersaMark ink (or other embossing ink) on dot side. Emboss with black embossing powder. Add Crystal Stickles to random dots inside frame. Adhere to black cardstock. Adhere to card as shown (I lined it up so there was the same amount of space on bottom and sides, leaving top a little larger).

4. Rub Powder Tool over a piece of Stamping Watercolor Paper. Use Stamp Platform or stamp positioner to stamp lights from Watercolor Christmas Tree stamp in center using VersaMark ink (or other embossing ink). Emboss with black embossing powder. Using a very small brush (e.g. size 00), color bulbs as shown using Color Burst like watercolor. I used: Chartreuse, Gamboge, Lime Green, Ultramarine Blue, Cadmium Scarlet, and Marigold. Allow to dry. Note: I used a porcelain petal palette to mix all my colors.

Christmas Tree with Stickles Background

5. Add dots of masking fluid to each bulb. Allow to dry.

6. Use Stamp Platform or stamp positioner with tree part of Watercolor Christmas Tree stamp lining up with lights. Color stump with Burnt Umber Color Burst, making it darker on one side for shadow. Stamp stump. Wipe off stamp with damp cloth. Use a variety of greens to cover tree part of stamp, making it darker on the same side as you made the stump dark (do not color over stump area). I used Color Burst colors: Lime Green, Chartreuse, Olive Green, Terre Verte, and Pthalo Green (you probably only need a couple of these - just add some brown or other colors to vary shades). Stamp tree. Clean stamp. Use a brush to fill in any spots as desired. Optional: flick dark color green over tree - it doesn't show well on mine but it does add a bit more texture. Note: I used a porcelain petal palette to mix all my colors.

7. Once dry, use your finger to roll off masking fluid. Fussy cut or die cut tree. Add Glossy Accents to each light bulb. Let dry completely. Adhere tree as shown using dimensional/mounting tape.

Rubbernecker Stamps Color Burst Christmas Tree

Supplies
Follow my blog with Bloglovin so you won't miss any of the Christmas Tree fun!

Thursday, November 2, 2017

Distress Ink Trees in Snow

Rubbernecker Stamps Distress Ink Trees in Snow

I love the look of watercolor cards, especially for Christmas and the holidays. This one has the look of watercolor but is very easy to make. I used Distress Inks, although you could use traditional watercolor paints. The two part Watercolor Forest by Rubbernecker Stamps makes it super simple to create the trees; the background is just a few colors semi-randomly applied. A couple sprays of Sheer Shimmer Spritz makes this card look magical (unfortunately the shimmer doesn't show up well in the photos).

Affiliate links may be included in this post. I participate in the Amazon Services LLC Associates Program, an affiliate advertising program that provides a means for me to earn fees by linking to Amazon.com and affiliated sites at no cost to you. This helps offset a small portion of my crafting addiction... uh, hobby. See notice at bottom of blog for a longer description.

Making the Card

1. Cut white cardstock 7 x 10 inches; fold in half to form a 5 x 7 inch card base.

2. If necessary, cut watercolor paper about 5 x 7 inches. Use painter's tape for a delicate surface to tape down to a craft mat, making sure the tape seals well to the edges. They will be cut off but the tape will hold the paper more flat if the contact is good.

3. Use an old toothbrush or old firm paintbrush to flick masking fluid all over the surface of the watercolor paper. If you get a few splats that are too big, just wait until they dry, roll them off with your finger, then flick a few more dots in those locations.

4. Once masking fluid is try, use a spray bottle or Mini Mister to spray the entire surface lightly with water. Use Shabby Shutters Distress Ink (top edges) and Peeled Paint (centers/bases) on the smaller trees from the Watercolor Forest stamp set. Spray lightly with water and stamp where shown (i.e. lower left, leaving room below for snow banks and to the left for the top layer of trees, which will be offset) - you may want to leave the stamp in place for a few seconds before removing. This helps the dye ink to soak in a little more. If the image beaded up in places, use a waterbrush or watercolor brush to spread the ink around inside the tree areas.

5. Use Forest Moss Distress Ink on the larger trees from the Watercolor Forest stamp set. Spray lightly with water and stamp offset from the first set of trees a bit over to the left. You may want to dry with a heat tool.

Sheer Shimmer Spritz Distress Ink Trees in Snow

6. Spray lightly over the sky area above the trees. Starting with Weathered Wood Distress Ink, tap some on a craft mat, palette, or acrylic block. Use a waterbrush or a watercolor brush to add water to the ink then apply it below the trees to create snow banks as shown. Hint: you may want to apply lines of water first so it will bleed a little as you apply. Next apply it around the tops of the trees, leaving some white as a buffer. You may touch it in a couple places to get the inks to blend, if you like that look. You can add more or less water depending on how much you want the ink to travel or bleed. As you move away from the trees up into the sky area, start adding more and more Faded Jeans. Move the brush around sort of randomly to make some areas darker than others. Add small amounts of Dusty Concord as well (sparingly). The top areas should be darker. You can dry one layer and add another on top (again leaving some areas lighter) to darken it even more and give it a more painterly look. Be sure the area where you will stamp the sentiment is dark enough so that the white heat embossing (next step) will pop. Let dry or dry with heat tool.

7. Use your finger to rub off all the masking fluid. Remove tape. Check to make sure the watercolor panel is clean before proceeding. Trim panel to 4 1/4 x 6 1/4 inches. Using VersaMark Ink (or other embossing ink), stamp "Laughter and Joy" sentiment in upper right corner as shown.

8. Spray entire panel with Sparkle Sheer Shimmer Spritz - at least a foot or more away. You may want to apply a couple coats. I recommend doing this over a craft sheet or a sink. Allow to dry.

9. Cut blue cardstock to 4 1/2 x 6 1/2 inches. Adhere watercolored image to blue cardstock. Adhere to card base.

Rubbernecker Stamps Distress Ink Trees in Snow

Supplies
Follow my blog with Bloglovin so you won't miss any of the holiday fun!