Showing posts with label Prima. Show all posts

Wednesday, December 6, 2017

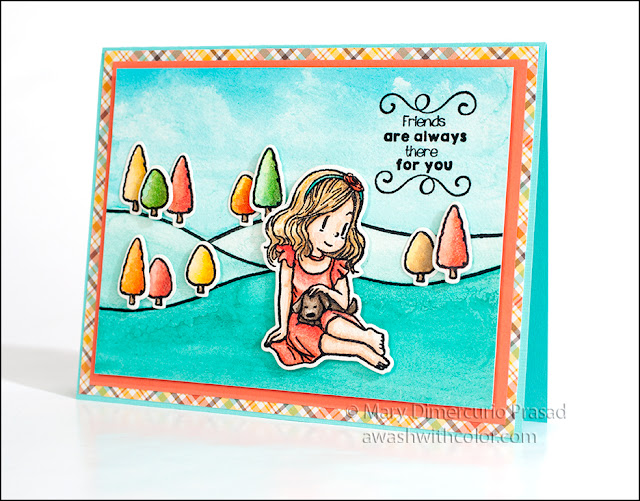
Friends Are Always There for You Watercolor Card

Dreamerland Crafts stamp, Lawn Fawn paper, Faber-Castell, Watercolor Card


Some of the recent Dreamerland Crafts stamps now have matching dies! This set is perfect for Spring, Summer, and Fall - depending on how you color the trees. It also comes with a kitten, a piglet, and a step ladder. I just love the sweet expression on the girl's face as she's petting the puppy on her lap.

Affiliate links may be included in this post. I participate in the Amazon Services LLC Associates Program, an affiliate advertising program that provides a means for me to earn fees by linking to Amazon.com and affiliated sites at no cost to you. This helps offset a small portion of my crafting addiction... uh, hobby. See notice at bottom of blog for a longer description.

Making the Card

1. Cut sea foam cardstock 5 1/2 x 8 1/2 inches; fold in half to form a 4 1/4 x 5 1/2 inch card base.

2. Cut Lawn Fawn Perfectly Plaid Fall 6x6 patterned paper (diagonal multicolored) 4 1/8 x 5 3/8 inches. Adhere to card base.

3. Cut salmon cardstock 3 7/8 x 5 1/8 inches. Adhere to card base.

Prima Watercolor Confections and Faber-Castell Polychromes colored card

4. Cut watercolor paper 3 5/8 x 4 7/8 inches. Using a Stamp Platform or Stamp Positioner, stamp hills in waterproof black ink (I used VersaFine Onyx Black). Hint: where the lines meet, use a little Post-It tape to mask excess overlap. Watercolor sky in a color similar to the blue in the patterned paper. While wet, use a scrunched up paper towel to create clouds.  I added a little more green to color the grassy areas.

5. On another piece of watercolor paper, stamp the girl and about 10 trees (half tall, half short). Watercolor the trees in Fall colors. I used Prima Watercolor Confections. I colored the girl's dress to match the red-orange line in the patterned paper. Once dry, you may add shading with colored pencils (e.g. Faber-Castell Polychromos). I also use a Prismacolor blender pencil to smooth out the coloring. Die cut each of the pieces. Hint: use a small piece of Post-It tape to hold the dies in place as you cut.

6. Stamp sentiment where shown. Once dry, adhere trees and girl using dimensional tape behind the girl and behind some of the trees (the ones you want in front). I used Lineco glue in a Fineline applicator to adhere the trees that weren't going to be popped up; it's easier to use glue rather than tape due to the texture of the paper.

Prima Watercolor Confections and Faber-Castell Polychromes colored card

Supplies
Follow my blog with Bloglovin so you won't miss any of the watercolor fun!

Thursday, September 21, 2017

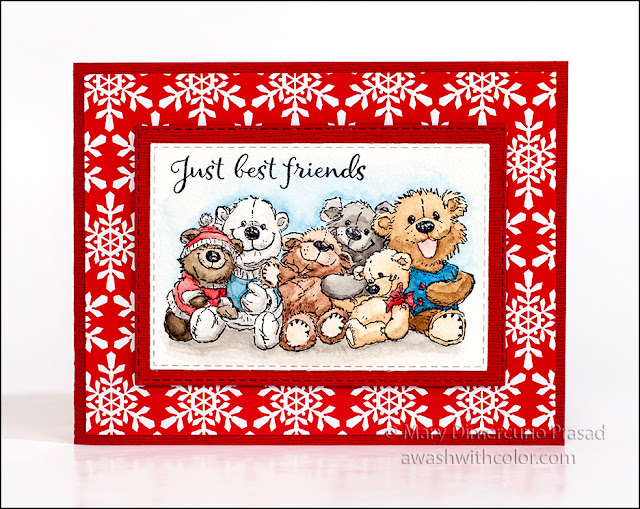
Bunch of Bears Friends Winter Prima Watercolor Card

Bunch of Bears by Rubbernecker Stamps Watercolor by Prima

This adorable stamp by Rubbernecker Stamps is so precious, I wanted it to be the focal point of this card. In order to keep attention on the image, I added the sentiment just above the bears' heads. The color palette is fairly simple - browns, blacks, and a little blue and red for a pop of color. The card could be used for the holidays or simply as a winter greeting.

Affiliate links may be included in this post. I participate in the Amazon Services LLC Associates Program, an affiliate advertising program that provides a means for me to earn fees by linking to Amazon.com and affiliated sites at no cost to you. This helps offset a small portion of my crafting addiction... uh, hobby. See notice at bottom of blog for a longer description.

Making the Card

1. Cut red cardstock 4 1/4 x 11 inches; fold in half to form a 4 1/4 x 5 1/2 inch side folding card base.

2. Cut red/white snowflake paper (Hollyday 6x6 Paper Pad) to 4 x 5 1/4 inches. Adhere to card base.

Bunch of Bears by Rubbernecker Stamps Watercolor Confections by Prima

3. Use a stamp platform or stamp positioner to stamp Bunch of Bears on watercolor paper in waterproof black ink. This paper usually has texture; the platform/positioner will allow you to re-stamp if necessary. Watercolor the image. I used Prima Watercolor Confections. You can watch how I colored the image in the following video (after the description and brush calligraphy demo). I tested my custom hybrid sable waterbrush on this image; you may also read the full post on how to make the brush if you are interested.


4. Once dry, die cut image with 5th die counting in from the largest (Nested Rectangle Small Stitch Die Cut Set), leaving a bit more room at top for sentiment. Stamp sentiment (Best Friends Etc) in black ink as shown using stamp platform or stamp positioner. Create a mat by cutting red cardstock with 4th die in (Nested Rectangle Small Stitch Die Cut Set). Adhere image to red mat.

5. Adhere matted image to card base as shown using dimensional tape.

Bunch of Bears by Rubbernecker Stamps Watercolor by Prima

Supplies
Follow my blog with Bloglovin so you won't miss any of the friendly bear fun!


SaveSave

Tuesday, May 16, 2017

Happiness Is Accordion Greeting Card


This sweet image of a girl and her cat is just purr-fect for a greeting card. I left extra space below the "hello" is for a message (I would recommend writing it before final assembly though - otherwise it might prove challenging). I love how the Accordion Rectangle card displays beautifully on a table or mantle. The roses by Susan Tierney-Cockburn may be colored to match the background paper almost exactly, making them the perfect embellishments for this card.

Affiliates links may be included in this post. See Notice at bottom of blog.

Making the Card

1. Find the shown rose sheet and dots sheet in Save the Date 6x6 paper pad. Die cut with Accordion Rectangle main die with these patterns up, i.e. facing die (may want to be cognizant of the pattern as you place the die). Trim and fold as shown in instructions on packaging but don't assemble yet.


2. Stamp Happiness Is (Dreamerland Crafts) on Distress Watercolor Cardstock with Potting Soil Archival Ink. Using brown ink, rather than black, creates a softer image. I used Distress watercolor paper because the white closely matches the background of the paper I used for the card base.

3. Watercolor the image (I used several sets of Prima watercolor paints, see Supplies below for the sets I used). I mixed the blue/green color for her dress so it would closely match the dots in the paper. I also mixed up enough to use on the leaves for the flowers (step 5). Die cut image using largest accessory rectangle die (Accordion Rectangle, ECD). Adhere to rose page as shown.


4. Die cut blue/green cardstock (Pastels, AC) using Katie Flourish Frame Edges - four of each (enough for 2 full frames). Adhere one set on the dotted page and the other on the back of the rose page (trellis). Die cut white cardstock with largest accessory rectangle die (Accordion Rectangle). Adhere to dotted page as shown. Note: I used fairly thin white cardstock for this and the rose in the next step.

5. Die cut two roses and one bud plus a bunch of extra petals (Rose 2, ECD) from white cardstock. Die cut two sets of leaves. Color leaves with watercolor (same color as dress, step 3); add veins once mostly dry if desired. Use Fired Brick Distress Ink as if it were watercolor to color the petals. I put a light coat on first then added a bit more darker from the bottom up through the centers of the petals (I just left the tips and edges lighter). Shape petals and leaves using ball stylus and leaf tools; see the video below for shaping and assembly (don't use the big stems but save one small stem for the bud; cut off the two large leaves for use). I also use Kids Choice Glue for flowers because of its viscosity.


6. Adhere roses and leaves as shown. Die cut "hello" (Accordion Rectangle, ECD) from pink/peach cardstock (Pastels, AC). Adhere where shown. Finish card assembly as per instructions on packaging.


Supplies
Follow my blog with Bloglovin so you won't miss any of the happy greeting fun!
SaveSave