Showing posts with label Shimmer Sheetz. Show all posts

Friday, November 11, 2016

Holiday Card with Ice Skates


When I was a kid, I used to love to ice skate all winter long. This card reminds me of the glide, glide, and sway - of spins and jumps, and skating through the quiet snow. It was a magical and wonderful time of year (but I'm glad to now live in North Carolina!).

Making the Card

1. Cut 85 lb Soft Finish Cardstock to 5 1/2 x 8 1/2 inches; fold in half for a 4 1/4 x 5 1/2 inch card base. Cut Soft Sky Soft Finish Cardstock 3 3/4 x 5 inches. Cut vellum 1 1/4 x 6 inches.

2. Silver emboss sentiment on vellum starting about 1/2 inch from left edge. Wrap around Soft Sky piece from step 1, starting about 1 inch from top, adhering on back using clear double sided adhesive. Adhere to front of card.

3. From 85 lb Soft Finish Cardstock, die cut two of all pieces of skates except blades. Die cut blades from Siver Metallic Shimmer Sheetz.
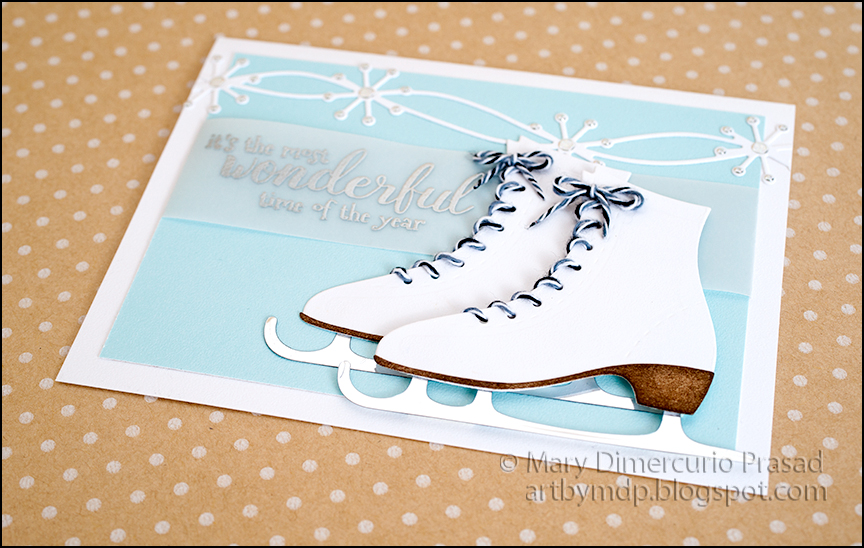

4. "Lace" skates with twine. Hint: put a small piece of clear double sided adhesive behind the top and bottom lace and stick the ends in them. Tie two small bows. To make a bow, I used tweezers that only open when squeezed, like the ones that come in Susan's Garden Tool Set, to help hold the single loop while I tied around it.

5. Apply Walnut Stain Distress Ink to sole/heel pieces of skates with ink blending tool. Adhere to bottom of skates with glue (e.g. Kids Choice Glue). Adhere blades to skates using clear double sided adhesive on back of skates.

6. Die cut snowflake boarder from 85 lb Soft Finish Cardstock. Add Transparent/Silver Glitter Dots as shown (you don't have to add them to where the skates cover or the parts that will get cut off). Adhere to top of card as shown. Trim off excess.

7. Glue bottom skate to card where shown. Glue on bow. Adhere top skate using dimensional tape as shown. Glue on bow.


Supplies

ECD Supplies
Other Supplies
  • Distress Ink: Walnut Stain
  • Ink Blending Tool
  • Twine: Black/Gray/White
  • Vellum
  • Silver Embossing Powder (e.g. Ranger Silver
  • Embossing Ink (e.g. VersaMark)
  • Dimensional Tape
Follow my blog with Bloglovin so you won't miss any of the ice skating fun!
Affiliates links may be included in this post. See Notice at bottom of blog.

Monday, April 25, 2016

Shimmering Chrysanthemums Card

Made for the ECD Susan Tierney-Cockburn Design Team

Shimmer Sheetz make really beautiful flowers! Here I decided to try them with Susan Tierney-Cockburn's Chrysanthemum dies. In person you can see a lot of different colors in the iridescent finish as you turn the card. The layers of black cardstock that make up the Hello sentiment give a really nice 3D look to the greeting. The embossed velvet background adds even more dimensionality to the card.

Making the Card

1. Cut Bright Orange Soft Finish cardstock 5 1/2 x 8 1/2 inches. Fold in half for a 4 1/4 x 5 1/2 inch card base.

2. Cut black cardstock 3 3/4 x 5 inches. Cut yellow velvet adhesive to 3 5/8 x 4 7/8 inches. Emboss using Bouquet Embossing Folder. Peel off backing and stick to black cardstock. Adhere to front of orange card base.

3. Using Garden Notes - Chrysanthemum, die cut large and medium petals from Orange Iridescent Shimmer Sheetz and small petals from Yellow Iridescent Shimmer Sheetz. Die cut leaves and stem from Green Iridescent Shimmer Sheetz. Hint: use a Metal Cutting Plate to help cut through the Shimmer Sheetz.


4. Shape petals using ball stylus - you need to apply a bit more pressure than with card stock to get them to curl. Rub back of each petal then flip and press in center to get them to cup. Shape leaves by pressing on back with ball stylus then turn over and draw vein lines with leaf tool (pointed end). I cut off the leaf from one of the stems and glued it elsewhere. I also accidentally double cut one of the leaves but it came out OK, just smaller, so I used it. I used Glue Dots to adhere petal layers together, as well as to adhere the flower to the card.

5. Using Hello die, die cut 4 or 5 copies from black cardstock and one from Orange Iridescent Shimmer Sheetz. Glue the black copies together, lining them up to form a thick stack. Glue the orange copy on top. Adhere to card as shown.

6. Adhere enamel dots where shown. Tie two pieces of twine into a bow. Adhere where shown.


Supplies

ECD Supplies
Other Supplies
  • Cardstock: Black
  • Enamel Dots
  • Twine: Candy Corn, Orange
  • Glue Dots
Follow my blog with Bloglovin so you won't miss any of the shimmering fun!
Affiliates links may be included in this post. See Notice at bottom of blog.

Monday, August 24, 2015

Fall/Thanksgiving Decorative Card

Made for the ECD Susan Tierney Cockburn Design Team

Susan's new leaf dies make really beautiful fall leaves. I wanted to make a wreath of all the different fall colors; Karen Burniston's Ring Accordion was the perfect base for such a card. I also wanted to use Susan's smaller leaves from a previous release to make matching shaker elements for the other side. The card makes a perfect decoration for fall or Thanksgiving.

For the words, I wanted to add foil in red and green. I have used Therm-O-Web's Deco Foil before but I recently bought some Heidi Swapp Minc foil on sale so I thought I would give it a try. Unfortunately this did not work nearly as well as the Deco Foil - at least not with my laminating machine. I even put them through 5 or more times. There were gaps in the coverage. I may try ironing it with a craft iron next time.

Making the Card

1. In order to do foiling (optional), you will need to print the words using a laser printer (toner based printer). I printed these on yellow/gold cardstock. Create a document with the words "Thankful" and "Grateful" using a fancy font, making sure they are far enough apart to die cut around each (I put one on each side of an 8 1/2 x 11 inch sheet). Print and foil as instructed. I made "Grateful" with red foil and "Thankful" with green foil. For more instructions and another card example of foiling, see my Rainbow Foiled Greetings Birthday Card post.

2. Using the Ring Accordion die set, cut two green ring accordion frames. Cut two more, one from yellow/gold cardstock and one from yellow/orange - you will only use the centers of these so cut the tabs off flush to the center circle. Using the circle die, cut the center out of the yellow/orange circle to create a circle frame. Again using the circle die, cut the foiled words from the yellow/gold cardstock. Cut eight border pieces from the yellow/gold cardstock. Train the folds on both green frames.

3. Using Garden Patch -7/8-inch & Mini Leaves, choose the small leaves that look the most "fall-like." I also used the leaf dies from Garden Patch - 1 1/2-inch & Mini Roses (even though they are for flowers, they look enough like fall leaves). Cut a variety of these leaves from Shimmer Sheetz (see Supplies list for colors and links). These will be part of the shaker elements.


4. Using the smaller Woodland Leaves dies, cut several sets from each cardstock color: light green, green, yellow/gold, yellow/orange, and red. Chalk them in fall colors (I used the fall leaf colors from all three Pan Pastel sets; see Supplies for links). Draw vein lines on each leaf with green or red colored pencil. Shape leaves by rubbing with large stylus on backs and drawing a line down the middle with the leaf tool for the main vein. Curl edges of some using edge of a die pick or handle of a small paint brush.


5. To create the shaker, insert "Thankful" circle inside a heavy duty presentation sheet protector (or other pocket material) and put the circle die on top to use as a guide. You may want to adhere a couple of the Shimmer Sheetz leaves over top of the word (I forgot to do this first so ended up using tweezers; I also went too far around, making it difficult to add the shaker elements). Use the Fuse tool to go around outside of the circle die, maybe half way around or so. Add seed beads, Shimmer Sheetz leaves, and chunky glitter as desired (in front of cardstock - anything behind will not show). Finish sealing the pocket. Cut around outside of seal, close but leaving a small space around the seal.

6. Adhere four border pieces around one of the green frames then the yellow/gold circle to the center (tabs to the right - remembering the flat side is the bottom). Cut off the tabs that are sticking out from the frame (one on the center and one on the frame outside). Adhere shaker using double sided adhesive to the center, then the yellow/orange frame. Adhere two leaves as shown.


7. On the other frame, laying flat with the tab to the left (flat part bottom), glue down the last four frame pieces. Flip the frame. Adhere leaves to "Grateful" circle as shown. Stick this to the center of the frame using dimensional tape. Now for the tricky part. You will glue leaves around the frame, noting that the ones at the bottom that over-hang will have to be folded up to allow the card to stand (i.e. don't leave much over-hanging) and leaving the tab area relative clear so it may fold (any leaves that hit the other frame will also need to be folded). Keep in mind the types of leaves and colors while gluing them to the frame so that they make a pleasing pattern (I tried to keep from placing two alike type or color leaves together). It helps if you lay them out first before gluing.

8. Using strong adhesive, stick tabs as directed to assemble the card. Finish by adhering the final leaves to the front of the card. I didn't mind that the leaves on the reverse side showed from the front of the card since it is intended to be used as a display piece.


Supplies

ECD Supplies


Other Supplies

  • Cardstock: Red, Light Green, Green, Yellow/Gold, Yellow/Orange
  • Heidi Swapp Minc Foil: Red, Green
  • Photo Sleeve Fuse Tool
  • Heavy Duty Presentation Sheet Protectors (I buy mine from Costco)
  • Colored Pencils: Red, Green (e.g. Prisma Color 925 Crimson Lake, 1090 Kelp Green)
  • Chunky Glitter - Red (e.g. Martha Stewart Crafts)
  • Seed Beads: Green
  • Dimensional Tape

Monday, June 22, 2015

Birthday Border of Purple Daylilies Card


This card, featuring Border of Purple Daylilies, was made especially for my friend, Becky. She loves purple (almost as much as I do!) and had admired another card I had made with lilies. Thus I decided to create a card featuring some sort of purple lilies. I found the perfect flower model at White Flower Farm's website.

Making the Card

1. Cut a piece of purple cardstock 5.75x8.5 inches. Fold in half to form a 4.25x5.75 card base.

2. Line up and center the main Tags & More 7 die at the top the card such that the edge of the folded card is inside the left edge of the die, i.e. you do not want to cut the fold, instead you want to line up the die outside of the fold. Be sure the die top is within a quarter inch of the top. Run it through the die cutting machine. The card should measure about 4.25x5.5 (A2 sized card) - if not, just trim the bottom a little.

3. Using the decorator vine die, open the card and cut the top front, lining up the holes.

4. Cut a piece of yellow cardstock to fit on the bottom of the card as shown, leaving a small margin. Cut a piece of Amethyst Gemstone Shimmer Sheetz to fit as shown. Emboss the Shimmer Sheetz using the Swirly Curves Embossing Folder. Adhere the Shimmer Sheetz to the yellow cardstock with strong double-sided adhesive.

5. Die cut 2 lilies, including stems and leaves from purple and green cardstock. Watercolor lightly with Concord Grape Distress Stain, front and back for shading. When dry, add colored pencil veins as shown. Shape assemble as described in my Lily on Velvet Greeting Card post (there is also a video tutorial), adding yellow Pan Pastel (Kit 1) to center areas as shown. For this card, I added green Pan Pastel (Kit 2) highlights to stems after shaping and used Mustard Seed Distress Powder for the stamen.


6. Adhere flowers to Shimmer Sheetz as shown. Die cut Happy Birthday Stand Up Helper from purple cardstock. Adhere where shown. Glue velvet ribbon around Shimmer Sheetz/yellow cardstock, covering bottom of Happy Birthday Stand Up and wrapping slightly around back.

7. Adhere to front of card as shown. Half color a length of seam binding with Concord Grape Distress Stain: I wet the entire piece first, rolled up the ribbon then dipped half into the stain. I also added a bit of Inktense purple watercolor pencil, with a brush and water, to areas of the ribbon to introduce more blue/purple color so it would better match my cardstock. Carefully dry with a heat tool. Finish with yellow/white twine on front tag and seam binding on back tag.


Supplies

Elizabeth Craft Designs
Other Supplies
  • Cardstock: Purple, Yellow, Green
  • Colored Pencils
  • Purple Velvet Ribbon
  • Distress Powder: Mustard Seed
  • Seam Binding Ribbon
  • Distress Stain: Concord Grape
  • Inktense Watercolor Pencils
  • Twine: Yellow/White

Thursday, January 29, 2015

ECD Jewelry - Red Shimmer Pine Sprig Earrings


This is the first time that I'm trying out the new Jewelry dies from Elizabeth Craft Designs. I think the earrings came out pretty well! They sparkle much more than they appear in the image due to the beautiful Shimmer Sheetz. The Ice Resin dries clear, smooth, and shiny - the perfect substrate material.

Making the Earrings

1. Cut 4 pieces of craft foam large enough to accommodate your chosen jewelry die plus space around it. Cut one piece with the die from the front and one piece from the back (this mainly only matters if the foam has adhesive on it already, otherwise just flip one after cutting). Stick each of the cut pieces to the non cut pieces so one is flipped compared to the other; these will form 2 molds. Note: in my photo below, the foam I used on the bottom was yellow and the foam that I die cut was blue.

2. Seal the molds. I used a thin coat of Multi-Meduim but it came off when I removed the jewelry (which gave the backs a matte texture). You may want to try silicone or other sealer plus a release agent.

3. Cut red metallic Shimmer Sheetz, one from the front of the sheet and one from the back so one will be a flipped image of the other.

4. Emboss the cut pieces using the Sprig embossing folder by placing each as desired in the folder and temporarily taping before running through machine (this will keep the pieces from moving). I wanted the sprigs to pop up so I oriented them as such.


5. Sand the tops of the pieces (sprigs). Paint them with Patina paints as desired (acrylic will likely work as well). Let dry.

6. Mix Ice Resin as directed, enough to fill both molds. Spread a very small amount into the bottom of each mold - just enough to cover the very bottom. Pop the painted pieces (painted side up) into the bottom of the moulds. Pour more Ice Resin into the moulds, just enough to fill them and evenly cover the metallic pieces.

7. Let dry at least one day or so, until they are mostly dry but still slightly flexible. Remove from molds. Sand edges if necessary. If you would like a curve in them, place them face down into a large tape roll. Press them against the side to give them a curve. Tape to hold them in place against the roll.

8. Let them dry until completely cured, about two more days. Drill small holes in the tops (I used a Dremel tool with a very small drill bit placed on an old rubber mouse pad). Polish edges if desired. Mount on dangle earring wires.

9. To make the card, cut a piece of white cardstock large enough for the earrings to dangle plus room for the stamped sentiment above. Stamp, punch holes for the earrings, and thread the wires through.

Supplies

ECD Supplies
  • Jewelry Dies
  • SS0214 Shimmer Sheetz, Metallic Red
  • E127 Embossing Folder, Sprig
Other Supplies
  • Craft Foam (e.g. Fun Foam)
  • Sandpaper
  • Ice Resin
  • Studio Multi-Medium, Matte
  • Patina by Ranger: Emerald, Jade
  • Earring Bases, Gold Dangle
  • Cardstock, White
  • Close to My Heart, My Acrylix
  • Ink: Red, Black

Thursday, January 22, 2015

Peony and Hydrangea Thank You Card


Created for the Elizabeth Craft Designs DT

This is my first card as part of Susan Tierney Cockburn's design team! Her new ECD dies make beautiful flowers.

Making the Card

1. Cut blue cardstock 5.5 x 8.5 inches; fold in half to form a card base. Cut pink cardstock 4 x 5.25 inches.

2. Die cut black cardstock, light blue Shimmer Sheetz, and raspberry Shimmer Sheetz using the Garden Patch 1 1/2 Inch & Mini Petals main die. Die cut Thank You sentiment from raspberry Shimmer Sheetz (use Adaptor Plate). Die cut 2 more copies of Thank You from pink cardstock. Glue the Thank You words in a stack to form thick words, with the Shimmer Sheetz on top.

3. Adhere the black frame to the pink cardstock (step 1), centered at the top (long side) as shown.

4. Emboss square pieces of raspberry Shimmer Sheetz using Bouquet folder; emboss blue pieces using Dancing Leaves folder. Tap/rub StazOn Black ink across the tops to enhance the design. Adhere into black frame using strong tape or glue (I use Glossy Accents), alternating designs. Add blue ribbon around where shown. Adhere stacked Thank You to card over ribbon where shown.

5. Using Hydrangea and Peony dies, die cut stems and leaves from green cardstock, Peony petals from light pink cardstock (cut about 3 sets of the single petal sets), Hydrangea flowers from cream cardstock (2 sets of flowers), and Peony center (stamen) from yellow cardstock (cut 2 copies).


6. Lightly ink all edges of cream flowers with Salty Ocean Distress Ink using an ink blending tool. Watercolor petals of Peony with Picked Raspberry Distress Ink: get each petal wet with a brush and water, add a small amount of color most of the way up the petal, then intensify the color at the base. Watercolor the leaves using Mowed Lawn Distress Ink: darker green in shaded areas (base of leaves), let dry then use a small brush to add veins. Add green shadows to the stems as well, along one side.

7. Shape the leaves and petals: rub the middle of the Hydrangea flowers with a small round stylus. Run a stylus around the back edge of each Peony Petal (including the ones that form the base), flip and rub with a large stylus or end of a die pick from the base about half way towards the tips - choose about 6 petals to shape the opposite way to go around the center and on the Peony bud (one very small and one small for bud), i.e. these will curve inwards while the others will curve outwards.

8. Cut the yellow stamen stalks (filaments) down the middles maybe 2/3rds of the way down. Add glue along the bottom edge of one, roll tightly along the bottom edge. Add glue to the other and roll it around the first. Spread the filaments out a bit with your finger.

9. Add a small dot (e.g. with toothpick) of Baby Blue Liquid Pearls to the centers of each of the Hydrangea flowers. With a large stylus or end of die pick, rub the back of the round Hydrangea base (top of stem) to form a cup. Add something to the cup to give it support from behind - I used a large enamel dot but you could fill it with Glossy Accents, Silicone Glue, or even dimensional tape (cut in circle). Glue the flowers to the outside. You may have to adhere a few on opposite sides then let them dry before adding more so they won't shift on you.


10. For the Peony bud, find the base (one with embossed lines), glue the small sized then the very small sized petals you reserved, as shown in photo. For the main Peony, rub the petal base in the center to give it a bit of a cupped shape (e.g. with the end of a die pick). Glue the stamen to the center. Glue the petals reserved for the center around the stamen then fill in the other petals.

11. Assemble and adhere stems, leaves, and flowers as shown. Don't be afraid to trim a stem and/or move leaves to create the look you want. I cut an extra leaf for the Hydrangea (bottom) and glued it on top of its matching leaf, along the bottom edge, to make it pop out. Make a double bow with twine and adhere where stems meet.

I used the left-over pieces from the first card to create the background for this card.

Supplies

ECD Supplies
Second Card, Extra ECD Supplies

Other
  • Cardstock: Blue, Pink, Light Pink, Black, Green, Cream, Yellow
  • StazOn Ink: Black
  • Distress Ink: Mowed Lawn, Salty Ocean, Picked Raspberry
  • Liquid Pearls: Baby Blue
  • Blue Ribbon
  • Blue/Brown Twine
  • Strong Adhesive (e.g. Glossy Accents)

Friday, January 2, 2015

Evergreen Tree Pivot Card


You wouldn't know it from looking at the front, but this is a gate fold card featuring the Evergreen Pivot Card dies (which are often used on the front of the card). This allows the trees to be a little more of a surprise when the card is opened. I used Shimmer Sheetz and Silk Microfine Glitter to give the card a lot of sparkle and shine!


Making the Card

1. Cut 5 1/2 x 12 inches from both the striped paper and cream cardstock. Adhere them back-to-back. Gatefold so first fold is about 4 1/8 inches from the left and the second fold is about 3 7/8 inches from the right (the last flap will be shorter to fit inside easily).


2. From the back, cut using the Evergreen Pivot Card die so the large tree is on the back of the shortest panel, aligning the die with the fold as usual, just from the back. Fold trees in as shown.

3. Cut turquoise cardstock 3 7/8 x 5 1/2 inches and a strip 3/8 x 5 1/2 inches. Glue the strip along the inside left side as shown. Emboss the other piece using Sprig Embossing Folder  Sand raised areas. Lightly ink randomly with Mowed Lawn using blending tool. Adhere to front panel as shown.

4. Cut 5 copies of Merry Christmas from black cardstock, glue each word together to form a thick stack, lining them up carefully. Cut one copy of Merry Christmas from Gold Metallic Shimmer Sheetz using the Metal Adaptor Plate. Glue to the top of the stacks.

5. Stick one side of Double Sided Adhesive to white cardstock, enough for all the lights, ornaments, gift bow, and sprigs (maybe 4x5 inches). Peel off the backing and sprinkle with Warm Diamond Silk Microfine Glitter polish with finger. Die cut 2 sprigs from Candle die set, 5 or 6 strings of lights (from Holiday House set), present bow, and a set of ornaments. Color with alcohol inks as desired.

6. Cut Holly Border from Green Metalic Shimmer Sheetz using metal adapter plate. Adhere along edge as shown. Adhere sprigs and Merry Christmas as shown. Add Red Glitter Dots as shown.

7. Cut trees from Green Metallic Shimmer Sheetz. Decorate as shown. Cut present base from Red Metallic Shimmer Sheetz. Adhere bow. Cut stars from Gold Shimmer Sheetz. Assemble as shown using dimensional tape for some of the ornaments and stars (the large tree has a double star – small star adhered to large star using dimensional tape).


Supplies

Elizabeth Craft Designs

Other Supplies
  • Cardstock: Cream, Turquoise (12x12 Sheets, White Core), Black, White
  • Paper Pad with Treatments: My Mind’s Eye, Be Merry, Glittered Striped Cream/Turquoise
  • Sandpaper
  • Distress Ink: Mowed Lawn
  • Ink Blending Tool, Foam
  • Alcohol Inks (e.g. Copics)
  • Liquid Adhesive/Glue

Wednesday, December 31, 2014

December ECD Challenger: Glitter and Shimmer

Created for the Elizabeth Craft Designs DT

My husband and I recently returned from a 6 week vacation in New Zealand and Australia. A while back, we were invited to stay with a friend in Brisbane, Australia; we finally took him up on it! Since it is so far to travel, we decided to stay a while (and also see NZ!). This is the thank you card I made for him. This month's challenge is Glitter and Shimmer - the card was created using Silk Microfine Glitter and Shimmer Sheetz.

Making the Card

1. Cut a piece of red cardstock to 7.25" x 5.5", fold in half and die cut with Spiral Circle Pull Card as directed on the back of the package (you will not use the spiral). Cut a piece of red cardstock with the small label die from Lorna Label PopUp.

2. Die cut black Shimmer Sheetz using Clock and Gears: circle, clock hands, large gear. Cut 3 or 4 copies (depending on your cardstock and how thick you would like the stacks) of clock hands and large gear from black cardstock. Glue the cardstock pieces together in stacks to make thick versions; add the Shimmer Sheetz die cuts to the top.

3. Die cut 4 or 5 copies of the small gear from light blue cardstock; glue together. Die cut 3 or 4 copies of Thank You words from light blue cardstock; glue together.

4. Adhere one side of Double Sided Adhesive to white paper. Die cut the clock face and Thank You. Peel off the other side and coat with Cool Diamond Silk Microfine Glitter; polish with your finger by carefully rubbing the glitter. Color glittered Thank You in light blue (I used Copic B01); glue to top of light blue cardstock stacks. Color the clock face in red (I used Copic R29).

5. Glue the black Shimmer Sheetz circle to the front of the card as shown. Adhere the red clock face to the circle as shown. Punch a hole in the center of the circle. Use a brad to secure the clock hands as shown.


6. Cut pattern paper shown to fit on the front and inside of the card: cut rectangles first leaving a small amount around the edges. Adhere the inside piece and cut slots from the back using a craft knife. To create the circle cut out in the front piece, temporarily adhere it in place and trace the partial circle from the back. Fussy cut following the line, leaving the same amount you left for the edges.

7. Tie two pieces of twine around the bottom edge of the front paper in a double bow as shown. Adhere to front of card. Adhere a piece of the Film Strip Ribbon under the bow as shown. Fussy cut a camera icon, coat with Glossy Accents. Once dry, adhere to center of bow as shown.

8. Print sentiment on cardstock; die cut with circle die from Clock and Gears. Be sure to leave room for gear. Adhere as shown (this will cover the back of the brad).

9. Adhere the Thank You to the small red label (step 1) and use dimensional tape to adhere to card as shown. Adhere the black gear and blue gear where shown.


Supplies

Elizabeth Craft Designs
Other Supplies
  • Cardstock: red, light blue, black, white
  • Paper: white
  • Alcohol Markers (e.g. Copic)
  • Glittered Brad, Recollections (Michaels)
  • Perfect Vacation 6x6 Paper Pad by American Crafts
  • Film Strip Ribbon, Idea-ology
  • Twine
  • Glossy Accents
  • Dimensional Tape

Wednesday, September 10, 2014

Nautical Hello Card


Created for ECD Design Team

The new Peel-Offs include nautical themed designs. I decided to step a little outside my box and create something different, at least for me anyway since it’s not a theme I frequent.

Making the Card

1. From the Nautical paper pack: cut a piece of the red cardstock 10x7 inches. Fold in half to create a card base. Cut a piece of the cream cardstock to 9 1/2 x 7 inches; fold in half. Using the Lorna Label Pop Up main die, center and die cut along the fold.

2. Cut a piece of cream cardstock 6 1/2 x 4 1/2 inches. Cut a piece of blue/cream striped cardstock 6 1/2 x 2 inches; adhere to bottom of cream cardstock. From the Basic Black Shimmer Sheetz, cut a thin strip 6 1/2 inches; adhere over the seam as shown.

3. Stamp the compass rose on graph paper from the Far and Away paper pad using Black Soot Distress Ink. Tear it out in a square. Using the blending tool, add Antique Linen Distress Ink around the edges. Crumple.


4. Using the main die from the Lorna Label Pop Up, die cut the label from red cardstock and trim down to just the label. Find the US map in the Far and Away paper pad. Using the banner die, cut flags of varying lengths as desired. Arrange and adhere to the red label as shown; trim from the back with scissors following the label contour. Adhere a piece of cheesecloth from behind as shown.


5. Adhere Peel-Offs (see supplies list below) shown on card to watercolor paper and paint with watercolors. Fussy cut around each - cut the “rope” off the lifesaver. Using your fingers, gently shape by rounding the edges down for all but the lifesaver.


6. Braid a length of blue/white twine to about 9 or 10 inches. Use half to tie a nautical knot. Die cut a banner from the Lorna Label Pop Up set from the cream cardstock; set a red eyelet at each end of the banner and thread ends of twine as shown, adhering and trimming ends behind the banner.

7. Arrange and adhere pieces to front of card as shown, using dimensional tape for the label, shells and banner.


8. From blue cardstock, die cut the label from Lorna Label Pop Up and emboss with stitching; sand lightly to show stitches. Adhere to center of pop up.

9. Cut 6 copies of the Hello word from black cardstock. Glue each layer on top of the other to create a thick stack. Add Glossy Accents to the top layer. Set aside to dry. Cut talk bubble from cream cardstock. Adhere Hello to talk bubble.

10. Using the other half of the braided twine, glue behind the handles of the lifesaver.

11. Color some of the transparent Glitter Dots in matching blue with alcohol marker (optional). Adhere to pop up as shown.

12. Adhere pop up to inside of card. Adhere everything to pop up as shown using dimensional tape.


Supplies

Elizabeth Craft Designs

Other Supplies
  • Watercolors
  • Nautical Paper Pad (Craft Smith)
  • Black Cardstock
  • Glossy Accents
  • Twine, Blue/White
  • Red Eyelets
  • Cheesecloth
  • Far and Away Teresa Collins 6x6, Map Paper
  • Stamp, Tim Holtz Stampers Anonymous Air Travel CMS 102, Compass Rose
  • Blending Tool
  • Distress Ink: Black Soot, Antique Linen
  • Blue Alcohol Marker

Sunday, August 31, 2014

August ECD Challenge: Asian Theme

 Created for the ECD Design Team

This month's Elizabeth Craft Designs Design Team challenge theme is Asian. I chose to make a Japanese themed card, complete with cherry blossoms, fans, and kimono. The fan patterned cardstock, each with its own cherry blossom design, was the perfect backdrop to my own hand-made "cherry blossoms."

Making the Card

1. Cut a piece of dark purple cardstock 10x7 inches, fold in half to form a 5x7 inch card base. Lightly sand near edges in several areas. Use a foam blending tool to add a little Brushed Corduroy ink to the white areas to give them an antique look.

2. Cut a piece of brown cardstock 4 1/2 x 6 1/2 inches. Cut a piece of the fan patterned cardstock 4 1/4 x 6 1/4 inches. Sand a few spots along the edges of the latter, then add a little Brushed Corduroy ink to the white areas, as well as a few other spots, with the foam blending tool. Adhere together then to card base as shown.

3. Cut a piece of dark purple cardstock 2 x 4 inches. Cut a piece of light purple cardstock 1 3/4 x 3 3/4. Antique as in step 1. Adhere together. This is the mat for the kimono.

4 Cut two tree trunks from brown cardstock using the All Seasons Tree die set. Cut each trunk in half to create branches. Trim the ends of some of the longer branches by rounding them (leave the trunk for now). Place on card base as desired (see front of card for my placement). Mark and trim the trunk parts that hang off the fan cardstock or stick out from under where the kimono will go. Glue down the base of each of the branches but leave some of the tips unglued; curl them up slightly to give them dimension.

5. Cut a bunch of middle and small sized five-petal flowers (Bunch of Flowers 1) from the dark and light purple cardstock. Cut very small flowers (All Seasons Tree set) in the same colors - these will be the centers. Sand/antique all flowers. Shape the petals. I use a rubber mouse pad and the end of a small paint brush handle. Adhere the smallest flowers to the centers of the opposite color (i.e. glue dark purple centers on light purple flowers and vice versa).  Adhere the flowers to the branches as desired.


6. Cut the base kimono design from the Bronze metallic Shimmer Sheetz using the Metal Adaptor Plate. Cut the fancy kimono design from the tan Velvet Adhesive Sheet. Peel and stick the fancy design to the base. Adhere the kimono to its mat using dimensional tape. Adhere the mat to the card as shown.

Supplies


Elizabeth Craft Designs


Other Supplies

  • Dark and Light Purple (white core - I used DCWV), Brown Cardstock
  • DCWV Far East (Fan Cardstock)
  • VersaFine Ink, Imperial Purple
  • Distress Ink, Brushed Corduroy
  • Foam Blending Tool