Showing posts with label Paper Smooches. Show all posts

Wednesday, October 21, 2020

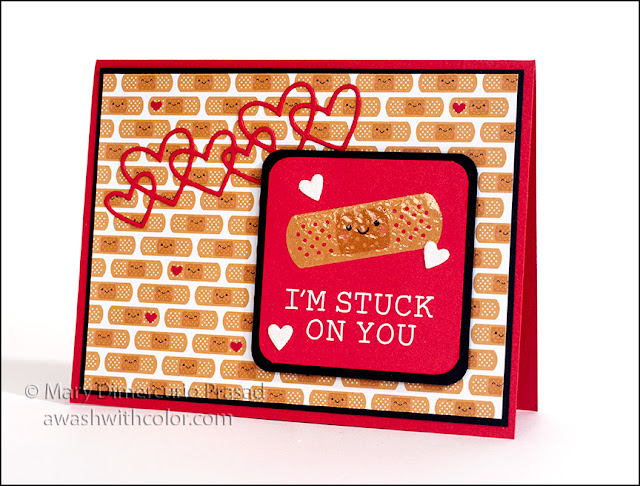
Doodlebug Design Quick Card - Stuck on You

Doodlebug Design Quick Card - Stuck on You

Here's another fairly quick card using Doodlebug Design papers. So Much Pun is part of their "punny" collection, along with So Punny. They have a page or two in each pack that can be cut apart for easy additions to cards. I made this particular card for my husband. I just love how cute and colorful Doodlebug Design products are!

Copyright Notice: ©Mary Dimercurio Prasad. All rights reserved. Any illegal reproduction of this content, including images, will result in immediate legal action.

Disclaimer:  Please help support my work in this small way - just use my links if you plan to purchase anything - there's no extra cost to you. Here's the official jargon: links, affiliate links, and cookies may be used in this post and on this site. Using this site implies your consent. I participate in the Amazon Services LLC Associates Program, Share a Sale, and other affiliate programs; these affiliate advertising programs provide a means for me to earn fees by linking to amazon.com and/or other affiliated sites. This helps offset a small portion of my crafting addiction... uh, hobby. I am truly thankful for your kind support! I also receive free products from companies, possibly monetary compensation, and sometimes free products for review. Regardless, all opinions are my own. Google and Blogger use cookies to provide and improve their services. See Notice at the bottom of this blog for a longer description and/or see the full Privacy Policy for even more details.

Making the Card

1. Cut red cardstock 5 1/2 x 8 1/2 inches; fold in half to form a 4 1/4 x 5 1/2 inch card base. Cut black cardstock 4 x 5 1/4 inches for mat; set aside. In the So Much Pun 6x6 paper pad, find the page with the smiling bandages.  Cut to 3 7/8 inches tall first, watching orientation of bandages (i.e. cut off top or bottom). Next cut to 5 1/8 wide, keeping the leftover strip of bandages for the inside of the card. Adhere to black mat then adhere to card base.

2. From red cardstock, die cut Linked Hearts. Adhere where shown on card base. You may want to wait until you do step 3 before placing and gluing hearts. Note: the hearts I used have been discontinued but I put an alternative in the Supplies list; you may have to change the orientation of these hearts and the pun in step 3.

Doodlebug Design Quick Card - Stuck on You

3. In the So Much Pun 12x12 Paper Pack, find the sheet of square puns and cut out the "I'm stuck on you" pun. Cut black cardstock slightly larger (I just put the pun in a corner of the cardstock, with the amount of space I wanted on the cut sides, then put pencil marks on the other sides to match, and cut). Use the Crop-A-Dile Corner Chomper Tool to round the corners 1/4 inch on both the pun and the black cardstock; adhere together. Adhere to card base as shown using dimensional tape.

4. Optional, use Wink of Stella on main bandage. Once dry, add Glossy Accents over same bandage.

5. From white glitter cardstock, die cut triple hearts using Coffee Charms die. Adhere where shown.

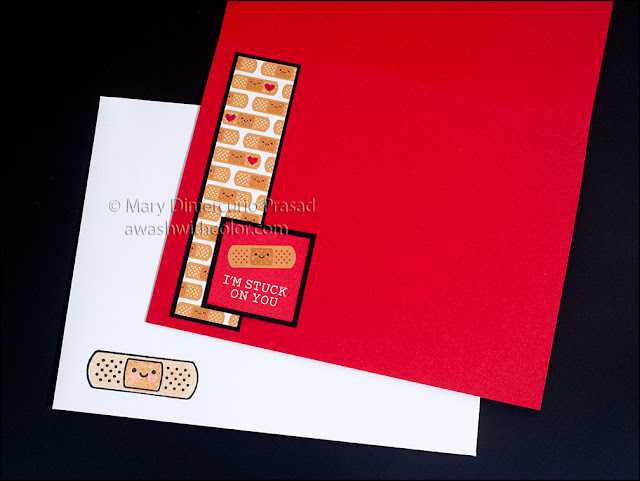
6. Cut red paper with Envelope Liner die for A2 card (sorry, inside liner is not shown). Set aside small red hearts. Make an A2 envelope from white paper using Envelope Board - leave unassembled (assembly in step 7). Stamp bandage and face on front bottom left corner with Memento Tuxedo Black ink (may want to fold envelope temporarily to note where to stamp but lay it all flat again for stamping). Color image with colored pencils.

Doodlebug Design Quick Card - Stuck on You

7. Adhere liner to inside envelope then assemble envelope. Use a bone folder to help with folds.

8. For the inside of the card (image further below), cut a black mat slightly larger than the saved strip of bandages. Adhere together than to inside of card where shown. In the So Much Pun 6x6 Paper Pack, find the sheet of square puns (matching the 12x12 for the front of the card) and cut out the "I'm stuck on you" pun. Cut black cardstock slightly larger; adhere together then adhere inside of card where shown.

9. To add a little more detail to the small bandages on both the front of the card and on the inside strip, glue small red hearts (saved from step 6) as shown. You may have to look closely to see them. Your pattern may vary somewhat depending on how the pattern was printed and cut on your particular sheet. I recommend placing all hearts first then gluing then down once you like the placement. I put 5 on the front and 3 inside the card.

Friday, February 17, 2017

Let's Play Kaboodle Dog Card with Faber-Castell Polychromos Colored Pencils


The adorable doggie footprint border, stitching, and stitched tag dies are new from Frantic Stamper, as part of their March release. The Whipper Snapper Kaboodle dog is perfect for the tag (a little bit has been cropped but enough shows to be super cute). The background is also by Whipper Snapper; background Dog's Life was stamped in VersaMark ink to provide a subtle pattern. This ink is great for watermarking - it looks like you stamped in a darker toned ink that perfectly matches the paper.

I used Faber-Castell Polychromos colored pencils to color the image. These pencils are easily blended with a light hand.

Making the Card

1. Cut Desert Storm cardstock 5 1/2 x 8 1/2 inches; fold in half to form a 4 1/4 x 5 1/2 inch card base.

2. Cut Kraft cardstock to 4 x 5 1/4 inches. Die cut scallop border very close to the left side (Large Scalloped Edger Set); die cut paw prints (keep a couple of the footprints for an optional inside decoration). Die cut stitching down the right side (In Stitches #3). Stamp Dog's Life background using VersaMark ink in center (I recommend using a stamp positioner). Die cut a strip of black cardstock, about 1 x 5 1/4 inches, with scallop border. Adhere behind footprints; trim if necessary. Adhere to card front.


3. Stamp Kaboodle in black ink on Desert Storm cardstock (about 3 x 4 1/2 inches). Color with colored pencils. Die cut with largest Nested Tags #2. Tie jute through tag hole. Adhere to card as shown using dimensional tape.

4. Cut a 3/4 x 3 1/8 inch strip of Desert Storm Cardstock. Stamp "let's PLaY" and two paw prints as shown. Cut tails in one side. Adhere to card as shown using dimensional tape.

5. Optional: glue a couple footprints inside the card (I put two on the bottom right - adhered after some of the photos were taken).


Supplies
  • Frantic Stamper Dies: Large Scalloped Edger Set (FRA-DIE-10129), Nested Tags #2 (FRA-DIE-10101), In Stitches #3 (FRA-DIE-10187)
  • Whipper Snapper Stamps: Dog's Life B/G (AT622), Kaboodle (MY927)
  • Paper Smooches Stamps: Chubby Chums
  • Cardstock: Desert Storm (Neenah), Kraft (Recollections), Black
  • VersaMark Ink
  • Black Ink (e.g. Memento Tuxedo Black)
  • Colored Pencils (e.g. Faber-Castell Polychromos)
  • Jute
  • Dimensional Tape
Follow my blog with Bloglovin so you won't miss any of the dog gone fun!
Affiliates links may be included in this post. See Notice at bottom of blog.

Wednesday, October 26, 2016

Paper Smooches Color of the Season Card


I just love the colors of Fall. The trees look so beautiful at this time of year. I wanted the focus of the card to be on the colorful leaves so I made the background and tree the same color, just giving the tree a little dimension by stacking die cuts.

Making the Card

1. Cut kraft cardstock 5 1/2 x 8 1/2 inches; fold in half to form a 4 1/4 x 5 1/2 inch card base.

2. Die cut 3 trees from kraft cardstock. Adhere these together to form a thick stack. Adhere to card base as shown.

3. Die cut a set of leaves from the following colors of cardstock: green, yellow, yellow/orange, orange, red. Ink edges with various colors of Distress Ink using an ink blending tool.

4. Shape each leaf over foam pad using ball stylus. Use pointy end of leaf tool or die pick to draw a line down the middle of each leaf.

5. Stamp sentiment in black (e.g. VersaFine Onyx Black). Adhere leaves to tree, a few at the base of the tree, and in a swirly pattern as shown.


Supplies
  • Paper Smooches Die: Fall Tree
  • Paper Smooches Stamps: Fall Sampler
  • Distress Inks: Walnut Stain, Aged Mahogany, Candied Apple, Spiced Marmalade, Rusty Hinge, Fossilized Amber, Mowed Lawn, Peeled Paint
  • VersaFine Onyx Black Ink
  • Ink Blending Tool
  • Foam Pad (or Rubber Mouse Pad)
  • Ball Stylus, Die Pick or Leaf Tool
Follow my blog with Bloglovin so you won't miss any of the Fall color fun!
Affiliates links may be included in this post. See Notice at bottom of blog.

Wednesday, October 19, 2016

Colorfull Fall Leaf Grateful Card


These Paper Smooches stamp leaf outlines work beautifully with Imagine Crafts' Memento Luxe Inks. Create this colorful Fall background, perfect for Thanksgiving or as just a note to a loved one.

Making the Card

1. Cut red cardstock 5 1/2 x 8 1/2 inches; fold in half to form a 4 1/4 x 5 1/2 inch cardbase. Cut brown cardstock 4 x 5 1/4 inches. Cut white cardstock 3 7/8 x 5 1/8 inches.

2, Die cut "Grateful" from red cardstock, one leaf (Leaves 2 dies) each from yellow, green and orange cardstock, and all three leaves from brown cardstock. Set aside for now.


3. Watch the following video for stamping:


4. Adhere "Grateful" and leaves as shown.


Supplies

  • Memento Luxe Inks: Pear Tart, Olive Grove, Pistachio, Peanut Brittle, Dandelion, Morocco, Love Letter, Rhubarb Stalk, Rich Cocoa
  • Paper Smooches Dies: Grateful, Leaves 2
  • Paper Smooches Stamps: Fall Sampler
  • Cardstock: White, Brown, Red, Yellow, Green, Orange

Follow my blog with Bloglovin so you won't miss any of the colorful Fall fun!
Affiliates links may be included in this post. See Notice at bottom of blog.

Wednesday, October 12, 2016

Paper Smooches Fall Blessings Watercolor Card


I used the colors of Fall leaves for my watercolor background. The added veins (or branches) in gold are reminiscent of trees. I used the Paper Smooches new Leaf Frame die to inlay the pieces, while stacking copies from the Blessings die to pop up the word.

Making the Card

1. Cut white cardstock 5 1/2 x 8 1/2 inches; fold in half for a 4 1/4 x 5 1/2 inch card base. Cut brown cardstock 4 1/8 x 5 3/8 inches. Adhere to card base.

2. Cut watercolor paper 4 1/4 x 5 1/2 (this is 1/4 inch larger than the final version, leaving 1/8 inch around for tape - if you need more room for tape, adjust paper size accordingly). Tape to craft mat or other surface.

3. Place Leaf Frame face down in the area it will be cut (mine is offset towards the bottom right corner). Pencil a line outside where you would like the watercolor to go - leaving about 1/8 inch or so room; you will need to erase the line but it will be difficult, if not impossible, to do so if you watercolor over it. Put the die aside.


4. Add water to the area you would like to watercolor. Work in layers - starting light, letting the paper dry some, add more color, dry more, brighter color. Finally add some FineTec mica in Inka-Gold with a medium brush; this may not show much. Dry completely then use a fine tipped brush to add FineTec mica Arabic-Gold: make the lines look like leaf veins or branches. Optional: Splatter with brown watercolor and Arabic-Gold, bang brush against your finger with some paint on the brush - but not too wet. I recommend trying on scrap paper first.

5. Once watercolor has fully dried, die cut using Leaf Frame being careful not to lose any pieces. Adhere outside frame to card base as shown, careful to center in brown layer. Die cut brown paper with Leaf Frame. Adhere brown Leaf Frame inside watercolored outside frame. Adhere leaf pieces.

6. Die cut "Blessings" in center of watercolored inside frame piece (you may want to use a little temporary tape to hold the die in place as you die cut). Be sure to keep all the pieces. Adhere big piece with Blessings cut out of it to the card as shown. Temporarily piece in the word Blessings (do not adhere). Adhere small inside pieces (l, e, and g).


7. Die cut 4 or 5 copies of "Blessings" from brown cardstock. Layer these on top of one another to form a thick stack. Hint: to glue the dot on the i stack, first stick it to some temporary tape. Adhere the watercolored version to the top of the stack. Adhere in Blessings place on card.

8. Take the small piece where the "to you and yours" will go and use water and paper towel to blot off some of the color. Dry. Stamp "to you and yours" in small piece as shown with Timber Brown StazOn ink. Adhere as shown.


I made the following quick card with the leftover frame from the above card and a test run scrap, from which I cut another "Blessings" sentiment. I also added a few enamel dots.


Supplies
  • Paper Smooches Dies: Blessings, Leaf Frame
  • Paper Smooches Stamps: Fall Sampler
  • Watercolor Paper: Arches Rough
  • Painter's Tape
  • Watercolor Paint: Winsor & Newton, FineTec Mica
  • Cardstock: Brown
  • StazOn Ink: Timber Brown
Follow my blog with Bloglovin so you won't miss any of the Fall cardmaking fun!
Affiliates links may be included in this post. See Notice at bottom of blog.

Wednesday, October 5, 2016

Paper Smooches Guest Designer - Halloween Card


I was chosen to be the Paper Smooches guest designer for October! Woo-hoo! This is my first project. I used the new Leaf Frame Die to make a crooked window (haunted hauses don't have your straight ordinary windows) looking out onto the full moon and creepy tree (Fall Tree Die) scene. The sentiment is from the new Fall Sampler stamps.

Making the Card

1. Cut black cardstock 5 1/2 x 8 1/2 inches; fold in half to form a 4/1/4 x 5 1/2 inch card base.

2. Cut Tangerine Gingham Linen patterned paper 4 x 5 1/4 inches. Stamp web, spider, and "happy halloween" sentiment. You may want to heat set or let it dry for a while if you are using VersaFine - it takes a while to dry. Once dry, draw a line connecting the spider to the web using a black pen (e.g. Copic Multiliner).

3. Die cut black and dark gray cardstock with Leaf Frame. Use dark gray for inside of frame and black for the frame edge. Adhere at an angle to Tangerine patterned paper (step 2) as shown. Don't worry if part of the leaf hole is in the card area, the moon will cover it. Leave the overhang for now.

4. Die cut or punch 1 1/2 inch circle from yellow/orange cardstock. Stamp bat where shown (near one edge). Glue to window as shown.

5. Die cut Fall Tree from black cardstock. Line up in window and mark with pencil where it hits the edges; trim (you don't have to trim the left side as it will get trimmed with the other stuff). Adhere.

6. From the back side, cut along the edge to trim overhanging stuff. Adhere to card base. Add sequins where shown.


Supplies
  • Paper Smooches Dies: Leaf Frame, Fall Tree
  • Paper Smooches Stamps: Fall SamplerHalloweenies
  • 1 1/2" Circle Die or Circle Punch
  • Cardstock: Black, Dark Gray, Yellow/Orange
  • Patterned Paper: Doodlebug Design Tangerine Gingham Linen 5430
  • VersaFine Onyx Black Ink
  • Black Pen (e.g. Copic Multiliner)
  • Sequins: Doodlebug Designs - Tangerine, Bumblebee
Follow my blog with Bloglovin so you won't miss any of the creepy fun!
Affiliates links may be included in this post. See Notice at bottom of blog.

Monday, August 29, 2016

Creating a Galaxy or Nebula with Radiant Neon


Creating galaxy or nebula backgrounds is really popular these days. Many people are using watercolor paints to create them. I decided to use the incredibly bright Radiant Neon Inks by Imagine Crafts to create mine, along with Memento Tuxedo Black ink. This combination gives a surprisingly realistic look (well, similar to the enhanced space photos seen in magazines and online). I applied Sheer Shimmer Spritz to the background as well - it's so beautiful in person! Unfortunately the photos don't pick up much more than a few shiny dots here & there but you can see it better in the video (although the colors are duller in the video, sigh).

Making the Card

1. Cut purple/blue cardstock to 5 1/2 x 8 1/2 inches; fold in half for a card base.

2. Cut watercolor paper to about 5 x 6 inches. Note: the final size will be 4 x 5 1/4 inches, leaving extra space for taping down and triming.

3. Watch the video below to create the nebula look on the watercolor paper. To create a galaxy, just apply the color in a band across the card. Hint: do a Google search for "nebula" or "galaxy" - click the "Images" tab and use one of the photos as a model as you work. You will see me do this on my iPhone, which I set up in front of my work area (out of view of the video camera).

NOTE: YouTube took down my video and put a strike on my account due to a FALSE copyright claim by Sony Music Entertainment (SME). The actual music copyright owner is Pacific Digital Video, from whom I have permission to use their music. Someone called "Ogie" sang over Pacific's music track illegally and SME is distributing it. SME filed a false copyright violation against me and YouTube will not even look at this unless I allow SME to sue me! Their process rewards false copyright claims - the victims have no viable recourse. I now have a strike on my YouTube account because I filed a counter notification and wouldn't yield to them. No one at YouTube will look at the issue.


4. After cutting down the watercolor piece to 4 x 5 1/4 inches, emboss the sentiment in white embossing powder where shown (I use an anti-static tool before embossing). Mount it on the front of the card base using a strong tape, e.g. Tear It tape. Adhere alien using dimensional tape.


Supplies
  • Radiant Neon Ink Pads or Inkers:  Electric Yellow, Electric Orange, Electric Coral, Electric Pink, Electric Purple, Electric Blue, Electric Green
  • StazOn Ink: Jet Black
  • irRESISTible Texture Spray: Wedding Dress
  • Memento Ink Pad: Tuxedo Black
  • Memento Marker: Tuxedo Black
  • Sheer Shimmer Spritz: Sparkle
  • VersaMark Ink Pad (For Embossing)
  • Embossing Powder: White
  • Watercolor Paper: Arches Hot Press (Recommended)
  • Ink Blushers
  • Tear It! Tape
  • Painter's Tape (Masking Tape)
  • Stamps: Paper Smooches Space Cadet
  • Plastic Packaging
  • Paintbrush(s)
  • Optional: Spray Bottle with Water
  • Cardstock: Purple/Blue
  • Dimensional Tape
Follow my blog with Bloglovin so you won't miss any of the space themed fun!
Affiliates links may be included in this post. See Notice at bottom of blog.

Wednesday, August 10, 2016

Paper Smooches Hero Zig Clean Color Card


Super is another Paper Smooches stamp set with matching dies. This set is so fun. It doesn't show in the photos but I used a Wink of Stella glitter brush on just his teeth so when you turn it in the light, they gleam. I used another Paper Smooches stamp set (the stamps look like brush strokes and splatters) to create the sunset. I colored everything with Zig Clean Color Real Brush markers.

Making the Card

1. Cut watercolor paper to 4 x 5 1/4 inches.

2. Using Positive Strokes Two stamps, color with Zig Clean Colors going from yellow to blue - spray with water before stamping. Note: this will likely discolor the stamps. Use a watercolor brush to flick some blue over the design.

3. Die cut black cardstock with Super 2 dies.

4. Stamp hero from Super on watercolor paper using VersaFine Onyx Black (or other waterproof black ink).

5. Color figure with Zig Clean Colors (I used a brush and water as well). Fussy cut around character with detail scissors. Use a black marker to go around the outside edges from the back side (e.g. Memento Marker Tuxedo Black).

6. Temporarily put buildings on card and note where sentiment and small superhero will go. Stamp small superhero and sentiment in Versafine Onyux Black. Adhere buildings where shown.

7. Cut black cardstock 5 1/2 x 8 1/2 inches. Fold in half to form a 4 1/4 x 5 1/2 inch card base. Adhere scene to card (use strong adhesive - watercolor paper may have warped).

8. Optional: add Clear Wink of Stella to superhero's teeth.

9. Adhere superhero to card using dimensional tape.


Supplies
Follow my blog with Bloglovin so you won't miss any of the superhero fun!
Affiliates links may be included in this post. See Notice at bottom of blog.

Monday, June 27, 2016

Art Impressions Picture Perfect Greeting Card


Art Impressions makes whimsical stamps that are so much fun to color. For this card I used Zig Clean Color Real Brush pens for the first time. The colors are nice and vibrant - perfect for this design.

Making the Card

1. Cut light blue cardstock 7x10 inches; fold in half to form a 5x7 inch card base. Cut chevron paper to 4 1/2 x 6 inches; adhere to front of card as shown. Cut pink flower paper to 4 1/2 x 4 1/2 inches. Use the largest square STAX die (about 4 inches) to cut center, creating a frame (keep inside piece for another project). Keep the scraps from these sheets! One chevron piece should be 1 1/4 x 4 1/2 inches; use the back side (white dots on black) for under the sentiment. The pink flower leftover piece will be used for the sentiment itself.

2. On a piece of watercolor paper a bit larger than 4 1/2 inches square, stamp Art Impressions Picture Perfect in black waterproof ink (e.g. VersaFine Onyx Black). Watercolor image (I used Zig Clean Color Real Brush, although any watercolor will do). Die cut with largest STAX die.

3. Adhere pink flower frame to card as shown. Adhere watercolor image inside frame. Stamp sentiment in black ink on leftover piece of pink flower paper - trim to a strip then add tails to right side. Adhere white/black polka dot paper where shown. Adhere sentiment using dimensional tape in center.

4. Adhere clay heart as shown. Watch video below to see how to create this embellishment.


5. Die cut small and medium hearts from rose paper. Cover with Glossy Accents, let dry. Rip off a couple pieces of washi tape and adhere as shown. Adhere hearts.

Supplies
Follow my blog with Bloglovin so you won't miss any of the whimsical fun!
Affiliates links may be included in this post. See Notice at bottom of blog.
SaveSaveSaveSave

Wednesday, May 18, 2016

Paper Smooches Boom Bots Card


Paper Smooches has some of the cutest stamp sets! And many have dies to match. Love! I made this card with the Boom Bots stamp set and dies. I thought it would be fun to use paper that has typewritten "love" on it, in a font that you might find on a computer, as if their love is scrolling over them.

Making the Card

1. In black alcohol marker friendly ink (e.g. Memento Ink Tuxedo Black), stamp "female" robot on light "love" paper; stamp "male" robot on darker "love" paper. Die cut each. (If you can't find these papers, you could used a small stamp or printer to make a similar background on cream and light gray cardstock.)

2. Color with Copic markers (or other alcohol markers). See bottom of post for colors.

3. Cut Cryogen White cardstock to 5 1/2 x 8 1/2 inches; fold in half to form a 4 1/4 x 5 1/2 inch card base. It doesn't show up in the photos but this cardstock has a beautiful subtle shimmer.

4. Mask areas shown (i.e. bottom area of front card, then open card and mask back). Use ink blending tool to blend Rhubarb Stalk Memento ink upwards in a circular motion starting from masked bottom.

5. Stamp sentiment in black ink (e.g. VersaFine Onyx Black).

6. Adhere robots using dimensional tape where shown. Adhere clay heart where shown. Note: see my post on how to make clay embellishments.


Supplies
  • Cardstock: Curious Metallics (Paperworks) Cover Weight - Cryogen White
  • Paper Smooches: Boom Bots Stamps, Boom Bots Icons
  • Love Paper (6x6 Pads): My Mind's Eye - Love Me (lighter version), Recollections - Valentine (darker version)
  • Robots: Memento Ink - Tuxedo Black
  • Sentiment: VersaFine - Onyx Black
  • Post-It Tape (or other masking material)
  • Background: Memento Ink - Rhubarb Stalk
  • Ink Blending Tool
  • Dimensional Tape
Copic Markers Used
  • Boy Robot: T0, T1, T2, T3, T4
  • Girl Robot: T0, T1, T2, T3, E93

Follow my blog with Bloglovin so you won't miss any of the bot love fun!
Affiliates links may be included in this post. See Notice at bottom of blog.

Tuesday, January 6, 2015

Sizzix and Stephanie Barnard Tree Triplits Card


I love Sizzix dies and Stephanie Barnard's stamps and dies... what could be better than using these beautiful Christmas Trees triplits dies created by Stephanie for Sizzix to create a fun flip card?

Making the Card

1. Cut the base card from green cardstock using the Regal Flip-its main die. Fold. If you need help folding the Flip-its card, check out the video (if it doesn't come up when you click the link, enter "flip it" in the video search area; it should be the first video Introducing Sizzix Framelits as Flip-its for Cardmaking).

2. Cut the light green patterned paper using the decorator pieces in the Regal Flip-its set, as well as one Regal label for the inside. Cut the red cardstock with the same Regal label die for the front. Cut the frame (Regal Flip-its set) from light green cardstock. Cut the smaller inside from light green patterned paper. Layer (red/lightgreen patterned/light green frame) then adhere the labels and frames both outside and inside as shown.


3. Cut 3 or 4 copies of Joyful and Holiday Cheer from green and red cardstock respectively. Glue them together in matching stacks to form thick words (you may want to skip the dots on the "i"s - they are a bit difficult).

4. Cut trees and stars in the colors shown using Christmas Trees triplits dies. Adhere as shown.

5. Adhere the words as shown - be sure to leave a little space above Joyful for the star. Optional: use Wink of Stella glitter brush pen on the star above Joyful and coat with Glossy Accents before adhering to card.

The word die cuts look delicate but are fairly easy to stack to make thick dimensional elements for a great look. Hint: use a glue that gives you a some open time to wiggle them in place before they dry. I use Studio Multi-Medium Matte applied with a small brush.

Supplies