Monday, July 13, 2015

Silks Cornflower Rectangle Pull Card

Created for the ECD Susan Tierney Cockburn Design Team

This card is filled with shimmery goodness! Silks Acrylic Paints and Liquid Pearls add such beauty to the flowers and butterflies. I wanted to make use of the translucent nature of the paint so I stamped words and a musical score on white cardstock before painting over. The painting was done in a very loose fashion - super easy and fun. I used Susan's Garden Coneflower dies to make a colorful version of Cornflowers for the front of the card. Opening the card reveals an explosion of butterflies!


Making the Card

1. On white cardstock, stamp music and words in black waterproof ink.

2. Randomly paint Silks over stamped areas - one section using Snapdragon, Jasmine, Wisteria, and Sky Blue (for flower petals & stamen) and another using Pretty Peridot, Vintage Mint, and Black Emerald (for leaves). Have fun with it - let the colors overlap and mix in places to create different colors.


3. Die cut using Susan's Garden - Coneflower: 10 petal clusters and 2 stamen from the pink/purple/blue section and 6 leaves from the green section. Paint backsides in matching colors.
4. Shape petals on molding pad using Susan's Garden 4 Piece All Metal Tool Set. Use either the loop tool or one of the ball styluses to rub petals and leaves, then draw a line down the middle of each with the leaf tool (pointed end). Glue petal clusters offset from each other - I used 5 in each flower to make them really full.


5. To create stamen, apply glue around tops of each prong and dip in embossing powder. Add a line of glue across the bottom strip and roll up using tweezers. Note: you could roll them up first, add glue to tips, then dip in embossing powder. I tried it both ways; it's a little trickier dipping them after, although I made more of a mess doing it before. Once dry, adhere each stamen to the center of a flower. Spread out stamen tips, if you haven't already done so.


6. Die cut a bunch of butterflies from scraps of
pink/purple/blue sections of painted & stamped cardstock using Garden Notes - Bugs & Butterflies. Paint backsides as well. Squirt some Liquid Pearls on a craft sheet or scrap paper and apply to wings with a small brush (see Supplies for colors). In a similar manner, use black Enamel Accents to paint bug bodies and antenna. Once dry, gently bend wings up on both sides of each butterfly body.

7. Die cut Rectangle Pull Card base from blue cardstock 7.25 x 5.5 inches. See instructions on packaging. From fuchsia cardstock, die cut large rectangle using decorator piece. Die cut two purple rectangles with small rectangle decorator piece. Dry brush pink/purple/blue paint to add more color to the small rectangles. Adhere to card as shown.


8. Using the long edge die from Katie Flourish Frame Edges, cut two from purple paper. Add Wink of Stella for shimmer. Adhere to card as shown.

9. Die cut pull tab (Rectangle Pull Card) from blue cardstock. Adhere with strong adhesive inside card as shown (see also instructions). Cut thin strips of plastic packaging. Bend end of strip, apply strong glue, adhere under pull tab (glue only under tab, let strips be free on front). See photo. Add several - I added one at a different angle after the others dried. Reinforce with small piece of cardstock (e.g. cut down from another pull tab). Cut strips to different lengths. Adhere butterflies as shown.


10. Adhere flowers to front; add leaves, enamel dots, and sequins as shown.


Supplies

Elizabeth Craft Designs Supplies
Other Supplies
  • Cardstock: White, Blue, Purple, Fuchsia
  • Stamps: Word, Music
  • Black Waterproof Ink (e.g. Versafine)
  • Silks Shimmer Semi-Gloss Acrylic Paint: Snapdragon, Jasmine, Wisteria, Sky Blue, Pretty Peridot, Vintage Mint, Black Emerald
  • Wow! Embossing Powder: Opaque Primary Azure
  • Liquid Pearls: Hydrangea, Baby Blue, Lavender Lace
  • Enamel Accents: Black
  • Wink of Stella: Clear
  • Plastic Packaging
  • Enamel Dots, Sequins

Friday, July 10, 2015

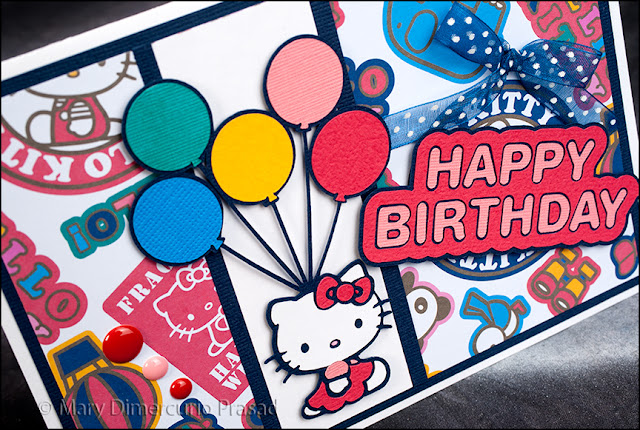
Cricut Hello Kitty Birthday Card


I made this card for a friend who used to live in our area but moved away (boo!). She has a collection of Hello Kitty travel images framed over her bed. I found the background paper at my local craft store - the perfect combo with my Cricut Hello Kitty Greetings cartridge. Unfortunately the physical cartridge is unavailable right now but I'm hoping they will bring it back (at least as digital form). It's super cute.

Making the Card

1. Cut white cardstock to 5 1/2 x 8 1/2 inches (half of an 8 1/2 x 11 inch sheet); fold in half to form a card base.

2. Cut dark blue cardstock 4 x 5 1/4 inches. Center and adhere to card front. Cut two thin strips of dark blue cardstock (about 1/8 inch).

3. Cut Hello Kitty paper 3 3/4 x 5 inches, keeping pattern in mind. Center and adhere to dark blue cardstock on card front.

4. Cut Hello Kitty with balloons from Cricut Hello Kitty Greetings cartridge - about 3 1/2 inches high. Cut white strip wide enough to go behind kitty. Cut Happy Birthday sentiment (measure where you would like to place it). Adhere everything where shown, using dimensional tape behind both Hello Kitty with balloons and sentiment.

5. Tie ribbon in a bow and adhere where shown using glue dot or other strong adhesive. Adhere enamel dots as shown.


Supplies
  • Hello Kitty Greetings Cricut Cartridge
  • Hello Kitty 12x12 Mega Paper Pad SC9600 Sanrio
  • Cardstock: White, Dark Blue, Red, Yellow, Pink, Green Blue
  • Dimensional Tape
  • Ribbon: Dark Blue with White Polka Dots
  • Glue Dot (or other strong adhesive)
  • Enamel Dots: Red, Pink

Wednesday, July 8, 2015

Poker Themed Step-Ups Thank You Card


I made this card for the organizer of an annual board gaming convention. He enjoys card games like Poker and Tichu so I thought I would make a thank you card with that theme. This was also the perfect opportunity to use my new Friends Forever Step-Ups Framelits Card, by Sizzix and Stephanie Barnard.

Making the Card

1. Cut the base card from black cardstock using 660144 Sizzix Framelits Die Set 23PK - Card, Friends Forever Step-Ups; fold as instructed.

2. Use the decorator die to cut black and white striped paper for the front; adhere.

3. Adhere cards in arrangement shown - this is how I used dimensional tape:
10 - one thickness, adhere to back step
J - double thickness, adhere to 10 card
Q - adhere directly to front step
K - double thickness, adhere to Q
A - adhere directly to front of card


4. Cut 4 copies of "thanks" from white cardstock and one from red/orange cardstock. Line up and glue layers together to form a thick stack with the red/orange layer on top. I used Multi-Medium Matte as an adhesive. Adhere across gap in card as shown.

5. Cut poker chip and poker chip stack from white and red/orange cardstock using SVG Cuts Game Night Kit. I resized the colored layer (called green in their file) to 2.5" width (this may vary with software by a small amount - just be sure to line up the base layer with the top layer to check that the widths are correct, i.e. the round poker chip layers should match perfectly.

6. This is the really fun part! If necessary, attach the pointed tip to the Photo Sleeve Fuse tool. Plug in and let warm up for about 10 minutes. Using the medium decorator tag die from 973 Elizabeth Craft Designs Tags Pivot Card, measure out an amount, somewhat larger than the die, of a heavy weight page protector (or pocket page). You will use this to make a shaker tag. Tape down the die at the bottom and carefully trace around all but the bottom end with the Fuse tool. It should cut through the plastic in an outline shape of the tag, sealing the edges. The bottom end will be left open so we can put some shiny stuff inside.


7. Either use a stamp for your sentiment or type one up on your computer then print it out on white cardstock. Be sure to keep the sentiment around 3/4" x 1 3/4" in size so there will be some space around it inside the pocket. Use the tag die to center and cut out the sentiment. Carefully put the tag inside the pocket, then fuse around the tag's hole (top of tag). If the plastic does not stick to itself, use some glue to seal around the edges. Add sequins, star glitter, or whatever small shiny bits you would like inside the pocket. I glued a few to the tag so they wouldn't all float to the bottom. I did this very carefully with tweezers, although you could do this before putting the tag inside the pocket.

8. Carefully fuse the bottom closed using the tag die again (line it up and tape it down from the sides or top to keep it from moving). Thread two pieces of twine through the hole as shown.

9. Adhere tag using a strong glue (I used Glossy Accents; Multi-Medium Matte will probably work as well). Adhere round poker chip with dimensional tape (I actually used fun foam to pop it up, cut in a circle using the poker chip as a template) and the poker chip stack with tape or glue. Adhere sequins and/or glitter where desired to finish the card.

10. Optional: I didn't want the card to open too far so that the cards would line up. To do so, I used a small length of black ribbon adhered to the bottom insides of the card (i.e. I strung the ribbon from card front to card back from the inside).


Supplies

Sunday, July 5, 2015

Twinkling H2Os Tiny Tattered Florals Card


Hope y'all had a wonderful 4th of July weekend! I'm having fun creating a beautiful shimmery card using Twinkling H2Os, Silks, Texture Paste, and a few other goodies. I'm applying to the ColourArte Design Team - so wish me luck! I just love ColourArte products!

Making the Card

1. Wet Twinkling H2Os; I use a small spray bottle filled with water to give each a couple spritzes.

2. Cut a panel of watercolor paper about 4 1/2 x 5 3/4 inches. Tape down to a craft sheet or other flat surface using painter's tape. Generously wet the entire front using spray bottle or paint brush. Drop in the following colors of Twinkling H2Os: Summer Breeze, Bashful Blue, Sea Spray, and Mystique. Let them blend in some places. Dry panel with heat tool or let it dry naturally.


3. Splatter with drops of water randomly across the panel. Let sit for a few seconds then blot off with paper towel. This removes or lightens the color in those places.

4. Mix a small amount of both Texture Paste and Silks Vintage Mint until color is completely integrated with paste (you could also leave it marbled if you like that look). Tape or firmly hold down stencil over paper and apply colored paste with palette knife. I applied some paste to the left and right sides, leaving the middle alone. Set aside to dry. Note: immediately wash stencil and palette knife, before paste dries.


5. On about half of a sheet of 8 1/2 x 11 inch white cardstock, spray with water until just wet. Randomly paint with Twinkling H20s: Luv-u-Pink, Chiffon Pink, and Dreams Bloom. Wet as necessary but don't rub too hard; cardstock has a more delicate surface than watercolor paper. Add Hopeful Honeysuckle sparingly in some spots. Dry.


6. Die cut 3 different sizes of Tiny Tattered Florals and one "hello" sentiment using Lawn Fawn Scripty Hello die. Note: I usually cut extra in case some come out better than others. Add Hopeful Honeysuckle to the petal bases, leaving the tips alone so they will be lighter in color. This will add dimension to the flowers. To shape petals, rub back of each with ball stylus to get them to cup slightly. Roll flowers as instructed on packaging; glue to center area - the part that is larger than the rest of the petals.


7. Cut green/blue cardstock to 4 1/4 x 11 inches. Fold in half to form a card base. Trim unpainted edges of watercolor panel, it should be about 4 x 5 1/4 inches. Adhere panel to center of card front.

8. Die cut at least 3 different sized leaves from green/blue cardstock. Add Summer Breeze to front of leaves then add a little Mystique at the base of each for some shading. Once dry, rub ball stylus along backs then draw a line down the front of each center with die pick or leaf tool (pointy end).


9. Die cut four copies of "hello" from white cardstock. One at a time, line up and adhere each together to form a thick stack. Add pink copy to the top. Adhere flowers, leaves, and "hello" to card front as shown.


Supplies

ColourArte Supplies
  • Silks: Vintage Mint
  • Twinkling H20s: Summer Breeze, Bashful Blue, Sea Spray, Mystique, Luv-u-Pink, Chiffon Pink, Dreams Bloom, Hopeful Honeysuckle
Other Supplies