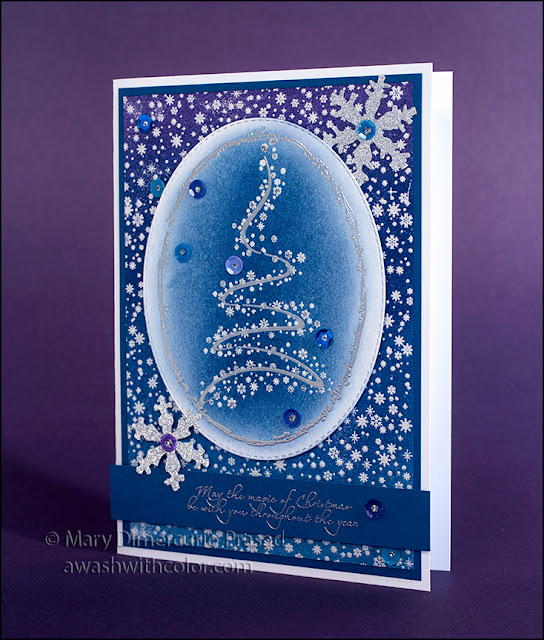
This card has some incredible sparkle and shine, unfortunately not all of it shows in the photographs - but it is really beautiful in person. The Rubbernecker Stamps Snowflake Panel background and Snowflakes and Stardust tree stamps coordinate perfectly for a snowy holiday or Christmas card. Tim Holtz, Idea-ology, and Sizzix products help add to the fun.
Affiliate links may be included in this post. I participate in the Amazon Services LLC Associates Program, an affiliate advertising program that provides a means for me to earn fees by linking to Amazon.com and affiliated sites at no cost to you. This helps offset a small portion of my crafting addiction... uh, hobby. See notice at bottom of blog for a longer description.
Making the Card
1. Cut white cardstock 7 x 10 inches; fold in half to form a 5 x 7 inch card base. Cut blue cardstock 4 3/4 x 6 3/4 inches. Adhere to card base.
2. Cut Canson Bristol XL paper about 5 x 7 inches. You could use regular cardstock but this paper makes blending easy. Use Stamp Platform or stamp positioner to stamp Snowflake Panel in VersaMark Ink or other embossing ink - you will cover the entire panel so you may want to stamp horizontally across the paper, embossing as you go. I recommend using a powder tool before stamping (although I forgot and some powder stuck where I didn't want it to - I didn't bother re-stamping, I figured it added to the snowy look... at least that's what I tell myself). Emboss with Silver Pearl embossing powder.
3. Once the paper has been completely embossed, use an ink blending tool to blend from bottom to top with the following Distress Inks: Stormy Sky, Faded Jeans, Chipped Sapphire, Dusty Concord. Be sure to overlap each color as you go. I usually blend up the paper then back down. Trim to 4 1/2 x 6 1/2 inches; add matching ink to edges so they won't stand out. Use a slightly damp paper towel to wipe over embossing. Spray a couple coats of Frost Sheer Shimmer Spritz. Adhere to card base.
4. Cut Canson Bristol XL paper about 5 x 6 inches. Use Stamp Platform or stamp positioner to stamp Snowflakes and Stardust Set tree line (use the one that matches the snowflakes tree stamp) in VersaMark Ink or other embossing ink; emboss with Silver. Next stamp snowflakes tree and emboss with Silver Pearl. Finally stamp Distress Oval Frame and emboss with Silver.
5. Die cut around frame using largest oval from Nested Oval Small Stitch Die Cut Set. Use ink blending tool to blend Stormy Sky Distress Ink starting in center and fading out to edges (leave edges white). Blend Faded Jeans Distress Ink in center area to darken around tree, fading into Stormy Sky ink. Use a slightly damp paper towel to wipe over embossing. Spray with a couple coats of Frost Sheer Shimmer Spritz. Adhere to card base with dimensional/mounting tape where shown.
6. On blue cardstock, stamp sentiment and emboss with Silver. Trim to 5 inches wide, leaving a small amount above and below sentiment. Adhere where shown with dimensional/mounting tape.
7. Die cut Sizzix Mini Snowflakes from silver Deco Sheets (you will need to use the Sizzix Movers & Shapers Base Tray and two cutting pads). My favorite die cutting machine is the Sizzix Big Shot Pro because it is heavy duty and cuts the largest Sizzix Pro dies. If you don't need to cut Pro dies, the next model down is the Sizzix Big Shot Plus. The most economical is the Sizzix Big Shot. Adhere largest snowflake in upper right corner; Deco Sheets are adhesive backed so you just need to peel off the backing. On the smaller snowflake, peel adhesive backing away from area that will touch the sentiment and tree oval only. Add dimensional/mounting tape to other parts. Adhere where shown.
8. Adhere Blue Jeans and Lilac Doodlebug Design sequins where shown. I use Beacon Gem-Tac for gluing sequins. Apply Silver Stickles to centers of sequins as well as randomly along the tree snowflakes.
Supplies
- Rubbernecker Stamps: Snowflake Panel (482), Snowflakes and Stardust Set (481), Distress Oval Frame (986)
- Rubbernecker Stamps Dies: Nested Oval Small Stitch Die Cut Set (5014D)
- Cardstock: White, Blue
- Paper: Canson Bristol XL
- Powder Tool
- Heat Tool
- Stamp Platform or Stamp Positioner
- Ranger Embossing Powder: Silver, Silver Pearl
- VersaMark Ink or Other Embossing Ink
- Blending Tool
- Distress Ink: Stormy Sky, Faded Jeans, Chipped Sapphire, Dusty Concord
- Sheer Shimmer Spritz: Frost
- Stickles: Silver
- Dimensional/Mounting Tape
- Deco Sheets (Tim Holtz/Idea-ology)
- Sizzix Movers & Shapers Magnetic Dies: Mini Snowflakes Set (657474)
- Sizzix Movers & Shapers Accessory - Base Tray (657007)
- Doodlebug Design Sequins: Blue Jeans, Lilac


You are so positively amazing! Your card is gorgeous!! Yes, most of your cards are gorgeous when I get them in the mail. There has been a time or two that I didn't want to send them on to Rubbernecker Stamps :)
ReplyDeleteAgain, just amazing! LOVE your card! You have a gift.
Thank you! That is kind of you to say - I appreciate it!
Delete