Wednesday, July 29, 2015

Framelits Drop-Ins LOTV Anniversary Card


This is the card I made my hubby for our 25th wedding anniversary, earlier this month. I just love the Lili of the Valley image of these two cuties sitting in a tree (K-I-S-S-I-N-G ?). I colored the image with Copic alcohol markers to look a little like a watercolor wash, with soft blending.

Making the Card

1. Die cut card base from cream cardstock using the large card die from Sizzix Framelits Lovely Sentiments Drop-ins. From red cardstock, cut frame with "love" drop-in. From pink chevron paper, cut heart background (keep heart pieces) - trim to fit behind red frame. Adhere red frame over heart background; center and adhere to card front.

2. Stamp Lili of the Valley "In Love" on Copic friendly paper in black ink (e.g. Memento Tuxedo Black). I used Curious Metallics Cryogen White (cover weight). It has a subtle shimmer and looks really beautiful in person. It also allows alcohol marker colors to blend really well. Color as desired (the list of colors I used is below Supplies).

3. Using the two largest Spellbinders Classical Ovals, one from each set: S4-112 and S4-110, die cut colored image and background (blue/cream dot cardstock). Adhere background to front of card where shown. Use dimensional tape to adhere colored image centered on background. Adhere some of the chevron hearts as shown.


4. From the script writing paper, die cut card inside liner using Sizzix Framelits Banners 3-D Drop-ins and the main banner die. Train the folds. Die cut banner pieces from blue/cream dot cardstock. Adhere banner pieces centered on banner base (I bent the center piece in half before adhering). To adhere inside card: put adhesive all around the outside back of half (do not add any on backs of the banner areas) then, while folded, line up the non-sticky side inside the card and close. One half will be stuck down. Flip to put adhesive on the other side in the same way then close.

5. Cut "you & me" sentiment from red cardstock, then its shadow from pink chevron paper. Adhere together. Fold in half. Add dimensional tape behind "you" and "me" (none behind "&"). Adhere sentiment and hearts where shown.


Supplies
Copic Markers Used
  • Skin: E0000, E000, E00, E13, E11 Cheeks E95, E01
  • Socks: T2, T0
  • Boy's Hair N9, N7, N5, 100 Black
  • Girl's Hair/Tree/Shoes E49, E59, E57, E55, E99
  • Leaves YG63, YG61, G99, G94
  • Flowers/Hat/Stripes/Dots: R29, R27, R24, R22
  • Dress/Shorts: BG75, BG72, BG70

Monday, July 27, 2015

Susan's Garden Canvas Rose Container

Created for the ECD Susan Tierney Cockburn Design Team

This is the first time I used Susan's Garden - Rose 1 dies. The rose it makes sticks out a bit too far for most cards (unless hand delivered) but it's the perfect size for the top of a recycled container. This container had some kind of salt inside (now long gone). The lid was clear but I decided to decorate both the inside and outside, so the clear plastic no longer shows. For the bottom I used faux stone spray - I thought it would be fun to have that texture on the bottom of the container.


Making the Project

1. Die cut about 4 sets of petals (only need one bud) from canvas sheet using Susan's Garden - Rose 1. You may want to use the Metal Adaptor Plate if you have problems cutting all the way through.


2. Paint each with acrylics. Use one color for the back then do the front but this time add highlights and shading. I used a small brush to add darker lines of their respective colors on petals and leaves. I also put the paint on thick to give a little texture.


3. Shape petals and leaves as in the video (further below) but PRESS rather than rub to shape. The paint may come off if you run the stylus down the paint.


4. Use a strong quick drying adhesive to assemble the flower. Hint: the canvas is not as stiff as paper or cardstock; I first glued the outside petals to the calyx, starting with the largest petals then adding smaller until each prong of the calyx was full. I let them dry then pulled them up and glued the petals to each other to form more of a cup shape. The rest was pretty much the same as the video. Be patient with the petals. You may have to glue others to each other.


5. Remove lid from container. You will spray only the bottom outside of the container. Protect area where lid goes with painter's tape or washi tape. Spray with Make It Stone! White Onyx (cover surface before spraying in well ventilated area - I prefer to do this outside). You may want to wait a few hours before adding another coat or two. Leave it to dry overnight.

6. Using container lid, trace a circle on patterned paper; carefully cut just within the line (this depends on the lid - mine had a lip). Adhere to lid. Do same for inside if desired. Add washi tape around side to decorate.

7. Add leaves and flower to top of lid as shown. Once bottom of container has dried, carefully remove painter's tape.


Supplies

ECD Supplies
Other Supplies
  • Canvas Sheet (e.g. Fredrix Medium Texture Artist Canvas Pad, 10 Sheets 9x12)
  • Acrylic Paint: I used the following colors by Golden Professional Artist Colors - Cadmium Yellow Light, Viridian Green Hue, Phthalo Green (Blue Shade), Alizarin Crimson Hue, Naphthol Red Light, Titanium White
  • Strong Quick Drying Glue (e.g. Aleene's Fast Grab Tacky Glue)
  • Container with Lid
  • Krylon Paper Finishes: Make It Stone! White Onyx 3318213
  • Black Washi Tape
  • Patterned Paper: Crate Paper Style Board 6x6 Pad #683439

Monday, July 13, 2015

Silks Cornflower Rectangle Pull Card

Created for the ECD Susan Tierney Cockburn Design Team

This card is filled with shimmery goodness! Silks Acrylic Paints and Liquid Pearls add such beauty to the flowers and butterflies. I wanted to make use of the translucent nature of the paint so I stamped words and a musical score on white cardstock before painting over. The painting was done in a very loose fashion - super easy and fun. I used Susan's Garden Coneflower dies to make a colorful version of Cornflowers for the front of the card. Opening the card reveals an explosion of butterflies!


Making the Card

1. On white cardstock, stamp music and words in black waterproof ink.

2. Randomly paint Silks over stamped areas - one section using Snapdragon, Jasmine, Wisteria, and Sky Blue (for flower petals & stamen) and another using Pretty Peridot, Vintage Mint, and Black Emerald (for leaves). Have fun with it - let the colors overlap and mix in places to create different colors.


3. Die cut using Susan's Garden - Coneflower: 10 petal clusters and 2 stamen from the pink/purple/blue section and 6 leaves from the green section. Paint backsides in matching colors.
4. Shape petals on molding pad using Susan's Garden 4 Piece All Metal Tool Set. Use either the loop tool or one of the ball styluses to rub petals and leaves, then draw a line down the middle of each with the leaf tool (pointed end). Glue petal clusters offset from each other - I used 5 in each flower to make them really full.


5. To create stamen, apply glue around tops of each prong and dip in embossing powder. Add a line of glue across the bottom strip and roll up using tweezers. Note: you could roll them up first, add glue to tips, then dip in embossing powder. I tried it both ways; it's a little trickier dipping them after, although I made more of a mess doing it before. Once dry, adhere each stamen to the center of a flower. Spread out stamen tips, if you haven't already done so.


6. Die cut a bunch of butterflies from scraps of
pink/purple/blue sections of painted & stamped cardstock using Garden Notes - Bugs & Butterflies. Paint backsides as well. Squirt some Liquid Pearls on a craft sheet or scrap paper and apply to wings with a small brush (see Supplies for colors). In a similar manner, use black Enamel Accents to paint bug bodies and antenna. Once dry, gently bend wings up on both sides of each butterfly body.

7. Die cut Rectangle Pull Card base from blue cardstock 7.25 x 5.5 inches. See instructions on packaging. From fuchsia cardstock, die cut large rectangle using decorator piece. Die cut two purple rectangles with small rectangle decorator piece. Dry brush pink/purple/blue paint to add more color to the small rectangles. Adhere to card as shown.


8. Using the long edge die from Katie Flourish Frame Edges, cut two from purple paper. Add Wink of Stella for shimmer. Adhere to card as shown.

9. Die cut pull tab (Rectangle Pull Card) from blue cardstock. Adhere with strong adhesive inside card as shown (see also instructions). Cut thin strips of plastic packaging. Bend end of strip, apply strong glue, adhere under pull tab (glue only under tab, let strips be free on front). See photo. Add several - I added one at a different angle after the others dried. Reinforce with small piece of cardstock (e.g. cut down from another pull tab). Cut strips to different lengths. Adhere butterflies as shown.


10. Adhere flowers to front; add leaves, enamel dots, and sequins as shown.


Supplies

Elizabeth Craft Designs Supplies
Other Supplies
  • Cardstock: White, Blue, Purple, Fuchsia
  • Stamps: Word, Music
  • Black Waterproof Ink (e.g. Versafine)
  • Silks Shimmer Semi-Gloss Acrylic Paint: Snapdragon, Jasmine, Wisteria, Sky Blue, Pretty Peridot, Vintage Mint, Black Emerald
  • Wow! Embossing Powder: Opaque Primary Azure
  • Liquid Pearls: Hydrangea, Baby Blue, Lavender Lace
  • Enamel Accents: Black
  • Wink of Stella: Clear
  • Plastic Packaging
  • Enamel Dots, Sequins

Friday, July 10, 2015

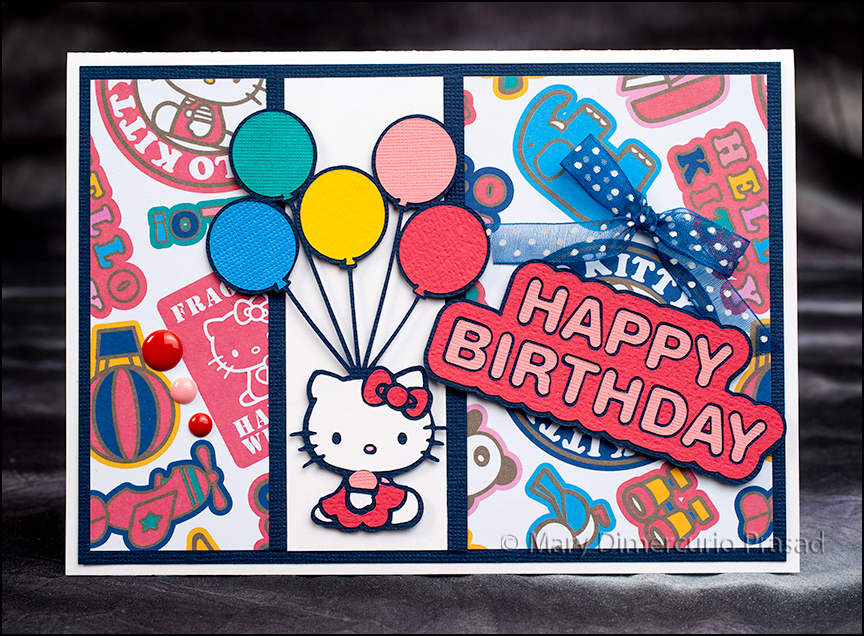
Cricut Hello Kitty Birthday Card


I made this card for a friend who used to live in our area but moved away (boo!). She has a collection of Hello Kitty travel images framed over her bed. I found the background paper at my local craft store - the perfect combo with my Cricut Hello Kitty Greetings cartridge. Unfortunately the physical cartridge is unavailable right now but I'm hoping they will bring it back (at least as digital form). It's super cute.

Making the Card

1. Cut white cardstock to 5 1/2 x 8 1/2 inches (half of an 8 1/2 x 11 inch sheet); fold in half to form a card base.

2. Cut dark blue cardstock 4 x 5 1/4 inches. Center and adhere to card front. Cut two thin strips of dark blue cardstock (about 1/8 inch).

3. Cut Hello Kitty paper 3 3/4 x 5 inches, keeping pattern in mind. Center and adhere to dark blue cardstock on card front.

4. Cut Hello Kitty with balloons from Cricut Hello Kitty Greetings cartridge - about 3 1/2 inches high. Cut white strip wide enough to go behind kitty. Cut Happy Birthday sentiment (measure where you would like to place it). Adhere everything where shown, using dimensional tape behind both Hello Kitty with balloons and sentiment.

5. Tie ribbon in a bow and adhere where shown using glue dot or other strong adhesive. Adhere enamel dots as shown.


Supplies
  • Hello Kitty Greetings Cricut Cartridge
  • Hello Kitty 12x12 Mega Paper Pad SC9600 Sanrio
  • Cardstock: White, Dark Blue, Red, Yellow, Pink, Green Blue
  • Dimensional Tape
  • Ribbon: Dark Blue with White Polka Dots
  • Glue Dot (or other strong adhesive)
  • Enamel Dots: Red, Pink