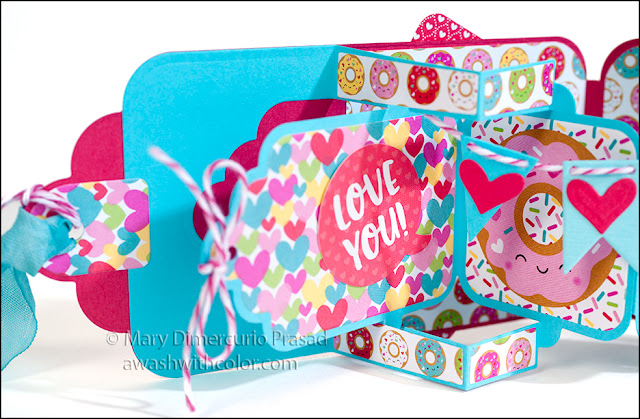
I have been anxious to use the Tag Book Pop-up die set since I got it! It makes an amazing card - and can even be used to make a mini album. Although it might seem a little intimidating, it is actually quite straightforward to assemble (and a lot easier than it looks, especially with Karen's assembly video). The decorator dies that Karen put in the set make decorating a breeze.
The Doodlebug Design Cream & Sugar papers are delightful. Even the small donuts have smiling faces - so cute and colorful.
Affiliate links may be included in this post. I participate in the Amazon Services LLC Associates Program, an affiliate advertising program that provides a means for me to earn fees by linking to amazon.com and affiliated sites at no cost to you. This helps offset a small portion of my crafting addiction... uh, hobby. See notice at bottom of blog for a longer description.
Making the Card
1. Using the red cardstock for the exterior tags and blue for the interior, assemble the Tag Book Pop-up according to the instructions in the video below. I cut the arm enforcement pieces using the donut patterned paper in the Cream & Sugar 6x6 Paper Pad.
2. To decorate the inside tags, use the tag die (Tag Book Pop-up) to cut one from the colorful heart paper (Cream & Sugar 6x6 Paper Pad) and one from the page with the teacups (Cream & Sugar 6x6 Paper Pad). Be careful when lining up, you may want to use Post-it tape to hold the die in place while running it through the machine. Note: there will be a small amount of pink along the bottom edge from the image below the teacups. Adhere as shown. Add the "Love You!" sticker (Cream & Sugar 12x12 Paper Pack) where shown.
3. Use the square die with rounded corners (Tag Book Pop-up) to cut out the donut and milk & cookie (Cream & Sugar 6x6 Paper Pad). Adhere where shown. Die cut two of the large tag reinforcers from colorful heart paper (Cream & Sugar 6x6 Paper Pad); adhere to each large tag inside card (i.e. the card covers inside).
4. Cut 2 pieces of the donut patterned paper (Cream & Sugar 6x6 Paper Pad) to 2 7/8 x 2 7/8 inches. Use 1/2 inch corner rounder on the right side of one (this will go on the left side inside) and on the left (this will go on the right side inside). Adhere inside, lining up wth rounded edges.
5. Cut a piece from the smiling food patterned paper (Cream & Sugar 6x6 Paper Pad) to 2 7/8 x 4 7/8 inches. Use 1/2 inch corner rounder on all corners. Adhere to front of card. Trim mini notebook page (Cream & Sugar 6x6 Paper Pad) and use 1/4 inch corner rounder to round corners. Die cut paperclip (Tag Book Pop-Up) from blue cardstock. Adhere to note paper as shown. Adhere to front of card.
6. Die cut a large tag reinforcer from pink gingham (Gingham-Linen Rainbow Petite Prints 6x6 Pad); adhere to outside tag as shown. Die cut two of each type of banner (Twist Panel Pop-up) from both blue and light blue cardstock. Die cut five hearts (Tag Book Pop-up) from red cardstock. Adhere one heart to each banner and one to the front pink gingham tag reinforcer. Cut about 6 or 7 inches of dark pink/light pink/white twine; string banners along twine. Glue ends of twine behind upper arms (in front of cutout area, but not in it) - one on each side - so that the banner will droop a little when card is opened all the way. Once dry, trim any extra.
7. Cut two pieces of 8 inch twine; loop through front and back tag holes (I fold the twine in half, push the fold through the hole then stick the two ends through and gently tighten). Cut two pieces of 7 inch twine; tie bows on inside tag holes.
8. Cut a piece of white seam binding about 15 inches long. Use Broken China Distress Ink and Distress Oxide Ink, along with water, to color the seam binding. Let dry (I don't use a heat tool for this since it sometimes fades the color). Cut in half and loop one piece through the front and one piece through the back tag holes.
9. Finally place cover stickers from the Cream & Sugar 12x12 Paper Pack. (I used a craft knife to cut out the middle of the donut). Use dimensional tape to adhere donut where shown. Use double dimensional tape to adhere "hugs & kisses" where shown.
Supplies
- Karen Burniston in Cahoots with Riley and Company Dies: Tag Book Pop-up (1023), Twist Panel Pop-up (1009)
- Cardstock: Red, Blue, Light Blue
- Doodlebug Design Papers: Cream & Sugar 12x12 Paper Pack, Cream & Sugar 6x6 Paper Pad, Gingham-Linen Rainbow Petite Prints 6x6 Pad
- We-R-Memory-Keepers Corner Chomper 1/4 and 1/2 inch
- Distress Ink: Broken China
- Distress Oxide Ink: Broken China
- Seam Binding: Hug Snug White
- Twine: Dark Pink/Light Pink/White
- Dimensional/Mounting Tape


Such a gorgeous card, Love the papers you have used.
ReplyDeleteCazx