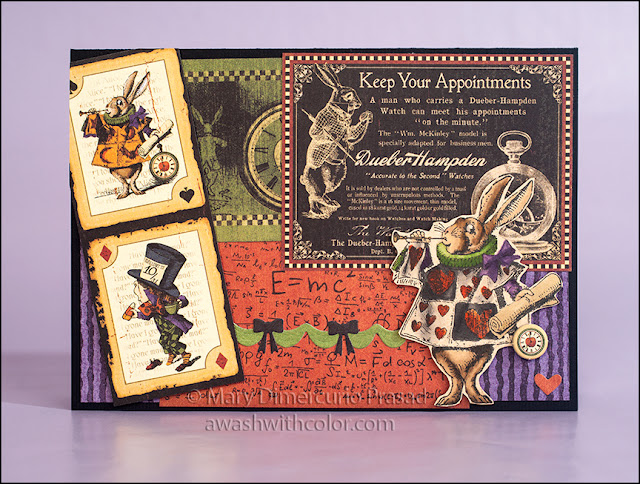
Today's card is a collaboration with Deep Red Stamps and Xyron. Deep Red Stamps sent the Xyron Design Team a few stamps to play with (I received 3). I fell in love with the quirky White Rabbit. I had some papers that would go perfectly with the image - Graphic 45's Hallowe'en in Wonderland! It features almost the exact same rabbit (his clothes have a different design but it's basically the same bunny). Although the papers are for Halloween, I worked around the pumpkins, Alice dressed as a witch, and other like themed papers. Note: the papers have been discontinued, although they may reprint then for Halloween - typically these are limited release items. You can use their other papers for a similar look. Deep Red Stamps also has a White Rabbit Late stamp that could be incorporated into a design.
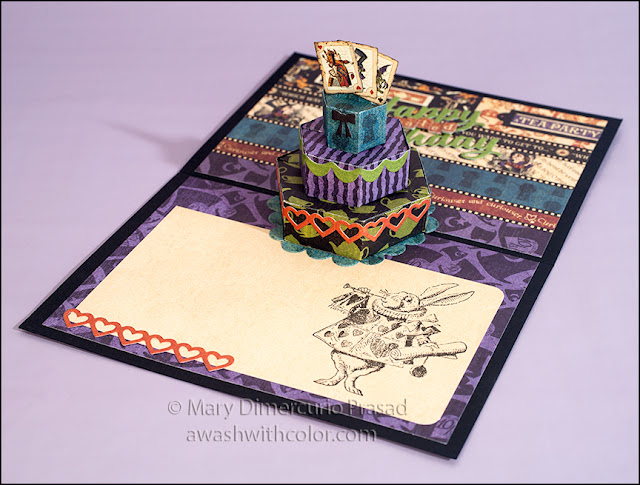
I decided to make a belated birthday card, referring to the "I'm late!" rabbit quotes (see short video below). For my pop up cake, I decided to add an eclectic mix of papers (see what I did there?) with Karen Burniston's Cake Pop-up dies.
Affiliate links may be included in this post. I participate in the Amazon Services LLC Associates Program, Share a Sale, and other affiliate programs; these affiliate advertising programs provide a means for me to earn fees by linking to amazon.com and/or other affiliated sites at no cost to you. This helps offset a small portion of my crafting addiction... uh, hobby. I am truly thankful for your kind support! I also receive free products from my design team companies. Regardless, all opinions are my own. I do not get paid for my posts unless otherwise specified. Cookies may be used on this site. See notice at bottom of blog for a longer description.
Making the Card
1. Cut black cardstock 7x10 inches; fold in half to form a 5x7 inch top folding card base.
2. From Hallowe'en in Wonderland: cut purple/black striped patterned paper 4 3/4 x 6 3/4 inches and 3 1/2 x 6 3/4 inches (put aside the former for inside of the card - you will actually use the hat side). Cut aorund black background "Keep Your Appointments" label. Find sheet with vertical strip of cards, cut off White Rabbit and Mad Hatter cards - but don't cut them apart. Find green sheet with running rabbit and watch (Alice is on ends of the strip) - trim that section down leaving enough to go under other element (see top front of card). For inside the card: find sheet with various horizontal strips; cut off top green strip then cut 6 1/2 across by just less than 4 3/4 (to leave room for the inside fold) - trimming off everything below the purple hats, see photo of inside card above - top area. Add stickers inside label areas (I put "You're LATE!" and the teapot/cups in one label and "A TEA PARTY" in the other - trimming off extra overhang from behind with detail scissors). Die cut 2 long scalloped pieces (Cake Pop-up) from blue keyhole patterned paper. Set aside the inside card elements for now.
3. From Rare Oddities: find the red/orange paper, and die cut two sets of hearts (Cake Trims) nearest the top. Stamp Quantum Background on bottom half in Memento Tuxedo Black ink. I recommend using a Stamp Platform or Stamp Positioner. Trim down. From cream paper cut 3 1/2 x 6 inches. Stamp White Rabbit on right side in Black Soot Distress Ink (you could use Memento Tuxedo Black if desired - I wanted a more sketchy look for the inside); set aside for inside of card. On extra piece of cream paper, stamp White Rabbit in Memento Tuxedo Black ink. From green paper, die cut two sets of banners (Cake Trims) and Happy Birthday. From black paper, die cut a set of bows (Cake Trims) and Happy Birthday.
4. Color White Rabbit stamped in Memento with Copic Markers. The colors I used are listed under Supplies. Trim around rabbit using detail scissors.
5. Add adhesive to elements for card front (green running rabbit/watch, Keep Your Appointments label, 3 1/2 x 6 3/4 inch purple/black stripe, Quantum Background, both Happy Birthdays) using Xyron 9" Creative Station with Permanent Adhesive. Adhere purple/black striped piece to bottom leaving 1/8 inch around edges, then Quantum Background about 1 1/4 inches from left side of card, just lower than purple/black stripe piece (leaving about 1/16 inch from bottom of card). Adhere green running rabbit/watch at top, about 1/8 inch from edge, leaving room for Keeping Your Appointments label on right (rabbit's right ear will be about 2 inches from left side of card). Adhere Keeping Your Appointments label at top right, leaving 1/16 inch from edge of card.
6. Run heart strands, at least one heart from the inside, blue scallops, green banners, and black bows (4) through 1.5" Create-a-Sticker (see photo below video). Adhere green banner to front of card where shown. Add bows as shown. Create dimensional tape as in video below and use it to adhere cards and colored White Rabbit as shown. Optional: trim any card parts that are sticking off card, from the back side, using detail scissors. Adhere heart in bottom right corner. Adhere chipboard watch over rabbit's watch (Hallowe'en in Wonderland).
 |
| Adding Adhesive to inside card elements - showing cake assembled (step 8) |
8. Using the Cake Pop-up dies and the Hallowe'en in Wonderland papers, use the small cake die to cut 2 from the blue/black keyhole paper, medium die to cut 2 from purple/black striped paper, and large die to cut 2 from the green/black teacup paper. Watch the video below the photos for cake assembly (finish reading this paragraph first so you will know what to use for decorating). For adhesive on most of the tabs, rather than using liquid glue I placed a couple small release sheets on the side and under the tab then used my Mega Runner on the tab. The adhesive is very strong; this way you do not have to wait for glue to dry - just press and it sticks. See photos below. If adhesive gets on craft mat, just roll off with your finger. Decorate cake with red/orange heart strands (bottom tier), green banners (middle tier), two black bows (one on front, one on back) top tier, and cards at top (see step 9). Use blue scallops to decorate bottom once cake has been adhered inside of card.
9. From the strip with small cards (Hallowe'en in Wonderland), cut the triple with Mad Hatter as well as the single Queen of Hearts card. Trim down the left card in the triplet so it won't show when Queen of Hearts is adhered over it. Using edge of blending tool foam, lightly ink edges with Black Soot Distress Ink. Adhere Queen of Hearts card overlapping Mad Hatter card; important: the bottom must be about 1 inch wide - if too wide, it won't fit inside top of cake when birthday card is folded.
10. Adhere green Happy Birthday to black Happy Birthday (steps 3 and 5), slightly offset - I recommend doing this starting from one side, moving one or two letters at a time. Adhere to card where shown. If any extra adhesive, use an Adhesive Eraser - it easily picks it up. Use dimensional tape (step 6) on the back of red/orange letter stickers (Hallowe'en in Wonderland) to add "belated" in the middle of Happy Birthday. Adhere heart chain where shown (bottom left).
Supplies
- Xyron: 9" Creative Station, Permanent Adhesive, Mega Runner, 1.5" Create-a-Sticker, Adhesive Eraser
- Deep Red Stamps: White Rabbit (SKU 4X502016), Quantum Background (SKU 4X605041)
- Cardstock: Black
- Graphic 45 Patterned Paper: Hallowe'en in Wonderland 12x12 Papercrafting Set (4501377), Rare Oddities 6x6 Patterns & Solids (4501151)
- Karen Burniston in Cahoots with Riley and Company Dies: Cake Trims (1029), Cake Pop-up (1028), Happy Birthday (1030)
- Copic Markers: 0, N0, N2, N4, N6, N8, R02, YR12, R05, YR18, RV42, E89, E44, E35, E42, E81, E41, E84, V09, V17, YG17, YG67
- Optional: Stamp Platform or Stamp Positioner
- Memento Tuxedo Black Ink
- Black Soot Distress Ink
- Detail Scissors
- We R Memory Keepers Corner Chomper 1/4" - 1/2"
- Blending Tool and Replacement Foam


No comments:
Post a Comment
Thank you for leaving a comment! I read (and appreciate) every one!