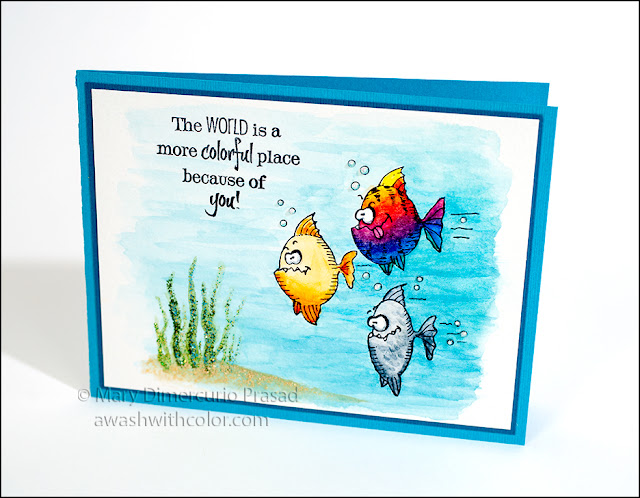
These fish have the craziest expressions! The original stamp has a worm on a hook with a sign that says "help" but I decided to use a sentiment on the card that didn't really work well with the desperate worm, so I removed it. Watercolor is the perfect medium for coloring this card - the watery background is super easy to do by working in layers. Stickles and Clear Wink of Stella add beautiful sparkle to the card.
Affiliate links may be included in this post. I participate in the Amazon Services LLC Associates Program, an affiliate advertising program that provides a means for me to earn fees by linking to amazon.com and affiliated sites at no cost to you. This helps offset a small portion of my crafting addiction... uh, hobby. See notice at bottom of blog for a longer description.
Making the Card
1. Cut blue cardstock 4 1/4 x 11 inches; fold in half to form a side-folding 4 1/4 x 5 1/2 inch card base. Cut dark blue cardstock 4 x 5 1/4 inches. Adhere to card base.
2. Cut watercolor paper (Strathmore 400 Series) to 4 x 5 1/4 inches (you will trim off a small amount later, I usually make it a little larger for wiggle room when centering). Before inking, you may want to cover the worm on a hook area on the stamp with Post-it tape, or just be very careful when inking so as not to get any on that part of the stamp. Remove the Post-it tape before stamping. Use a Stamp Platform or stamp positioner to stamp fish in waterproof black ink (e.g. Archival Jet Black) on the watercolor piece you just cut. I recommend a positioner because the watercolor paper will probably have texture. I stamped my image a couple times. Stamp the sentiment where shown using the same ink.
3. Watercolor image. I used Daniel Smith Extra Fine watercolors. If you are interested in these watercolors, I highly recommend getting the dot chart. This allows you to try all the colors, getting an idea of which you might like best. The chart also includes transparency and lightfast ratings. Eventually I plan to do a review, so stay tuned! Also paint in the sandy sea bottom and some kelp (I did these fairly lightly since I'll add Stickles later).
4. My bubbles got a bit too much blue on them so I used a white gel pen to create highlights. I still wasn't happy so I tried using Nuvo Crystal Glaze on them. This is the first time I've used it. They dried 3 dimensional but they were dull, not shiny. I'm not sure if this was due to the gel pen or paint but I didn't like it so I added Crystal Stickles on top to give them sparkle and cover the dullness. I finally liked the way it turned out.
5. Add different colors of green Stickles to the Kelp. I used a small brush to apply them - the nozzles were too big for precision. I used: Patina, Lime Green, and Distress Stickles Forest Moss. For the sand I used Distress Stickles Scattered Straw. I don't believe they make Distress Stickles anymore, although you can still find them around. You could try substituting Sandstone, Platinum, or Mercury Glass Stickles for the Scattered Straw and Pine for Forest Moss.
6. Optional: add Clear Wink of Stella Brush to the rainbow fish.
7. Adhere image to card base.
Supplies
- Rubbernecker Stamps: Luncheon Meet (86-17), Create a Garden 2 (3009)
- Cardstock: Blue, Dark Blue (These have a turquoise hue to them.)
- Watercolor Paper (e.g. Strathmore 400 Series)
- Watercolors (e.g. Daniel Smith Extra Fine Watercolors)
- Stamp Platform or Stamp Positioner
- Waterproof Black Ink: Archival Ink Jet Black
- Nuvo Crystal Glaze
- Wink of Stella Clear
- Stickles: Crystal, Patina, Lime-Green
- Distress Stickles: Forest Moss (sub Pine Stickles), Scattered Straw (sub Platinum, or Mercury Glass Stickles)


No comments:
Post a Comment
Thank you for leaving a comment! I read (and appreciate) every one!