Sunday, September 24, 2017

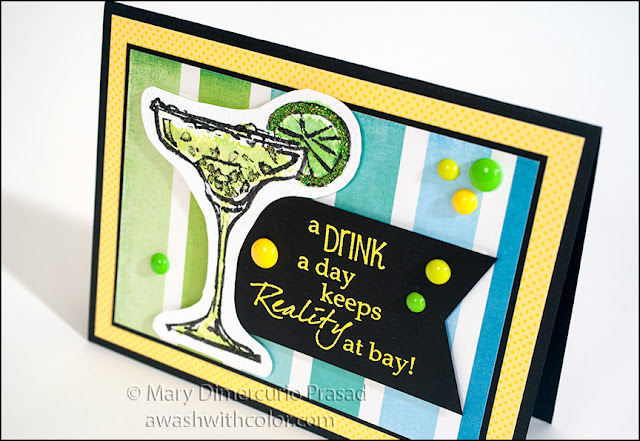
A Drink a Day Card Featuring Rubbernecker Stamps

Rubbernecker Stamps colored with Color Burst

Another fun set from Rubbernecker Stamps: the two part Watercolor Margarita Glass and sentiment Drink a Day. For a more festive look, I added some Stickles to the ice cubes as well as the lime rind. I also added clear Wink of Stella to the drink and lime (it doesn't show well in the photos but looks great in person).

Affiliate links may be included in this post. I participate in the Amazon Services LLC Associates Program, an affiliate advertising program that provides a means for me to earn fees by linking to Amazon.com and affiliated sites at no cost to you. This helps offset a small portion of my crafting addiction... uh, hobby. See notice at bottom of blog for a longer description.

Making the Card

1. Cut black cardstock 5 1/2 x 8 1/2 inches; fold in half to form a 4 1/4 x 5 1/2 inch card base.

2. Cut yellow polka dot patterned paper (Doodlebug Design Petite Prints), 4 x 5 1/4 inches. Adhere to card base. Cut black cardstock 3 1/2 x 4 3/4 inches. Cut striped pattern paper (Lori Whitlock/Echo Park, Sunshine Beach) 3 3/8 x 4 5/8 inches. Adhere to black card stock then to card base.

Rubbernecker Stamps colored with Color Burst

3. Mount drink stamp, inside/liquid part, (Watercolor Margarita Glass) to stamp platform or positioner. Use Chartreuse and Lime Green Color Burst to color drink and lime - paint on with a watercolor paint brush. I made the rind darker green, you can't see it well in the photo but is helps darken the Stickles. Stamp on Watercolor Paper leaving plenty of room around image.

4. Mount the drink outline (Watercolor Margarita Glass) to the stamp platform or positioner. See my previous wine glass post for a description and photo showing how I line up the stamps using a platform (works similarly for a positioner).

5. Optional: add Clear Wink of Stella to drink and fruit.

6. Add Diamond Stickles to ice cubes in glass. Add Lime Green Stickles to lime rind. Once dry, cut around stamped image, leaving an edge all around.

7. Stamp sentiment (Drink a Day) on black cardstock in VersaMark or embossing ink. Emboss using WOW Opaque Primary Sunny Yellow. Cut down, leaving about 1/4 inch on top and bottom but extra on sides. Cut tails on right side. Position on card with Margarita glass and decide where to trim left side (I use a pencil to make a mark where to cut). Use dimensional tape to adhere to card where shown, tucking sentiment under glass.

8. Adhere enamel dots as shown.

Rubbernecker Stamps colored with Color Burst

Supplies
Follow my blog with Bloglovin so you won't miss any of the Color Burst fun!

SaveSave

Thursday, September 21, 2017

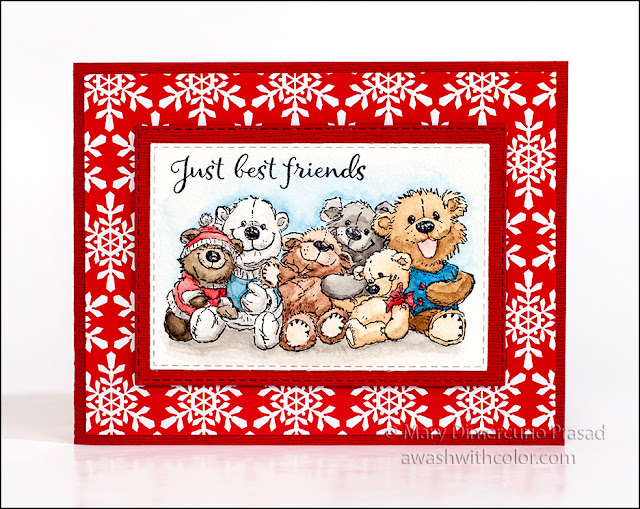
Bunch of Bears Friends Winter Prima Watercolor Card

Bunch of Bears by Rubbernecker Stamps Watercolor by Prima

This adorable stamp by Rubbernecker Stamps is so precious, I wanted it to be the focal point of this card. In order to keep attention on the image, I added the sentiment just above the bears' heads. The color palette is fairly simple - browns, blacks, and a little blue and red for a pop of color. The card could be used for the holidays or simply as a winter greeting.

Affiliate links may be included in this post. I participate in the Amazon Services LLC Associates Program, an affiliate advertising program that provides a means for me to earn fees by linking to Amazon.com and affiliated sites at no cost to you. This helps offset a small portion of my crafting addiction... uh, hobby. See notice at bottom of blog for a longer description.

Making the Card

1. Cut red cardstock 4 1/4 x 11 inches; fold in half to form a 4 1/4 x 5 1/2 inch side folding card base.

2. Cut red/white snowflake paper (Hollyday 6x6 Paper Pad) to 4 x 5 1/4 inches. Adhere to card base.

Bunch of Bears by Rubbernecker Stamps Watercolor Confections by Prima

3. Use a stamp platform or stamp positioner to stamp Bunch of Bears on watercolor paper in waterproof black ink. This paper usually has texture; the platform/positioner will allow you to re-stamp if necessary. Watercolor the image. I used Prima Watercolor Confections. You can watch how I colored the image in the following video (after the description and brush calligraphy demo). I tested my custom hybrid sable waterbrush on this image; you may also read the full post on how to make the brush if you are interested.


4. Once dry, die cut image with 5th die counting in from the largest (Nested Rectangle Small Stitch Die Cut Set), leaving a bit more room at top for sentiment. Stamp sentiment (Best Friends Etc) in black ink as shown using stamp platform or stamp positioner. Create a mat by cutting red cardstock with 4th die in (Nested Rectangle Small Stitch Die Cut Set). Adhere image to red mat.

5. Adhere matted image to card base as shown using dimensional tape.

Bunch of Bears by Rubbernecker Stamps Watercolor by Prima

Supplies
Follow my blog with Bloglovin so you won't miss any of the friendly bear fun!


SaveSave

Sunday, September 10, 2017

Dogs Are Best Friends Too Card with Copics


These dogs are so adorable! I couldn't wait to make a card with them. I colored them with Copic markers then used the matching dies to cut them out. I used mounting tape to pop up a couple of the dogs, giving them dimension. The Doodlebug Designs Puppy Love paper is the perfect accompaniment for the background of this card.

Affiliate links may be included in this post. I participate in the Amazon Services LLC Associates Program, an affiliate advertising program that provides a means for me to earn fees by linking to Amazon.com and affiliated sites at no cost to you. This helps offset a small portion of my crafting addiction... uh, hobby. See notice at bottom of blog for a longer description.

Making the Card

1. Cut brown cardstock 7 x 10 inches; fold in half to form a 5 x 7 inch card base.

2. Cut brown patterned paper with doggie heads (Puppy Love 6x6 Paper Pad) to 4 3/4 x 6 inches. Make a small hole about 1/2 inch from bottom right and 1 3/8 inches from right side (optionally, you could wait on putting the card together until you have finished all the parts, then decide where you want the brad inserted). Insert paw brad and flatten in back. Adhere to card base at the right side leaving 1/8 inch on top/bottom/right side.

3. Cut brown cardstock 1 7/8 x 5 5/8 inches. Cut heart paper (Puppy Love) to 1 3/4 x 5 1/2 inches; adhere to brown. Adhere to card where shown.


4. Using 2nd largest stitched rectangle die (Nested Rectangle Small Stitch Die Cut Set), die cut teal cardstock. Using 3rd largest stitched rectangle die, cut teal/light teal doggie background paper (Puppy Love); adhere to teal stitched rectangle.

5. Stamp the three dogs (Dogs 1) in alcohol marker friendly ink (Memento Tuxedo Black) on alcohol friendly cardstock (X-Press It Blending Card). Color with alcohol markers (I used Copics - the list of colors is below Supplies). Die cut using matching dies (Dogs 1 Die Set). Adhere bulldog where shown on teal/light teal dog background stitched rectangle (I did not use dimensional tape on this one). Adhere the other two dogs using dimensional/mounting tape. Adhere to card base where shown.

6. Stamp sentiment "Best friends..." in VersaMark (or other embossing ink) on vellum. Emboss using fine black embossing powder (I use a powder tool first to prep the area). Cut around sentiment in rectangle about 1 5/8 x 1 7/8 inches. Optional: round corners with 1/4 inch corner rounder. Use glue in very small dots behind words (you don't want it to show), adhere where shown, tucking under paw print.

7. Cut prongs off of bone brad. Use Glue Dots or other strong adhesive behind it to adhere to card as shown.


Supplies
Copic Markers Used (Note: I wasn't completely diligent in keeping track, e.g. I may have used other shades of gray when coloring the shaded areas than I listed).
  • C0 Colorless Blender
  • Bulldog: E55, E57, E59, E50, W0, W2, W4, W6
  • Spiked Collar: R22, R24, R29, C2, C4, C6
  • Schnauzer: N0, N1, N2, N3, N4, N6, N8
  • Tongue: R81, R83, R85, C2
  • Tall Dog: E33, E35, E37, E50
  • Blue Collar: B24, B26, B29, C4
Follow my blog with Bloglovin so you won't miss any of the doggie fun!

Thursday, September 7, 2017

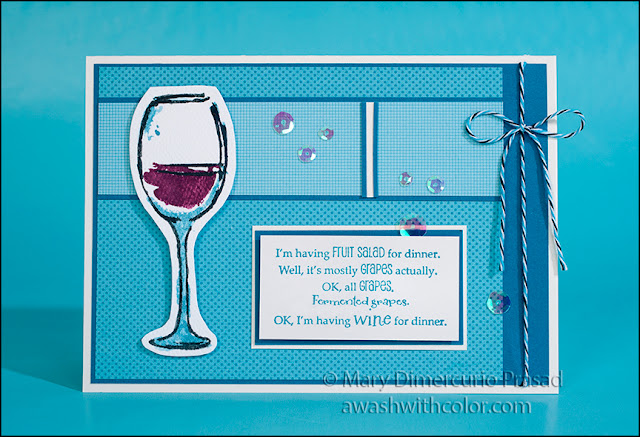
Fruit Salad Wine Card

Rubbernecker Stamps Fruit Salad Wine Card

Rubbernecker Stamps makes a lot of humorous sentiments. This is another on the wine theme (you can also see one in a previous post). The background paper is by Doodlebug Design - one of my favorite packs, the 6x6 pad Dot-Grid-Daisy-Stripe Rainbow Petite Prints. It makes it fairly easy to find a patterned paper that matches a particular color I'm looking for.

Affiliate links may be included in this post. I participate in the Amazon Services LLC Associates Program, an affiliate advertising program that provides a means for me to earn fees by linking to Amazon.com and affiliated sites at no cost to you. This helps offset a small portion of my crafting addiction... uh, hobby. See notice at bottom of blog for a longer description.

Making the Card

1. Cut Cryogen White (or off-white) cardstock 7x10 inches; fold in half to form a 5x7 inch card base.

2. Cut turquoise cardstock 4 3/4 x 6 3/4 inches. Cut turquoise polka dot patterned paper (Dot-Grid-Daisy-Stripe Rainbow Petite Prints) 4 5/8 x 6 inches (keep extra piece!). Adhere to left side of turquoise piece leaving about 1/16 inch on left side. Cut turquoise cardstock 1 1/2 x 6 inches; flip extra piece of patterned paper over and adhere (it should be showing the grid side). Glue to larger piece where shown. Cut a piece of blue/white/black twine about 6 or so inches long. Put adhesive behind the cardstock where you want the ends to go then tuck the twine around, sticking the ends in the adhesive on either side. Adhere to card base. Tie a bow in another piece of twine; adhere on twine where shown.

Rubbernecker Stamps Fruit Salad Wine Card

3. Add a very small amount of each of the following colors of Color Burst to a palette: Merlot, Cerulean Blue, Lamp Black. Mix a little Cerulean Blue with a little Lamp Black, plus water as needed, to make a turquoise matching your papers; apply to glass parts of inside stamp (if you find mixing the blue difficult, just use Broken China Distress Oxide Ink; you will need to apply it to the stamp somehow, e.g. tap some on a craft mat then add it to the stamp with a watercolor brush and a little water). Apply Merlot to wine area on stamp. Stamp on watercolor paper leaving space all around. Use a watercolor brush and water and/or extra Color Burst to paint in any areas as you like.

4. Use a stamp positioner to line up the wine glass stamp outline. (To see how I used my positioner, see my previous wine stamp post.) Paint it in Lamp Black Color Burst and stamp. Watercolor over areas as desired. When dry, cut around image, leaving some space around it. See photo. Adhere to card base using dimensional tape.

5. Stamp sentiment in Broken China Distress Oxide Ink on Cryogen White (or off-white) cardstock. Optional: clear emboss sentiment. Trim down. Cut turquoise cardstock 1/8 larger in each dimension. Cut Cryogen White (or off-white) cardstock 1/8 inch larger than turquoise piece. Adhere stamped panel to turquoise mat using dimensional tape. Adhere to Cryogen White (or off-white) piece. Adhere to card base as shown.

6. Optional: cut a 3/8 x 1 3/8 inch strip of Cryogen White (or off-white) cardstock and two pieces of 1/16 x 1 3/8 inch strips of turquoise cardstock. Glue turquoise strips to either side of Cryogen White (or off-white) strip. Adhere to card where shown.

7. Add a variety of crystal sequins as shown.

Rubbernecker Stamps Fruit Salad Wine Card

Supplies
Follow my blog with Bloglovin so you won't miss any of the fruit salad fun!